www.hp.
HP Scanjet N7710 Scanner English Setup and Support Guide
Copyright and license © 2007 Copyright Hewlett-Packard Development Company, L.P. Reproduction, adaptation or translation without prior written permission is prohibited, except as allowed under the copyright laws. The information contained herein is subject to change without notice. The only warranties for HP products and services are set forth in the express warranty statements accompanying such products and services. Nothing herein should be construed as constituting an additional warranty.
1 Scanner setup Items shipped in the box.............................................................................................................2 Install the software......................................................................................................................3 Set up the hardware...................................................................................................................4 Test the installation...............................................................
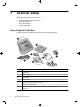
1 Scanner setup Follow these steps to set up the scanner: • • • • Check the items shipped in the box Install the software Set up the hardware Test the installation Items shipped in the box Unpack the scanner hardware. Be sure to remove any shipping tape.
Install the software 1. Insert the HP Scanning Software CD that came with the scanner into the computer CD drive. Wait for the installation dialog box to display. If the installation dialog box does not display after a few moments: a. Click Start, and then click Run. (On Windows Vista, click Start, and then type run into the search box.) The Run dialog box is displayed. b. In the Open box, type d:\setup.exe (where d: is the letter of your computer's CD drive). c. Click OK. 2.
Chapter 1 (continued) Programs Software use Kofax VirtualReScan Use to create clearer and more readable scans from colored or damaged documents. ScanSoft PaperPort CD Programs Software use ScanSoft PaperPort Use to organize, find, and share paper and PDF documents. I.R.I.S. Readiris Pro CD Programs Software use I.R.I.S. Readiris Pro Use to scan typed documents with full-featured optical character recognition (OCR) to create editable text that can be saved in a variety of file formats.
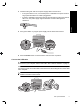
English 3. Check that the green LED on the power supply cable connector is on. • If the green LED is not on, ensure that power is available to the power outlet or surge protector that the AC cable is plugged into. • If power is available to the power outlet or surge protector but the green LED is still not on, the power supply might be defective. Contact HP Support for assistance. 4. If the green LED is on, plug the power supply into the back of the scanner. 5.
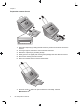
Chapter 1 Prepare the scanner for use 2 1 3 1. Attach the output tray by sliding the back of the tray into the slot under the front of the scanner. 2. For longer originals, extend the document feeder extension. 3. Extend the output tray by unfolding the flap. 4. Gently open the HP paper-path cleaning cloth package that came with the scanner. 5. Remove the cleaning cloth and unfold it. 6. Place the unfolded cloth into the document feeder. 7. Press the Tools ( ) button to open the Scanner Tools Utility.
8. Click the Clean button to feed the cloth through the scanner. NOTE: The cloth will feed through the scanner. This confirms that the hardware installation was successful, the drivers and tools are installed and the scanner hardware is functioning normally. 9. Repeat Step 8 at least once. CAUTION: Wait two minutes for the components to dry before inserting paper into the document feeder. NOTE: You will periodically need to use a paper-path cleaning cloth for other care and maintenance tasks.
Chapter 1 3. Press the (Scan Document To ) button. The page will feed through the scanner. • If you have installed HP Smart Document Scan Software, a scan of the page will appear on your computer screen. If a scan does not appear on your computer screen, see “Uninstall and then reinstall the HP Scanjet drivers and utilities” on page 15. • If you do not have HP Smart Document Scan Software installed, scan from the software application you intend to use for scanning.
English 7. Print on a full-page 8 1/2” x 11” or A4 label sheet and cut out each label along the outline. 8. Place the label on the pull-down tray on the front of the scanner.
2 Scanner buttons and features Scanner buttons Use the buttons on the scanner front panel to start a scan, select a profile for a scan, and configure some scanner settings. 4 2 5 3 1 Icon Button name Description 1 Select Profile Number or Number of Copies Select a profile (before scanning) or the number of copies (before copying). The selected profile number or number of copies is displayed on the front panel.
Feature Description Card slot You can use the card slot on the back of the scanner to scan rigid items such as laminated cards and embossed cards. For information on how to use the card slot, see the scanner User Guide. You can scan a stack of originals ranging in size from business cards to legal-size paper. You can also scan originals up to 215.9 mm x 863.6 mm (8.5 inches x 34 inches) one page at a time.
3 Where to get additional information The scanner comes with several sources of information about using the scanner and the scanning software. HP Scanjet N7710 User Guide The scanner User Guide is the primary source for scanner information such as using, maintaining, and troubleshooting the scanner. It is available as a compiled help (.CHM) file.
4 Troubleshooting Scanner error codes Error Code Description Error 02 SDRAM Error Press the Power switch to the off position. Wait 30 seconds, and then press the Power switch to the on position. If the message is still displayed, contact HP Support. Error 03 USB Error 1. 2. 3. 4. English For help responding to an error code, see the appropriate topics below. Check the USB connection between the scanner and the computer.
Chapter 4 (continued) Error Code Description to turn the scanner on. If the message is still displayed, contact HP Support. Error 24 Pick Failure The document feeder cannot pick up the paper or the paper is jammed. Follow these steps to resolve the error: 1. 2. 3. 4. Remove the paper from the document feeder. Sort through the stack to make sure the sheets are not stuck together. Make sure the paper meets the size and weight specifications, as specified in the scanner User Guide.
USB cable Check the physical connection to the scanner: • • Use the cable that was included with the scanner. Another USB cable might not be compatible with the scanner. Ensure that the USB cable is securely connected between the scanner and the computer or USB hub. The trident icon on the USB cable faces up when the cable is properly connected to the scanner. 1.
Chapter 4 Other sources for troubleshooting help For more troubleshooting help with the scanner hardware or software, see “Where to get additional information” on page 12.
5 Product care and support This section describes the options for product support. Occasional cleaning of the scanner helps ensure higher-quality scans. The amount of care necessary depends upon several factors, including the amount of use and the environment. You should perform routine cleaning as necessary. The HP Scanner Tools Utility can remind you when service is necessary. For help locating the utility, see “Where to get additional information” on page 12.
Chapter 5 1. Please consult the product documentation that came with the product. • Review the troubleshooting section in this manual. • Review the software documentation that is described in “Where to get additional information” on page 12. 2. Visit the HP online support at www.hp.com/support or contact your point of purchase. HP online support is available to all HP customers.
6. TO THE EXTENT ALLOWED BY LOCAL LAW, THE ABOVE WARRANTIES ARE EXCLUSIVE AND NO OTHER WARRANTY OR CONDITION, WHETHER WRITTEN OR ORAL, IS EXPRESSED OR IMPLIED, AND HP SPECIFICALLY DISCLAIMS ANY IMPLIED WARRANTIES OR CONDITIONS OF MERCHANTABILITY, SATISFACTORY QUALITY, AND FITNESS FOR A PARTICULAR PURPOSE. Some countries, states, or provinces do not allow limitations on the duration of an implied warranty, so the above limitation or exclusion might not apply to you.
6 Regulatory information and product specifications This section contains regulatory information and product specifications for the HP Scanjet N7710 scanner and accessories. Scanner specifications Name Description Scanner type Duplex sheet-feed scanner Size Width: 320 mm (12.6 inches), Depth: 270 mm (10.6 inches), Height: 312 mm (12.3 inches) Weight 5.4 kg (11.8 lbs) Scanning element Charge-coupled device (CCD) Interface USB 2.0 high speed (compatible with USB 1.
marketing name (HP Scanjet N7710) or product number (L1989A). Additional regulatory information about your scanner can be found on the regulatory_supplement.htm file on the HP Scanning Software CD. NOTE: The regulatory label is on the bottom of the scanner. The output paper tray covers up this label. Recycling, energy consumption, and environmental information is located on the HP Scanning Software CD that comes with the scanner. On the CD, browse for the file named recycle_supplement.pdf.
Chapter 6 22 HP Scanjet N7710 Scanner
HP Scanjet N7710 扫描仪 简体中文 安装和支持指南
版权和许可 © 2007 Copyright Hewlett-Packard Development Company, L.P.
目录 1 扫描仪安装 包装箱内的物品...........................................................................................................2 安装软件......................................................................................................................3 安装硬件......................................................................................................................4 测试安装......................................................................................................................7 自定义配置文件标签....
1 扫描仪安装 按以下步骤安装扫描仪: • • • • 检查包装箱内的物品 安装软件 安装硬件 测试安装 包装箱内的物品 打开扫描仪的硬件包装。确保取下所有的包装封带。 1 2 4 7 6 3 2 5 8 1 HP Scanjet N7710 扫描仪 2 出纸盒 3 电源适配器 4 USB 电缆 5 配置文件标签 6 安装和支持指南(本手册) 7 纸张通道清洁布 8 Scanning Software CD(有关详细信息,请参阅位于第 3 页的“随附的软件”。) HP Scanjet N7710 扫描仪
安装软件 1. 将扫描仪随附的 HP Scanning Software CD 插入计算机的 CD 驱动器。 请等待,稍后将显示安装对话框。如果未出现安装对话框,请执行以下操 作: a. 单击“开始”,然后单击“运行”。(在 Windows Vista 中,单击“开 始”,然后在搜索框中键入“运行”。) 将显示“运行”对话框。 b. 在“打开”框中,键入 d:\setup.exe(其中 d: 是您计算机 CD 驱动器的盘 符)。 c. 单击“确定”。 2. 单击“安装软件”安装扫描软件。按屏幕提示安装下列应用程序: • Kofax VRS 4.10 • HP Scanjet 驱动程序和工具 • HP 智能文档扫描软件 3.
第1章 ScanSoft PaperPort CD 程序 用途 ScanSoft PaperPort 用来组织、查找和共享纸质文档和 PDF 文档。 I.R.I.S. Readiris Pro CD 程序 用途 I.R.I.S. Readiris Pro 通过全功能光学字符识别 (OCR) 技术将键入的文档扫描为能以 多种格式保存的可编辑文本。 NewSoft Presto!BizCard CD 程序 用途 NewSoft Presto!BizCard 用来将名片转换到数据库,该数据库可以被多个用户共享,可以 被导出到联系人管理软件中,还可以和 PDA 同步。 安装硬件 要安装扫描仪硬件并使扫描仪准备就绪,须完成以下工作。 连接电源适配器 电源适配器附带有一段电缆,可以插入扫描仪后部。在该电缆末端的接头处有一 个绿色 LED,当适配器正常工作时会点亮。 该电源适配器还配有一条交流电源线,其一端与适配器相连,另一端插入电源插 座或电涌保护器。 1. 将交流电源线插入电源适配器后部。 2. 将交流电源线的另一端插入电源插座或电涌保护器。 3.
4. 若绿色 LED 是点亮的,则将适配器电缆插入扫描仪后部。 连接 USB 电缆 小心 在通过 USB 电缆将扫描仪连接到计算机之前,请确保先安装 HP 扫描 软件。请参阅位于第 3 页的“安装软件”。 使用扫描仪随附的 USB 电缆将扫描仪连接到计算机。将电缆的正方形一端插入 扫描仪,将长方形一端插入计算机。 注意 HP 建议使用计算机背面的 USB 端口,以便更可靠地连接扫描仪。 安装硬件 5 简体中文 5.
第1章 令扫描仪准备就绪 2 1 3 1. 2. 3. 4. 5. 6. 将出纸盒后部插入扫描仪前部的下侧插槽内,安上出纸盒。 当原件尺寸较大时,可展开送纸器上的延长板。 翻开出纸盒盖,伸展出纸盒。 轻轻打开扫描仪随附的 HP 纸张通道清洁布包装。 取出清洁布,将其展开。 将展开的清洁布放入送纸器。 7.
8. 单击“清洁”按钮将清洁布送入扫描仪。 注意 清洁布将进入并通过扫描仪。如此即可确认硬件安装成功、驱动程 序和工具已安装且扫描仪硬件目前可以正常工作。 如果清洁布未进入并通过纸张通道而是停留在出纸盒中,则可能未完全安 装扫描仪。请参阅位于第 13 页的“安装完毕后扫描仪无法正常工 作”(见本指南“疑难排解”部分)。 9. 重复步骤 8 至少一次。 小心 在将纸张插入送纸器之前,请先等待两分钟,让部件变干燥。 注意 您需要定期地使用纸张通道清洁布来进行其他保养和维护工作。要定购 更多纸张通道清洁布,请访问 www.hp.com/support。 测试安装 确保原件上没有卷曲、褶皱、钉书钉、纸夹或其他附着物。不要将纸张粘在 一起放入送纸器。 1. 只能将单页纸放入送纸器。放入页面时应让待扫描的一面朝下,同时令页首 向下( )。 2.
第1章 3. 按下扫描文档到( )按钮。纸张将进入并通过扫描仪。 • 如果已经安装了 HP 智能文档扫描软件,则计算机屏幕上将显示扫描到的 页面。如果计算机屏幕上未出现扫描到的页面,请参阅 位于第 14 页的“卸载并重新安装 HP Scanjet 驱动程序和应用程序”。 • 如果没有安装 HP 智能文档扫描软件,则请从您计划用于扫描的软件程序 进行扫描。如果该应用程序中扫描过程正常,则说明此程序已成功安装。 如果该应用程序中扫描过程不正常,则请查阅应用程序软件帮助。 4.
2 扫描仪按钮及其功能 扫描仪按钮 扫描仪前面板上的按钮可用来启动扫描、选择扫描配置文件以及对扫描仪设置进 行配置。 4 2 5 3 1 按钮名称 描述 1 选择配置文件号码或份 数 (在扫描之前)选择配置文件或(在复印之前) 选择份数。 所选的配置文件号码或份数将显示在前面板上。 2 扫描文档到 使用所显示号码对应的配置文件开始扫描。 3 复印 按所显示的份数进行打印。 4 取消 取消正在进行的扫描或复印操作。 5 工具 打开 HP 扫描仪工具实用程序,您可以通过此实 用程序配置扫描仪前面板按钮、指定配置文件并 查看维护信息。 有关本章中提到的扫描仪按钮的详细信息,请参见《HP Scanjet N7710 用户指 南》。 特殊功能 下表概述了本扫描仪的几项重要功能。其中许多功能都可在 HP 智能文档扫描软 件或其他随附的扫描软件中使用。有关详细信息,请参阅 HP 智能文档扫描软件 帮助。 功能 描述 卡片槽 您可以通过扫描仪背面的卡片槽扫描硬质材料,如叠层卡片和 浮凸卡片。 扫描仪按钮及其功能 9 简体中文 图标
第2章 (续) 功能 描述 有关使用卡片槽的信息,请参阅扫描仪《用户指南》。 多种纸张尺寸 可以扫描一叠尺寸从名片到 legal 尺寸纸张的原件。也可以每次 扫描一页尺寸最大为 215.9 x 863.6 mm(8.
3 从哪里获得其他信息 本扫描仪附带有多个介绍扫描仪和扫描仪软件使用方法的手册或帮助。 HP Scanjet N7710 用户指南 扫描仪《用户指南》是介绍扫描仪使用、维护和疑难排解方法的主要手册。该手 册为经编译的帮助 (.
4 疑难排解 扫描仪错误代码 有关错误代码的帮助信息,请参阅以下相应主题。 错误代码 描述 错误 02,SDRAM 错误 将电源开关按到关闭位置。等待 30 秒钟,然后将电源开关按到打开 位置。如果仍然显示此消息,请联系 HP 支持。 错误 03,USB 错误 1. 2.
安装完毕后扫描仪无法正常工作 如果安装完毕后扫描仪无法正常工作,您可能会在计算机上看到以下信息之一: • • • • 扫描仪无法初始化。 无法找到扫描仪。 发生内部错误。 计算机无法与扫描仪通信。 请尝试以下方法修复此问题: 检查电缆 确认电缆连接正确。 电源适配器 该电源适配器还配有一条交流电源线,其一端与适配器相连,另一端插入电源插 座或电涌保护器。 电源线应连接扫描仪与电源插座。 1. 检查适配器电缆接头处的绿色 LED 是否点亮。 2. 如果绿色 LED 未点亮,则请确保交流电源线所连接的电源插座或电涌保护器 中有电。 3. 如果电源插座或电涌保护器中有电,但绿色 LED 仍不亮,则可能是电源适配 器存在故障。请联系 HP 支持以获得帮助。 4.
第4章 1. 根据扫描仪连接到计算机的方式,执行以下操作之一: • 如果 USB 电缆连接了用于 USB 集线器或便携式计算机的扩展座,请断 开 USB 电缆与 USB 集线器或扩展座的连接,然后将 USB 电缆直接连接 到计算机。 • 如果 USB 电缆直接连接了计算机,则请将它插入计算机的另一个 USB 端 口。 • 拔掉计算机上除键盘和鼠标以外的所有其他 USB 设备。 2. 关闭扫描仪电源,然后重新打开。 3. 重新启动计算机。 4. 在计算机重新启动后,请尝试使用扫描仪。 如果在您按步骤 1 中的方法改变了扫描仪与计算机的连接方式后,扫描仪正 常工作,则通信问题可能就出现在 USB 集线器或扩展座上。令扫描仪直接连 接到计算机。 如果您的扫描仪无法正常工作,请卸载 HP 扫描软件并重新安装。 卸载并重新安装 HP Scanjet 驱动程序和应用程序 如果检查扫描仪电缆连接时未检查出问题,则问题可能是因安装不完全而导致 的。尝试卸载并重新安装 HP 扫描驱动程序和实用程序。 1. 断开计算机上的 USB 电缆连接。 2.
5 产品保养和支持 本节介绍产品支持方面的选项。 保养和维护 时常清洁扫描仪有助于确保更高质量的扫描效果。扫描仪需要什么样的保养取决 于若干因素,包括使用次数和使用环境。应根据需要进行日常清洁。 HP 扫描仪工具实用程序会在需要进行保养时提醒您。有关查找该实用程序的帮 助信息,请参阅位于第 11 页的“从哪里获得其他信息”。 有关扫描仪维护的说明,请参阅 HP Scanjet N7710《用户指南》。有关查找该 指南的帮助信息,请参阅位于第 11 页的“从哪里获得其他信息”。 小心 在将原件放入送纸器之前,请确保其上没有未干的胶水、修正液或其他 可能落入扫描仪内部的物质。 简体中文 确保原件上没有卷曲、褶皱、钉书钉、纸夹或其他附着物。纸张不应当粘在 一起。 辅助功能 本扫描仪提供了以下辅助功能选项: • • LCD Reader 是一个软件程序,它能够显示扫描仪前面板显示屏上不断变化 的内容。LCD Reader 能启用辅助功能软件工具以描述扫描仪前面板上显示 的内容。 为防止扫描仪前面板上的按钮被意外按下,可禁用这些按钮。 有关 LCD Reader 以及如何禁用扫描仪按钮的更多信息,请参阅
第5章 1. 请参阅本产品随附的产品文档。 • 请查阅本手册中的疑难排解一节。 • 请查阅位于第 11 页的“从哪里获得其他信息”中所描述的软件文档。 2. 访问 HP 在线支持,网址为 www.hp.com/support,或联系产品销售商。 HP 在线支持适用于所有 HP 用户。它是获取最新产品信息和专家帮助的最快 速通道,包括: • 通过电子邮件快速咨询资深的在线支持专家 • 更新产品软件和驱动程序 • 重要的产品技术问题和疑难排解信息 • 主动产品更新以及支持通知和 HP 简讯(在您注册产品后可用) 3. 通过电话联系 HP 支持 • 支持选项和费用会因产品、国家/地区和语言的不同而有所差异。 • 费用及相关政策如有变更,恕不另行通知。请查看 www.hp.com/ support 网站以了解最新信息。 4. 保修期过后 在过了有限保修期后,用户可以通过 www.hp.com/support 获取在线帮助。 5. 保修延长或升级 若想对产品保修进行延长或升级,请联系产品销售商,或查看 www.hp.com/ support 上的 HP 金牌服务。 6.
对适销性、质量满意度和特定用途适用性的暗示的保修或规定。某些国家/地 区、州或省不允许对暗示保修期加以限制,因此上述限制或排除内容可能对您不 适用。本保修赋予您具体的法律权利,此外,您还可能获得其他权利,这会因您 所在国家/地区、州或省的不同而有所差异。 7. HP 的有限保修在任何可为本产品提供支持和销售本 HP 产品的国家/地区或 区域均有效。您能够获得的保修服务水平视当地情况而定。HP 不会出于某个国 家/地区的法律或法规原因而改变本产品的外形、尺寸或功能,以强制本产品在 该国家/地区使用。 8. 在当地法律所允许的范围内,本保修声明中的补偿是您唯一的和全部的补偿。 除上述声明以外,HP 或其供应商不对数据丢失,或直接、特殊、偶然、继发 (包括利润下降或数据丢失)损失或其他损失(无论是基于合同、民事侵权还是 其他方面)承担责任。某些国家/地区、州或省不允许排除或限制偶然的或继发 的损失,因此上述限制或排除条款可能对您不适用。 简体中文 9.
6 规范信息和产品技术指标 本节介绍 HP Scanjet N7710 扫描仪及其附件的规范信息和产品技术指标。 扫描仪技术指标 名称 描述 扫描仪类型 双面进纸扫描仪 尺寸 宽度:320 mm(12.6 英寸),深度:270 mm(10.6 英寸),高度:312 mm(12.3 英寸) 重量 5.4 千克(11.8 磅) 扫描元件 电荷藕合器件 (CCD) 接口 USB 2.0 高速(兼容 USB 1.1) 光学分辨率 600 x 600 dpi 硬件 交流电源 32V~,50/60Hz,2500mA,80W 功耗 有关功耗的数据,请参阅 HP Scanning Software CD 中的 regulatory_supplement.
回收信息 有关回收、能耗和环境方面的信息见扫描仪随附的 HP Scanning Software CD。 在该 CD 中,查找名为 recycle_supplement.pdf 的文件。 材料处理 本 HP 产品中含有下列材料,这些材料可能需要在其寿命终了时予以特殊处理: 扫描仪荧光灯和/或透明材料适配器中所含的汞。 出于环境方面的考虑,对这些材料的处理可能会受到管制。有关处理或回收的信 息,请联系当地管理部门或联系电子工业协会 (EIA) www.eiae.