HP Scanjet N8400 series English Setup and Support Guide
Copyright and license © 2007 Copyright Hewlett-Packard Development Company, L.P. Reproduction, adaptation or translation without prior written permission is prohibited, except as allowed under the copyright laws. The information contained herein is subject to change without notice. The only warranties for HP products and services are set forth in the express warranty statements accompanying such products and services. Nothing herein should be construed as constituting an additional warranty.
1 Scanner set up Items shipped in the box.............................................................................................................2 Install the software......................................................................................................................2 Set up the hardware...................................................................................................................4 Test the installation..............................................................
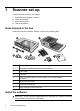
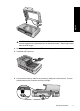
1 Scanner set up Follow these steps to set up the scanner: 1. 2. 3. 4. Check the items shipped in the box. Install the software. Set up the hardware. Test the installation. Items shipped in the box Unpack the scanner hardware. Be sure to remove any shipping tape. 1 HP Scanjet N8400 series scanner 2 Automatic document feeder (ADF) and ADF input tray 3 Power cable 4 USB cable 5 Scanning software CDs (For more information, see “Included software” on page 3.
NOTE: You must install the HP Scanjet Drivers and Tools in order to use the scanner. If you plan to use different scanning applications, you do not need to install the Kofax Virtual ReScan and HP Smart Document Scan Software programs. • During the installation, you will be asked to select the initial setting for the scanner lamp: • In Power Save mode, the scanner lamp times out and turns off automatically after about 15 minutes of inactivity. In this mode, the scanner is Energy Star compliant.
Chapter 1 (continued) Programs Software use They meet the minimum requirement for the scanner to work properly. Use the HP Document Copy software to send document scans directly to a printer. Use the HP Scanner Tools Utility to assign profiles to quick start buttons, to choose which profiles are selectable from the scanner front panel, and to view information about scanner settings, status, and maintenance.
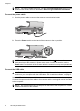
English CAUTION: Do not attempt to install the ADF in the closed position. The ADF must be installed in the opened position as described in step 1. Keep fingers away from the ADF hinges. 2. After installing the ADF, lower the ADF to the closed position. 3. Install the ADF input tray. 4. Connect the accessory cable to the accessory cable port on the scanner. Turn the thumbscrews on the connector until they are tight.
Chapter 1 NOTE: For help uninstalling the ADF, see the Care and maintenance section of the scanner User Guide, which is described in Where to get additional information. Connect the power cable 1. Use the power cable to connect the scanner to an electrical outlet. 2. Press the Power switch on the back of the scanner to the on position. NOTE: After using the scanner, press the Power Save ( ) button on the scanner front panel to put the scanner in power-save mode.
English Prepare the scanner for use 1. Gently open the HP paper-path cleaning cloth package that came with the scanner. 2. Remove the cleaning cloth and unfold it. 3. Place the unfolded cloth into the document feeder. 4. Press the Tools ( ) button on the scanner front panel to open the HP Scanner Tools Utility. Click the Maintenance tab. 5. Click the Clean button to feed the cloth through the scanner. NOTE: The cloth will feed through the scanner.
Chapter 1 NOTE: You will periodically need to use a paper-path cleaning cloth for other care and maintenance tasks. To order more paper-path cleaning cloths, go to www.hp.com/support. Test the installation 1. Place a single document page in the automatic document feeder (ADF). 2. Do one of the following: • If the HP Smart Document Scan Software is installed, press the Scan Document To ( ) button.
2 Scanner front panel buttons 1 2 1 Power Save button 2 Quick start buttons 3 Copy buttons 4 Scan Document To buttons 5 Tools button 6 Cancel button 3 4 5 English Use the buttons on the scanner front panel to start a scan, select a destination for a scan, and configure some scanner settings. 6 Power Save button Press the Power Save button to turn off the lamp and put the scanner in powersave mode when you are not using the scanner.
Chapter 2 NOTE: If the HP Smart Document Scan Software is installed, each quick start button defaults to a standard profile. You can override these settings. For information on how to set up an HP Smart Document Scan Software profile, see HP Smart Document Scan Software help. Copy buttons To copy documents and images quickly, specify the number of copies to make, select black-and-white or color, and then click the Copy ( ) button.
Cancel button English Press the Cancel button to cancel a scan in progress, or to cancel a series of scans when you are scanning from the ADF.
3 HP Smart Document Scan Software Profiles The HP Smart Document Scan Software includes several default profiles. By default, these profiles are selectable from the Scan Document To buttons on the scanner front panel. Additionally, four of the default profiles are assigned to the quick start buttons. You can view the default profile settings and quick start button assignments, and you can change these defaults.
Press the Tools ( ) button on the scanner front panel. Click Start, point to Programs or All Programs, point to HP, point to Scanjet, point to N8400 series, and then click Scanner Tools Utility. 2. For a button number, verify that the Program to Launch is set to HP Smart Document Scan Software, and then notice the Profile name. Use the HP Smart Document Scan Software to examine the settings of the selected profile.
4 Where to get additional information Several sources of information describe using the scanner and the scanning software. User Guide The scanner User Guide is the primary source for scanner information. It provides information about using, maintaining, and troubleshooting the scanner. It is available as a compiled help (.CHM) file.
HP Scanner Tools Utility help The HP Scanner Tools Utility help explains the scanner settings, information about scanner status and maintenance, how to assign functionality to quick start buttons, and how to choose the profiles that you can select from the scanner front panel. To open HP Scanner Tools Utility help, press the Tools button on the scanner front panel, and then click Help in the HP Scanner Tools Utility dialog box. English Technical Resources Visit www.hp.
5 Troubleshooting Scanner error messages The scanner displays status and error messages on the scanner front panel. For help responding to a scanner error message, see the appropriate topics below. 16 Scanner Error Message Recovery Process ADF Jam – Input Tray Clear the jammed paper from the automatic document feeder (ADF) input tray. For instructions, see Clear jams from the ADF in the Troubleshooting section. ADF Jam – Clean Out Clear the jammed paper from the opening behind the ADF access door.
(continued) Scanner Error Message Recovery Process Duplex Error Follow these steps to resolve the error: 3. 4. Multipick Error (Erro de alimentação) Close the program you are using to scan. Press the Power switch on the back of the scanner to the off position. Check the scanner cables to make sure that they are securely attached to the scanner. Press the Power switch to the on position, and then try to scan. If the problem persists, contact HP Support.
Chapter 5 Scanner does not work after installation If the scanner does not work after installation, you might see one of the following messages displayed on the computer: • • • • The scanner could not be initialized. The scanner could not be found. An internal error has occurred. The computer cannot communicate with the scanner. To fix the problem, check the scanner cables and software as described here. Check the cables Verify that the cable connections are in working order.
Accessory cable The accessory cable is connected between the automatic document feeder (ADF) in the scanner lid and the scanner base. Ensure the cable is securely connected in the back of the scanner. For more information, see “Connect the automatic document feeder (ADF)” on page 4. Uninstall and then reinstall the HP Scanjet drivers and utilities If checking the scanner cable connections did not solve the problem, the problem might have occurred because of an incomplete installation.
6 Product care and support This section describes the options for product support. Care and maintenance Occasional cleaning of the scanner helps ensure higher-quality scans. The amount of care necessary depends upon several factors, including the amount of use and the environment. You should perform routine cleaning as necessary. Routine cleaning and maintenance should include cleaning the scanner glass and the automatic document feeder (ADF).
Hewlett-Packard limited warranty statement HP Scanjet N8400 series scanner Model Asia/Pacific Americas Europe/Middle East/ Africa N8420 1 year 1 year 1 year N8460 1 year 1 year 3 years 1. HP warrants to you, the end-user customer, that HP hardware, accessories, and supplies will be free from defects in materials and workmanship after the date of purchase, for the period specified above.
Chapter 6 condition as warranted, you will be entitled to a refund of the purchase price upon prompt return of the product. 4. HP products may contain remanufactured parts equivalent to new in performance or may have been subject to incidental use. 5.
7 Regulatory information and product specifications This section contains regulatory information and product specifications for the HP Scanjet N8400 series scanner and accessories. English Scanner specifications Name Description Scanner type Flatbed with automatic document feeder (ADF) Size 625 mm x 415 mm x 265 mm (24.61 x 16.34 x 10.43 inches) Weight 15 kg (33 lb) Scanning element Charge-coupled device (CCD) Interface USB 2.0 high speed (compatible with USB 1.
Chapter 7 (continued) Name Description Power requirements • • • 5Vdc, 830mA 18Vdc, 310mA 32Vdc, 1260mA Environmental specifications Name Description Temperature Operating the scanner: 10° to 35° C (50° to 95° F) Storage: -40° to 60° C (-40° to 140° F) Relative humidity Operating the scanner: 15 percent to 80 percent noncondensing 10° to 35° C (50° to 95° F) Storage: up to 90 percent at 0° to 60° C or (32° to 140° F) Regulatory information Regulatory Model Identification Number: For regulatory ide
English of your waste equipment by handing it over to a designated collection point for the recycling of waste electrical and electronic equipment. The separate collection and recycling of your waste equipment at the time of disposal will help to conserve natural resources and ensure that it is recycled in a manner that protects human health and the environment.
Chapter 7 26 HP Scanjet N8400 series