HP Scanjet Enterprise N9120/Flow N9120 User Guide
Copyright and license © 2013 Copyright Hewlett-Packard Development Company, L.P. Reproduction, adaptation or translation without prior written permission is prohibited, except as allowed under the copyright laws. The information contained herein is subject to change without notice. The only warranties for HP products and services are set forth in the express warranty statements accompanying such products and services. Nothing herein should be construed as constituting an additional warranty.
Contents 1 Use the scanner Scanner overview.................................................................................................................................................................3 Scanner front panel buttons...........................................................................................................................................3 Scanner lamp setting.....................................................................................................................
The image is completely black or completely white.....................................................................................................28 Scanned images are not straight..................................................................................................................................28 Scanned images contain streaks or scratches.............................................................................................................
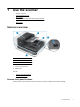
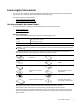
1 Use the scanner • • • • • • Scanner overview Load original documents How to scan Associate a quick start button with scanning software Scan from scanning software How to copy Scanner overview 1 Front panel 2 Automatic document feeder (ADF) 3 ADF input tray 4 ADF output tray 5 Latch for opening the ADF 6 Power switch See also • • Scanner front panel buttons Scanner lamp setting Scanner front panel buttons Use the buttons on the scanner front panel to start a scan and to configure some sca
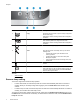
Chapter 1 Icon Button name Description 1 Copy By default, print the number of copies currently configured in HP Document Copy. Alternatively, start the scanning software that is assigned to this button. 2 Scan By default, start a scan that uses the HP Smart Document Scan Software profile that is assigned to this button. Alternatively, start the scanning software that is assigned to this button. 3 Cancel Cancel a scan or copy in progress.
Load original documents You can scan up to 200 single- and double-sided document pages from the automatic document feeder (ADF), and you can scan one side of a document directly from the scanner glass. The section contains the following topics: • • Use the automatic document feeder Load an original on the scanner glass Use the automatic document feeder For helpful information on loading your documents properly, refer to the following topics.
Chapter 1 • For small or narrow documents, load the edge that is less than 148 mm (5.8 in) pointing into the feeder so that the longer edge can be pulled into the feeder and passed along by the feed rollers. • When loading small or lightweight documents, such as A6 cards (index cards) or U.S. check carbons, load a stack of at least five documents to ensure that the ADF properly detects and feeds the stack.
2. Fan the stack of document pages to ensure that the pages do not stick together. Fan the edge that will be pointing into the ADF in one direction, and then fan that same edge in the opposite direction. 3. Align the edges of the documents by tapping the bottom of the stack against the table top. Rotate the stack 90 degrees and repeat. 4. Place the stack in the middle of the input tray. Load the stack face up. For fastest scanning, load the stack with the left edge leading into the ADF.
Chapter 1 6. Gently push the stack forward to trip the tray sensor. Load an original on the scanner glass Place items that do not meet the specifications for the automatic document feeder (ADF) directly onto the scanner glass. Minimum size: Any size Maximum size: 300 x 432 mm (11.8 x 17 in) Place the original face down on the scanner glass, as indicated by the reference mark. NOTE: In the scanning software, choose the layout setting that matches the orientation of the original on the scanner glass.
How to scan The basic steps for scanning are: 1. 2. Load the originals. Do one of the following: • Press the Scan ( ) button on the scanner front panel to start scanning with the assigned software (and profile, if appropriate). • On the computer, open the scanning software, and then select the ISIS or TWAIN data source. Select the appropriate settings, and then initiate a scan. TIP: 1 To reduce paper jams, use scan settings that specify the actual dimensions of the pages that you are scanning.
Chapter 1 Scan from HP Smart Document Scan Software 1. 2. Click Start, point to Programs or All Programs, point to HP, point to HP Smart Document Scan, and then click HP Smart Document Scan Software. Select a profile, and then click Scan. TIP: A description of the selected profile is displayed below the list. 3. Follow the onscreen instructions to complete the scan. For more information, see the HP Smart Document Scan Software Help. Scan from ISIS- or TWAIN-compliant scanning software 1. 2. 3.
2 Useful scanner features Experienced document management professionals might be interested in the following scan features that are available in the HP Smart Document Scan Software. Many of these features are also available from any ISIS- or TWAIN-compliant document scanning software that allows you to modify the scan settings.
Chapter 2 Automatically rotate scanned pages By default, pages fed through the automatic document feeder (ADF) appear in the scan output in the same orientation as the pages in the ADF input tray. The scanner can rotate the scan data to produce a different orientation in the scan output. For example, this feature is useful when you want fast scanning of pages that have a portrait orientation.
Set the background color for scans from the automatic document feeder When you scan from the automatic document feeder (ADF), you can choose a white or black background for the scan. When the scan background contrasts with the color at the outside edges of the document, the scanning software is better able to distinguish the edges of the scanned document. For example, use the black background to scan a document that is printed on white paper.
Chapter 2 Scan without reviewing The standard process for using the HP Smart Document Scan Software to complete your scans is as follows: 1. 2. 3. 4. Scan document pages. Review the scanned document pages in the HP Smart Document Scan Software Scan Progress Window. Reorder, delete, and rescan pages as necessary. Finish the scan by clicking Done Scanning in the Scan Progress Window. Wait for the scanning software to process the scanned document pages according to the profile settings.
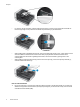
3. Raise the cartridge stall latch. 4. 5. If you are replacing an empty print cartridge, slide it to the right to remove it from the cartridge stall. Remove the print cartridge from its packaging. Pull the tab to remove the protective tape from the nozzles. 6. Hold the new print cartridge with the nozzles down and slide it into the cartridge stall. 7. Lower the cartridge stall latch to lock the print cartridge in place.
Chapter 2 8. 9. Grasp the center of the ADF input tray, and then lower the ADF input tray into position for scanning. Update the imprinter history: a. Press the Tools ( ) button on the scanner front panel to open the HP Scanner Tools Utility. Click the Imprinter tab. b. In the Cartridge Status section, click Record Replacement. Position the imprinter The position of the imprinter determines the left-right location of the imprinter mark on the scanned page.
1. 2. 3. Place a single page in the automatic document feeder input tray. Press the Tools ( ) button on the scanner front panel to open the HP Scanner Tools Utility. Click the Imprinter tab. In the Cartridge Status section, click Test Imprinter. Clean the imprinter Clean the imprinter whenever the imprinter mark does not print completely. 1. 2. Press the Tools ( ) button on the scanner front panel to open the HP Scanner Tools Utility. Click the Imprinter tab.
3 Care and maintenance This section presents information about how to care for and maintain the scanner. • • • • • • Order maintenance and scanning supplies Clean the automatic document feeder Clean the scanner glass Clean the scanner fan filters Replace the feed roller and separation pad HP Scanner Tools Utility scanner maintenance information Occasional cleaning of the scanner helps ensure high-quality scans.
3. Clean the clear scanning strip on the scanner bed. Wipe the clear area with a clean, damp, lint-free cloth. 4. 5. Close the scanner lid. Lift the latch on top of the ADF to open the top and side ADF access doors.
Chapter 3 20 6. Locate the white strip on the side ADF access door and the clear scan window inside the ADF. Wipe both of these areas clean with a clean, damp, lint-free cloth. 7. Wipe the ADF rollers with a clean, damp, lint-free cloth.
8. 9. Wait several minutes for the rollers to dry, and then close the ADF access doors. Reconnect the USB cable and power cable to the scanner, and then press the Power switch to the on position. Clean the scanner glass Clean the scanner glass under the following conditions: • • • Streaks, scratches, or spots appear in images scanned from the scanner glass. After scanning a document that is dusty or dirty from the scanner glass. The environment is dusty.
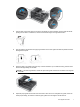
Chapter 3 NOTE: If the filter is damaged, replace it with a new filter. To order a replacement part, go to www.hp.com/support 4. 5. Inspect the filter cover. If it is dirty, use a clean, damp, lint-free cloth to remove the dirt. Ensure that the filter and the filter cover are completely dry. CAUTION: A wet filter can damage the scanner. 6. Place the clean, dry filter in the filter cover, and then replace the cover on the scanner. 7.
For detailed information on using the HP Scanner Tools Utility, see the HP Scanner Tools Utility help.
4 Troubleshooting This section contains solutions for common problems with the scanner. • • • • • • Scanner LEDs Installation troubleshooting Scanner operation problems Scanner buttons are not working correctly Automatic document feeder problems Additional troubleshooting information For additional troubleshooting, see the online help for the scanning software that you are using or visit www.hp.com/support for updated information about the scanner.
Installation troubleshooting If the scanner does not work after installation or if the scanner has stopped working correctly, you might see a message on the computer screen that is similar to one of the following: • • • • The scanner could not be initialized. The scanner could not be found. An internal error has occurred. The computer cannot communicate with the scanner.
Chapter 4 3. 4. Restart the computer. After the computer has restarted, try using the scanner. If the scanner works and you changed the way it was connected to the computer in step 1, the communication problem might involve the USB hub, the docking station, a USB port, or another USB device. Leave the scanner directly connected to the computer. Try using the scanner after reconnecting each additional USB device, and disconnect any USB devices that prevent the scanner from working correctly.
If the scanner lamp remains on after a long period of inactivity, turn off the scanner, wait 30 seconds, and then turn the scanner back on. NOTE: The scanner lamp does not turn off when paper is in the automatic document feeder input tray. Scanner does not scan right away Make sure the power switch on the right side of the scanner is turned on. If the scanner has not been used for a while, the scanner lamp might need to go through a warm-up period before scanning can begin.
Chapter 4 3. 4. On the Scan tab of the Profile Settings dialog box, click Advanced Settings. On the More tab of the Properties dialog box, select the Enable check box. Optimizing scanning and task speeds Several settings influence the total time for a scanning job. When you want to optimize scanning performance, consider the following information.
See also • • • Clean the automatic document feeder Clean the scanner glass Replace the feed roller and separation pad Vertical white stripes appear on the printed page The destination printer might be out of toner or ink. Scan a different original to the same printer to see if the issue lies with the printer. If the second original has the same problem, clean the automatic document feeder or the scanner glass.
Chapter 4 See also • Set up and use the imprinter Scanner buttons are not working correctly • • • Buttons do not work An unexpected program opens when a button is pressed Wrong profile is used when the Scan button is pressed Buttons do not work After each step, press a button to see if it is working correctly. If the problem persists, proceed with the next step. 1. 2. 3. 4. 5. The buttons might be disabled in the HP scanning software.
NOTE: You can also assign an HP Smart Document Scan Software profile to the Copy button. If you are using other scanning software, see the online help for that program. See also • Associate a quick start button with scanning software Automatic document feeder problems Use this section to help resolve issues that might occur when scanning from the automatic document feeder (ADF). Paper jams usually result from inappropriate paper being fed into the ADF. Review the tips for using the ADF.
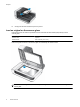
Chapter 4 32 4. Remove any jammed pages from inside the ADF. 5. Remove any jammed pages from the ADF output tray. 6. If the jammed page still cannot be removed, follow these steps: a. Open the scanner lid. b. Push the green tab toward the scanner lid to open the inner ADF access door. If the door does not open automatically, gently pry it open. c. Gently pull the page out of the ADF.
7. 8. 9. Close the inner ADF access door, and then close the scanner lid. At the scan destination, examine the scan output to determine which page was the last to be completely scanned. Reload the unscanned pages in the ADF input tray. If any pages are damaged, do one of the following: • Photocopy the damaged page, and then add the photocopy to the input stack. • Scan the damaged page from the scanner glass. • Reprint the original document. Prepare the stack as follows: a.
Chapter 4 Additional troubleshooting information For additional troubleshooting information, see the following resources: • • • 34 For information about the scanning software that you are using, see the online help for that program. To look for updated information about the scanner, visit the HP scanner support Web site at www.hp.com/ support. ◦ Select your country/region, and then select your language. ◦ Enter the scanner model number, and then press Enter.
5 Product care and support This section describes the options for product support. • • Maintenance, troubleshooting, and support Getting assistance Maintenance, troubleshooting, and support Occasional cleaning of the scanner helps ensure higher-quality scans. The amount of care necessary depends upon several factors, including the amount of use and the environment. You should perform routine cleaning as necessary.
6 Regulatory information and product specifications Scanner specifications Name Description Scanner type Flatbed with automatic document feeder (ADF) Size 692 x 558 x 343 mm (27.3 x 22.0 x 13.5 in) Weight 38.5 kg (85 lb) Scanning element Charge-coupled device (CCD) Interface USB 2.0 high speed (compatible with USB 1.1) Optical resolution 600 x 600 dpi hardware AC power 100–240V~, 50/60Hz, 1.8A Power consumption For power consumption information, see the regulatory_supplement.
product number (L2683A/L2683B). Additional regulatory information about your scanner can be found on the regulatory_supplement.htm file on the HP Scanning Software CD. Materials disposal This HP product contains the following materials that might require special handling at end-of-life: • Mercury in the fluorescent lamp in the scanner and/or transparent materials adapter. Disposal of this material can be regulated because of environmental considerations.
Chapter 6 might not apply to you. This warranty gives you specific legal rights, and you might also have other rights that vary from country/region to country/region, state to state, or province to province. 7. HP's limited warranty is valid in any country/region or locality where HP has a support presence for this product and where HP has marketed this product. The level of warranty service you receive may vary according to local standards.
7 Accessibility Accessibility features • • LED Reader Control of the scanner buttons LED Reader The LED Reader is software that outputs the status of the indicator LEDs on the scanner front panel to the computer monitor as the LEDs change. The LED Reader enables accessibility software tools to express what is being shown on the scanner front panel. To use the LED Reader, follow these steps: 1. 2. On your hard drive, navigate to the C:\Program Files\Common Files\Hewlett-Packard\Scanjet\9120\ directory.
Chapter 7 40 Accessibility