
Designing Disaster Recovery Clusters using Metroclusters and Continentalclusters, Reprinted October 2011 (5900-1881)


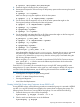


3. Initialize disks to be used with VxVM by running the vxdisksetup command only on the
primary system.
# /etc/vx/bin/vxdisksetup -i c5t0d0
4. Create the disk group to be used with the vxdg command only on the primary system.
# vxdg init logdata c5t0d0
5. Verify the configuration.
# vxdg list
6. Use the vxassist command to create the logical volume.
# vxassist -g logdata make logfile 2048m
7. Verify the configuration.
# vxprint -g logdata
8. Make the filesystem.
# newfs -F vxfs /dev/vx/rdsk/logdata/logfile
9. Create a directory to mount the volume group.
# mkdir /logs
10. Mount the volume group.
# mount /dev/vx/dsk/logdata/logfile /logs
11. Check if file system exits, then unmount the file system.
# umount /logs
IMPORTANT: VxVM 4.1 does not support the agile DSF naming convention with HP-UX 11i v3.
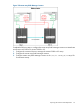
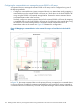
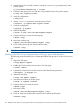
Validating VxVM Disk Groups using Metrocluster/Continuous Access Data Replication
The following section describes how to validate the VERITAS disk groups on nodes in the recovery
site:
1. Deport the disk group.
# vxdg deport logdata
2. Enable other cluster nodes to have access to the disk group.
# vxdctl enable
3. Suspend the Continuous Access link and have SVOL Read/Write permission.
# pairsplit -g devgrpA -rw
4. Import the disk group.
# vxdg -tfC import logdata
5. Start the logical volume in the disk group.
# vxvol -g logdata startall
6. Create a directory to mount the volume.
# mkdir /logs
7. Mount the volume.
# mount /dev/vx/dsk/logdata/logfile /logs
8. Check to make sure the file system is present, then unmount the file system.
# umount /logs
178 Building Disaster Recovery Serviceguard Solutions Using Metrocluster with Continuous Access for P9000 and XP