
Designing Disaster Recovery Clusters using Metroclusters and Continentalclusters, Reprinted October 2011 (5900-1881)


5. Start the logical volume in the disk group.
# vxvol -g logdata startall
6. Create a directory to mount the volume.
# mkdir /logs
7. Mount the volume.
# mount /dev/vx/dsk/logdata/logfile /logs
8. Check to make sure the file system is present, then unmount the file system and deport the disk
group.
# umount /logs
# vxdg deport logdata
Repeat steps 4 through 8 on all nodes that will access the disk group.
9. Establish the SRDF link.
# symrdf -g devgrpA establish
IMPORTANT: VxVM 4.1 does not support the agile DSF naming convention with HP-UX 11i v3.
NOTE: In a Metrocluster/SRDF environment, VxVM commands should not be run against
write-disabled disks. This is due to VxVM potentially putting these disks into an offline state.
Subsequent activation of a VxVM disk group might fail when the disks are again write-enabled,
and requires a vxdisk scandisks to be executed prior to disk group activation.
Additional Examples of M by N Configurations
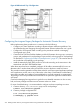
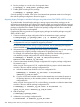
Figure 48 shows a 2 by 1 configuration with BCV’s, which indicates R1 volumes at Data Center
A and R2 volumes and BCVs at Data Center B for pkg A and pkg B.
Figure 48 2 by 1 Configuration
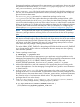
Figure 49 shows a bidirectional 2 by 2 configuration with additional packages on node3 and
node4, and R1 and R2 volumes at both data centers. In this configuration, R1 volumes and pkg
A and pkg B are at Data Center A, and R2 volumes are at Data Center B. R1 volumes for pkg
C and pkg D are at Data Center B, and R2 volumes are at Data Center A.
Building a Metrocluster Solution with EMC SRDF 271