
HP Slim Removable SATA Hard Drive Frame/Carrier Kit Installation Guide


HP Slim Removable SATA
Hard Drive Frame/Carrier Kit
Installation Guide
© Copyright 2013 Hewlett-Packard Development Company, L.P. The
information contained herein is subject to change without notice.The only
warranties for HP products and services are set forth in the express warranty
statements accompanying such products and services. Nothing herein should
be construed as constituting an additional warranty. HP shall not be liable for
technical or editorial errors or omissions contained herein.
Printed in
Second Edition: August 2013
Before You Begin
1. Save all files and properly turn off the computer through the
operating system, then turn off any external devices.
2. Disconnect the power cord from the power outlet and disconnect
any external devices.
WARNING! To avoid the risk of serious injury, ensure that the
power cord is unplugged from the electrical outlet at the wall
before installing the drive. Failure to do so may expose you to the
risk of electric shock.
CAUTION: To avoid the risk of damage to the computer, ensure
that the power cord is unplugged from the electrical outlet at the
wall before installing the drive.
WARNING! To reduce the risk of personal injury from hot
surfaces, allow the internal system to cool before touching.
CAUTION: Static electricity can damage the electronic
components of the computer or optional equipment. Before
beginning this procedure, ensure that you are static-free by briefly
touching a grounded metal object.
CAUTION: Be careful to not drop any screws into the system when
installing the drive.
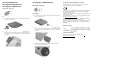
Hard drive frame
Installing a hard drive into the carrier and frame
1. Insert the hard drive into the carrier, making sure the connectors
on the hard drive line up with the connector slots on the carrier.
2. Install the rails onto the sides of the hard drive/carrier assembly 1,
and then insert two screws into each rail 2.
3. Slide the assembled carrier into the frame with the connectors
facing the rear of the frame.
Removing a hard drive from the carrier and frame
1. Press the eject button 1 on the frame, and then slide the carrier
assembly out of the frame to remove it 2.
2. Remove two screws from the rails on each side of the carrier 1,
and then pull the rails off of the sides of the carrier 2.
3. Remove the hard drive from the carrier.
HP EliteDesk 800 Tower
HP EliteDesk 800 Small Form Factor
HP EliteDesk 800 Ultra-slim Desktop
HP ProDesk 600 Tower
HP ProDesk 600 Small Form Factor
HP Compaq Elite 8300 Ultra-slim Desktop
Hardware required
Assembly
1. Peel the backing off the adhesive on the release latch.
2. Without allowing the release latch to touch the frame, carefully
align the holes on the release latch with the pins on the side of the
frame. Make sure the release latch is oriented properly.
3. Insert the pin at the front of the frame into the hole at the end of
the release latch, and press firmly.
4. Insert the second pin, and press the entire release latch firmly to
fasten the latch securely to the frame.
5. Install the drive. For detailed instructions on installing the drive in a
drive bay, refer to the documentation that came with the computer
or go to http://www.hp.com/support to locate documentation for
your model.
HP EliteOne 800 All-in-One
Hardware required
Assembly
1. Remove the cover from the adhesive strip on the new latch. Align
the two pins on the latch with the holes in the frame and press the
latch firmly onto the frame.
2. Install the drive. For detailed instructions on installing the drive in a
drive bay, refer to the documentation that came with the computer
or go to http://www.hp.com/support to locate documentation for
your model.
726175-002