Compaq Advanced Data Guarding Option Software Reference Guide Part Number 283954-001 May 2002 (First Edition) COMPAQ CONFIDENTIAL Writer: John Turner File Name: a-frnt Codename: adg2 Part Number: 283954-001 Last Saved On: 5/22/02 12:40 PM
© 2002 Compaq Information Technologies Group, L.P. Compaq and the Compaq logo are trademarks of Compaq Information Technologies Group, L.P. in the U.S. and/or other countries. Microsoft, Windows, and Windows NT are trademarks of Microsoft Corporation in the U.S. and/or other countries. All other product names mentioned herein may be trademarks of their respective companies. Compaq shall not be liable for technical or editorial errors or omissions contained herein.
Contents About This Guide Symbols in Text...................................................................................................................v Text Conventions .............................................................................................................. vi Getting Help ...................................................................................................................... vi Compaq Technical Support...............................................................
Contents iv Compaq Advanced Data Guarding Option Software Reference Guide COMPAQ CONFIDENTIAL Writer: John Turner File Name: a-frnt Codename: adg2 Part Number: 283954-001 Last Saved On: 5/22/02 12:40 PM
About This Guide This guide provides step-by-step instructions for installation, and reference information for operation, troubleshooting, and future upgrades for the Compaq Advanced Data Guarding Option Software. Symbols in Text These symbols may be found in the text of this guide. They have the following meanings. WARNING: Text set off in this manner indicates that failure to follow directions in the warning could result in bodily harm or loss of life.
About This Guide Text Conventions This document uses the following conventions: • Italic type is used for complete titles of published guides or variables. Variables include information that varies in system output, in command lines, and in command parameters in text. • Bold type is used for emphasis, for onscreen interface components (window titles, menu names and selections, button and icon names, and so on), and for keyboard keys.
About This Guide • Third-party hardware or software • Operating system type and revision level Compaq Website For information on this product, as well as the latest drivers and flash ROM images, go to www.compaq.com. Compaq Authorized Reseller For the name of your nearest Compaq authorized reseller: • In the United States, call 1-800-345-1518. • In Canada, call 1-800-263-5868. • Elsewhere, see the Compaq website for locations and telephone numbers.
1 Overview of RAID ADG Advanced Data Guarding (RAID ADG) is a fault-tolerance method that uses two different and independent sets of parity data. A logical volume using this exceptionally high level of data protection can tolerate the simultaneous failure of two hard drives without suffering downtime or data loss.
Overview of RAID ADG Theoretically, RAID ADG can support a logical volume that spans over 200 hard drives without any great risk of data loss. However, currently existing array controllers and storage systems support no more than 14 drives per channel. Thus, the largest obtainable logical volume, using a 4-channel controller, spans 56 hard drives.
Overview of RAID ADG Probability of Logical Drive Failure The probability that a logical drive will fail depends on the RAID level setting. • A RAID 0 logical drive will fail if only one physical drive fails. • For a RAID 1+0 logical drive, the failure situation is complex. — The maximum number of physical drives that can fail without causing failure of the logical drive is n/2, where n is the number of hard drives in the array.
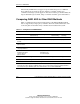
Overview of RAID ADG Increasing likelihood of logical drive failure > > > RAID 0 RAID 5 RAID 1+0 RAID ADG 1 6 11 16 21 26 31 36 41 46 51 56 Total number of physical drives in array Figure 1-2: Relative probability of logical drive failure for different RAID levels 1-4 Compaq Advanced Data Guarding Option Software Reference Guide COMPAQ CONFIDENTIAL Writer: John Turner File Name: b-ch1 overview of RAID ADG Codename: adg2 Part Number: 283954-001 Last Saved On: 5/22/02 12:41 PM
Overview of RAID ADG Choosing a RAID Method There are three primary reasons for using RAID ADG: • You need greater fault tolerance than RAID 5 can provide but you also want to use as much drive space as possible for data. • You need to use a greater percentage of drive space for data than with RAID 1+0 while maintaining a high level of fault tolerance. • You need a large logical volume, incorporating over ten hard drives. Table 1-2 may help you to decide which RAID option is best for your situation.
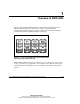
2 System Setup Enabling RAID ADG Before you can configure an array with RAID ADG, you must enable the array controller to use this feature. The most convenient method of doing this is to install a software key on the server. NOTE: Older versions of the Smart Array 5300 Controller can also be enabled for RAID ADG by a hardware enabler module that plugs into the array controller board. Either method of enabling this model of controller is valid. To install the software key: 1.
System Setup This action opens ACU-XE, the browser-based version of the Compaq Array Configuration Utility (ACU). IMPORTANT: Use the version of ACU-XE that is provided on the CD. The software key cannot be installed using versions of ACU-XE earlier than 1.40, nor can it be installed using ACU. 7. When the utility has loaded, select the controller that is to be used to configure RAID ADG. 8. Select License Key Management. 9. Select Enter License Key. 10.
System Setup Configuring the System with RAID ADG The procedure for configuring a system with RAID ADG depends on whether it is a new system and what operating system it uses. This section gives an overview of the procedure. For more detailed information, refer to the user guide for the array controller that the system is using. NOTE: The maximum size of a logical drive that can be configured through ACU is 2 TB. However, some operating systems do not support logical drives that are larger than 502 GB.
System Setup 2. Select the hard drives that are to make up the array, remembering to leave any that you want to use as online spares. 3. Click the Assign Drive to Array button in the upper middle part of the screen. 4. Select the hard drives that are to be used as online spares. 5. Click the Assign Spare to Array button in the lower middle part of the screen. 6. Click Done to activate the settings and return to the main ACU screen. Creating a Logical Drive within the Array 1.
System Setup 4. If you want to use the wizard, select RAID ADG as the fault-tolerance level. Alternatively, exit the wizard and custom configure the system. 5. Save the changes and exit CPQONLIN. Migrating an Existing Logical Drive to RAID ADG Before migrating a logical drive that is currently configured for RAID 0 or RAID 5, you must expand the array. If the logical drive has a RAID 1 configuration, it does not need to be expanded before migration.
System Setup 9. Click the Assign Spare to Array button in the lower middle part of the screen. 10. Continue the migration when expansion has finished. Migrating the Logical Drive 1. In ACU, click Migrate in the Logical Drive box in the lower right corner of the main ACU screen. 2. Select RAID ADG on the Migrate RAID/Stripe Size screen that is displayed. 3. Change the stripe size, if required. The default setting is 16 Kbytes for RAID ADG, suitable for most common uses.
System Setup 9. Change the stripe size if desired. The “Optimizing the Stripe Size” section discusses the stripe sizes that are most useful for various applications. 10. Press the Esc key to save the changes and begin the migration. Migrating a RAID ADG Volume to Another Controller You can migrate a RAID ADG logical volume only if both controllers support RAID ADG. If the new controller supports RAID ADG but does not have it enabled, the write cache is disabled.
System Setup 2. Double-click the ACU icon on the desktop. 3. Select the controller from the drop-down list on the main ACU screen. 4. Select the array. 5. Click Modify in the Array box. 6. Select the drives that are to be used as online spares. IMPORTANT: The capacity of an online spare should be no less than that of any other drive in the same array. This must be true of every array that uses that drive as an online spare. 7. Click the Assign Spare to Array button in the lower middle part of the screen.
System Setup • Change to a stripe size that is more suitable for the type of data transfer common to the system. • Change the RAID level to one that requires less RAID overhead. • Enlarge the logical drive to span all available controller channels. Changing the Cache Read/Write Ratio By default, the array accelerator cache capacity is equally divided between reads and writes.
System Setup Table 2-1: Supported Stripe Sizes for a Given RAID Level Fault-tolerance Level Supported Stripe Sizes (KB) Default (KB) RAID 0 or 1+0 8, 16, 32, 64, 128, 256 128 RAID 5 or ADG 8, 16, 32, 64 16 Table 2-2: Optimum Stripe Size Type of Server Application Suggested Stripe Size Change Mixed read/write No change necessary - accept the default value Mainly read (such as database or Internet applications) Change to a stripe size larger than the default value Mainly write (such as image m
System Setup NetWare 1. Visit the Novell website and be sure that the latest support pack or operating system patch is installed on the system. 2. Visit the Compaq website and be sure that you have the latest drivers for the controller that is installed in the system. 3. Open the CPQONLIN utility. 4. On the main screen, select the logical drive that you want to reconfigure and press the Enter key. 5. Click Drive Settings on the Logical Drive menu. 6. Select a stripe size. 7. Save the changes.