
HP StorageWorks Modular Smart Array Controller, Cache, and Battery Replacement Instructions (February 2006)


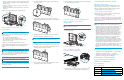


1. Locate the controller cover clips (1) on the rear, lower left, and right
sides of the module by holding the controller upright with the latch
handle facing you.
2. Unlatch the controller cover clips (1) on the rear of the controller
and raise the cover (2).
3. Simultaneously unlatch the clips that are holding the cache module
in place (3).
4. Pull the cache module away from the controller board (4).
Step 3: Replace cache batteries
(if applicable)
WARNING! The controller contains Nickel Metal Hydride
(NiMH) batteries. There is risk of explosion, fire, and personal injury if
the battery pack is incorrectly replaced or mistreated. To reduce the
risk of personal injury:
• Do not attempt to recharge the battery.
• Do not expose to temperatures higher than 60
o
C.
• Do not disassemble, crush, puncture, short external contacts, or
dispose of in fire or water.
• Replace only with HP spare designated for this product.
For more information about battery replacement or proper disposal,
contact your HP Authorized Reseller or your Authorized Service
Provider.
CAUTION: Do not dispose of batteries, battery packs, and
accumulators with general household waste. Use the public collection
system or return them to HP, your authorized HP Partners, or their
agents. For more information about proper disposal, contact an HP
Authorized Reseller or Service Provider.
NOTE: Replace battery packs in pairs, not individually.
NOTE: After replacement, while the batteries are charging, the
cache is disabled. When the batteries are fully charged, the cache is
automatically re-enabled.
1. Push down on the battery retaining clip, located near the lower
corner of the module.
2. Swing the battery pack away from the module to a 30-degree
angle, and then lift the battery pack upward to unhook the top of it.
3. Wait approximately 15 seconds after removing the old battery
pack to allow the battery charge monitor to reset.
IMPORTANT: If you do not wait 15 seconds after removing the
old battery, full charge of the new cache battery is delayed.
4. Repeat step 1 through step 3 in this section to remove the second
battery pack.
5. To install the replacement battery pack, hook the top of the new
battery pack to the top of the module, with the battery held at a
30-degree angle to the plane of the module.
6. Swing the battery downward, ensuring that the bottom clip and
two pegs line up with the holes in the module.
7. Verify that the top hook (1) and bottom clip (2) on the battery pack
are securely attached to the module.
8. Repeat step 5 through step 7 for the second battery pack (3).
Step 4: Install the cache module
(if applicable)
NOTE: When only one cache module is installed, you should
install the module in the bottom slot.
1. Slide the cache module into the controller (1) until the side latches
are fully engaged (2).
2. Close the controller cover.
Step 5: Install the controller
1. Insert the controller into the MSA chassis.
2. Push the controller in as far as it will go (1), and then press the
latch handle inward until it is flush against the front panel (2).
Confirming the firmware version
All MSA configurations
After replacing a controller, verify that the latest firmware for your
MSA is installed. Go to the web site for your MSA, and if newer
firmware is available, download the firmware from the Web and
install this latest version on the controller(s) (Table 3).
Dual-controller configurations
If the firmware versions on the two controllers are mismatched, the
following LCD message might be displayed:
07 CLONE FIRMWARE? ‘<‘ = NO, ‘>’ = YES
Press > to copy the firmware from the active controller to the standby
controller. If < is selected, the standby controller is disabled and the
MSA operates in a non-redundant mode until the firmware on the two
controllers does match.
NOTE:
• MSA1510i—Although rare, if the cache module batteries on a
replacement controller are uncharged and a power interrupt occurs
during the cloning process, the cloning process might fail. To
recover the affected controller, first go to the MSA1510i web site
and obtain firmware. Then, establish a serial connection to the
affected controller, using the custom CLI configuration cable
shipped with the MSA and a terminal emulator program such as
HyperTerminal. (No CLI prompt is displayed.) Using the transfer (or
send file) command of your emulator, send the firmware to the
controller using the XModem protocol. This transfer can take up to
45 minutes. Do not interrupt this process. See the MSA1510i
maintenance and service guide for more information.
• MSA1000/MSA1500 cs—Due to parts availability, replacement
controllers might ship with a new firmware version that is required
for that controller model. If older firmware is installed on the active
controller and newer firmware is installed on the replacement
controller, cloning might fail. To update the firmware on the active
controller, go to the web site for your MSA, obtain the latest
firmware, and update the firmware on both controllers to this latest
version.
Verifying controller status
• Verify that the controller heartbeat LED [Figure 1, (1)] is blinking.
• Verify that the controller fault LED [Figure 1, (2)] is off.
Unread error log messages can cause the fault LED to light.
• Verify that no new error messages are displayed.
Returning the failed controller
Follow the instructions shipped with the replacement.
Additional information
See your MSA web site:
15182
1
2
4
3
15185
15186
15188
15189
1
2
3
15183
1
2
2
1
15174
Table 3 MSA web sites
MSA model Web site
MSA1000:
http://www.hp.com/go/msa1000
MSA1500 cs:
http://www.hp.com/go/msa1500cs
MSA1510i:
http://h18006.www1.hp.com/products/storageworks/
msa1510i