
Advanced Data Guarding Option Software Reference Guide


System Setup
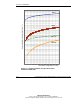
Compaq Advanced Data Guarding Option Software Reference Guide 2-5
COMPAQ CONFIDENTIAL
Writer: John Turner File Name: c-ch2 system setup
Codename: adg2 Part Number: 283954-001 Last Saved On: 5/22/02 12:42 PM
4. If you want to use the wizard, select RAID ADG as the fault-tolerance level.
Alternatively, exit the wizard and custom configure the system.
5. Save the changes and exit CPQONLIN.
Migrating an Existing Logical Drive to RAID ADG
Before migrating a logical drive that is currently configured for RAID 0 or RAID 5,
you must expand the array. If the logical drive has a RAID 1 configuration, it does
not need to be expanded before migration.
IMPORTANT: Although data loss is not anticipated, Compaq recommends that you back up
all data before migrating a logical drive.
NOTE: Expansion and migration each take about 15 minutes per gigabyte. Data can still be
read from or written to any logical drive on the controller during an expansion or migration,
although performance might be reduced. However, a controller can perform only one
expansion, extension, or migration at any given time.
Windows NT and Windows 2000
Expanding the Array
1. Add at least one extra hard drive to the system if migrating from RAID 5, or
three extra hard drives if migrating from RAID 0. The capacity of each added
drive should be no less than that of the smallest hard drive currently used in the
logical volume.
2. Double-click the ACU icon on the desktop.
3. Select the controller from the drop-down list on the main ACU screen.
4. Select the array to be expanded from the configuration view box.
5. Click Expand in the Array box.
6. Select the extra hard drives that you added to the system, except any that you
want to be used as spares.
7. Click the Assign Drive to Array button in the upper middle part of the screen.
8. Select the online spares, if any are to be used.