
HP Smart Array E500 Controller User Guide

Upgrading or replacing controller options 18
4.
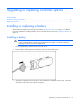
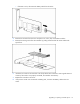
Unplug the cable from the battery pack.
5. Remove the battery pack from the server.
6. Plug the cable into the new battery pack.
7. Install the new battery pack into the server.
8. Verify that the other end of the cable is properly seated in the cache connector.
NOTE: After installing a battery pack, you might see a POST message during reboot
indicating that the array accelerator (cache) is temporarily disabled. This is normal, because
the new battery pack is likely to have a low charge. You do not need to take any action,
because the recharge process begins automatically when the battery pack is installed. The
controller will operate properly while the battery pack recharges, although the performance
advantage of the array accelerator will be absent. When the battery pack has been charged
to a satisfactory level, the array accelerator will automatically be enabled.
Replacing the cache
CAUTION: Do not use this controller with cache modules designed for other controller models,
or the controller will malfunction and you could lose data. Also, do not transfer this cache
module to a different controller module, or you could again lose data.
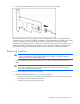
1. Close all applications, and then power down the server. This procedure flushes all data from the
cache.
2. Disconnect the server from the AC power source.
3. If the existing cache is connected to a battery, observe the BBWC Status LED ("Battery pack LEDs" on
page 29).
o If the LED is blinking every two seconds, data is still trapped in the cache. Restore system power,
and then repeat the previous steps in this procedure.