
Cache Battery for the HP Smart Array P700m Controller Installation Instructions

Cache Battery for the HP Smart
Array P700m Controller
Installation Instructions
Installing the battery
CAUTION: Electrostatic discharge can damage electronic
components. Be sure you are properly grounded before
beginning this procedure.
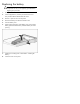
1. Position the battery pack in the opening in the battery case as
shown. The upper left edge of the battery is under the flanges
on the pillars at the left edge of the opening, and the right side
of the battery rests on the right pillars.
2. Pull the right hand portion of the battery case away from
the battery, and simultaneously rotate the battery pack into
the opening.
3. Connect the battery cable to the battery.
4. Remove or open the server access panel.
5. Remove the cache from the controller.
6. Connect the battery cable to the cache.
7. Identify a hard drive slot that enables the battery and cache to
remain connected while the battery case is inserted in the slot
and the cache is reinstalled on the controller.
8. Insert the battery case into the hard drive slot.
9. Plug the cache into the connector on the controller, routing the
battery cable so that the cache and battery can be removed
together if necessary. (If you need to remove the cache to
transfer data, the battery must remain connected so that the
data is preserved.)
10. Close the server access panel.
© Copyright 2007 Hewlett-Packard Development Company, L.P.
The information contained herein is subject to change without notice. The only
warranties for HP products and services are set forth in the express warranty
statements accompanying such products and services. Nothing herein should
be construed as constituting an additional warranty. HP shall not be liable for
technical or editorial errors or omissions contained herein.
Part Number 459171-001
August 2007 (First Edition)