
HP Smart Array 6400 Series Controllers Support Guide, September 2007


Fault Management in Supported RAID Configurations
If a physical disk fails in RAID 1, RAID 1+0, RAID 5, or ADG, the system will still process I/O
requests, but at a reduced performance level. Replace the failed physical disk as soon as possible
to restore performance and full fault tolerance for the logical drive it belongs to.
The risk of continuing operations without replacing a failed physical disk varies depending on
the RAID level that has been configured:
RAID 1 RAID 1 is configured with a single mirrored pair of disks. If one physical disk fails,
the remaining disk in the mirrored pair can still provide all the data.
RAID 1+0 A RAID 1+0 configuration has a minimum of four physical disks, and the total
number of physical disks is divisible by two to support mirrored pairs. In RAID
1+0, if a physical disk fails, the remaining disk in any mirrored pair still provides
all of the data that was on the failed disk. Several physical disks in an array can
fail without incurring data loss, as long as no two failed physical disks belong to
the same mirrored pair.
RAID 5 If a physical disk fails in a RAID 5 configuration, data is recovered using a parity
formula and is typically written to an online spare physical disk. If a second physical
disk fails before the data from the initial physical disk failure has been rebuilt on
the online spare disk, the logical drive fails and data is lost.
ADG Similar to RAID 5, ADG relies on a parity scheme to rebuild data if a physical disk
fails. However, in an ADG configuration the parity data is duplicated on two
different physical disks. As a result, ADG can support the failure of two physical
disks without data loss.
For a more detailed description of the RAID levels supported by Smart Array Controllers, see
the RAID Technology Overview, at:
http://docs.hp.com/en/netcom.html#Smart%20Array%20%28RAID%29
For detailed information on the probability of logical drive failure, see Appendix C (page 73).
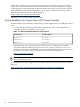
Choosing a RAID Method
Table 1-6 summarizes the advantages of each RAID method. Use this table to select the best
RAID method for your needs.
Table 1-6 Choosing a RAID Method
Suggested RAID LevelAlso ImportantMost Important
RAID ADGCost effectivenessFault tolerance
RAID 1, RAID 1+0I/O performance
RAID ADGFault toleranceCost effectiveness
RAID 5 (RAID 0 if fault tolerance is not required)I/O performance
RAID 5 (RAID 0 if fault tolerance is not required)Cost effectivenessI/O performance
RAID 1, RAID 1+0Fault tolerance
Fault Management in Supported RAID Configurations 21