
HP Smart Array 6400 Series Controllers Support Guide, September 2007


1. Close all applications.
2. Power off the server.
3. Power off any peripheral devices that are attached to the server.
4. Unplug the AC power cord from the outlet, and then from the server.
WARNING! To reduce the risk of personal injury or damage to the equipment, consult the
safety information and user documentation provided with your server before attempting
installation.
Many computers are capable of producing energy levels that are considered hazardous. These
computers are intended to be serviced by qualified personnel trained to deal with those hazards.
Do not remove enclosures or attempt to bypass any interlocks that may be provided for the
purpose of removing these hazardous conditions.
CAUTION: In systems using external data storage, be sure that the server is the first unit powered
off and the last unit to be powered on. Doing this ensures that the system will not erroneously
mark the disk drives as “failed”.
CAUTION: Electrostatic discharge (ESD) can damage electronic components. Be sure that you
are properly grounded before continuing the installation procedure; see Appendix D (page 75).
The Smart Array Controllers contain electronic components that can be easily damaged by small
amounts of static electricity. To avoid damage, follow these guidelines:
• Store the controller in its antistatic plastic bag until you are ready to install it.
• Work in a static-free area if possible
• Handle the controller only by the edges. Do not touch electronic components or electrical
traces.
• If you must lay the controller down, place it on a non-conductive mat or surface.
Before beginning installation, and without removing the Smart Array Controller from its antistatic
bag, inspect the controller for any signs of obvious damage, such as chipped or loose components.
Contact HP if the controller is damaged.
Installing Smart Array 6400 Series Controller Hardware Offline
To install the Smart Array 6400 Series controller hardware, follow these steps:
1. Disconnect any peripheral devices from the server.
2. Remove or open the access panel on the server.
3. Select an available 133 MHz PCI-X (or 66 MHz PCI) slot that has a 64-bit interface.
4. Remove the slot cover or open the hot-plug latch. Save the retaining screw, if one is present.
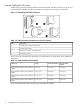
5. Slide the controller board into the server along the slot alignment guide; see Figure 2-1.
26 Installing Smart Array 6400 Series Controllers