
HP Smart Array 6400 Series Controllers Support Guide, September 2007

Configuring for HP-UX 11i v1 Using Ignite-UX Offline
To set up a Smart Array Controller as a boot device, you must install HP-UX 11i v1 on one of
the controller’s logical drives. Follow these steps:
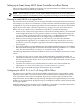
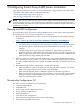
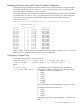
1. Start Ignite-UX from the HP-UX 11i v1 Core OS Install and Recovery Media. The Ignite-UX
Welcome screen displays:
Welcome to Ignite-UX!
Use the <tab> key to navigate between fields, and the arrow keys
within fields. Use the <return/enter> key to select an item.
Use the <return/enter> or <space-bar> to pop-up a choices list. If the
menus are not clear, select the "Help" item for more information.
Hardware Summary: System Model: 9000/800/A500-5X
+---------------------+----------------+-------------------+ [ Scan Again ]
| Disks: 3 (204.6GB) | Floppies: 0 | LAN cards: 1 |
| CD/DVDs: 0 | Tapes: 0 | Memory: 4096Mb |
| Graphics Ports: 0 | IO Buses: 7 | CPUs: 1 | [ H/W Details ]
+---------------------+----------------+-------------------+
[ Install HP-UX ]
[ Run a Recovery Shell ]
[ Advanced Options ]
[ Reboot ] [ Help ]
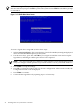
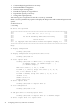
2. Select Run a Recovery Shell. The Recovery Shell screen displays:
NOTE: Creating the second RAM disc and mounting on /dev ...
* Generating device file for the second ramdisc...
* Loading mkfs to make a file system...
version 4 layout
15625 sectors, 15625 blocks of size 1024, log size 1024 blocks
unlimited inodes, largefiles not supported
15625 data blocks, 14529 free data blocks
1 allocation units of 32768 blocks, 32768 data blocks
last allocation unit has 15625 data blocks
* Loading mount to mount/dev/ram1 file system...
* Mounting /dev/ram1 file system succeeded!
* Copying /dev.old files back to /dev succeeds!
* Loading insf to create disk device files...
* Creating disk device files...
* Loading in a shell...
NOTE: Pushing a shell, you will have to use "reboot" to reboot
the system when done. Use the "loadfile" command to bring in more
commands as you need them.
#
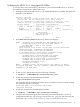
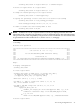
3. At the recovery shell prompt, enter the following command:
# loadfile -l INSTCMDS/opt/raidsa/bin/ciss_insf
4. At the next prompt, enter the following command:
# /opt/raidsa/bin/ciss_insf
and verify that the device file for the Smart Array Controller has been created by reading
the command output. For example:
Installing special file for Smart Array 6402
/dev/ciss3 installed
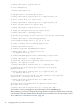
5. At the next prompt, enter the following command:
# loadfile -l INSTCMDS /opt/raidsa/bin/saconfig
6. Configure the arrays and logical drives following the instructions for the saconfig
configuration utility. See “The saconfig Configuration CLI” (page 45). You must enter the
entire path /opt/raidsa/bin/saconfig /dev/cissX to run saconfig.
Setting up a Smart Array 6400 Series Controller as a Boot Device 43