
RAID Technology Overview - September 2007
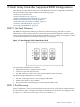


Summary of RAID Methods
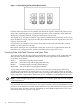
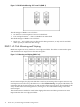
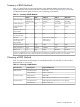
Table 2-1 summarizes the important features of the different RAID configurations that are
supported by the Smart Array Controllers. The decision chart in Table 2-2 (page 19) can help
you determine which option is best for your computing environment.
Table 2-1 Summary of RAID Methods
RAID ADGRAID 5RAID1+0RAID 1RAID 0
Advanced Data
Guarding
Distributed Data
Guarding
Mirroring and
Striping
MirroringStriping (no
fault tolerance)
Alternative name
50% to 93%67% to 96%50%50%100%Usable disk space*
(n-2)/n(n-1)/nn/2n/2nUsable disk space
formula
43421Minimum number of
physical disks
YesYesYesYesNoTolerates failure of
one physical disk?
YesNoOnly if no two failed
disks are in a
mirrored pair
NoNoTolerates
simultaneous failure
of more than one
physical disk?
HighHighHighHighHighRead performance
LowLowMediumMediumHighWrite performance
MediumMediumHighHighLowRelative cost
*Values for usable disk space are calculated with these assumptions: (1) All physical disks in the array have the same
capacity; (2) Online spares are not used; (3) No more than 28 physical disks are used per array for RAID 5.
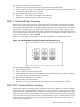
Choosing a RAID Method
Table 2-2 summarizes the advantages of each RAID method. Use this table to select the best
RAID method for your needs.
Table 2-2 Choosing a RAID Method
Suggested RAID LevelAlso ImportantMost Important
RAID ADGCost effectivenessFault tolerance
RAID 1, RAID 1+0I/O performance
RAID ADGFault toleranceCost effectiveness
RAID 5 (RAID 0 if fault tolerance is not required)I/O performance
RAID 5 (RAID 0 if fault tolerance is not required)Cost effectivenessI/O performance
RAID 1, RAID 1+0Fault tolerance
Summary of RAID Methods 19