
SCSI Disk Drives User Manual


B-2 Rack-Ready Modules
Installation and Removal of Drives
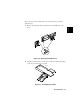
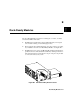
The Rack-Ready Drives are equipped with an ejection lever assembly in place
of the rubber feet used on the desktop version. See Figure B-2. The ejection
lever assembly is designed for easy installation and removal of drives from the
rack mount kit.
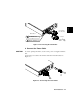
1. Power down the host system.
2. Open the ejection lever assembly.
3. Installation: Slide the drive into the enclosure until the drive’s power and
I/O port plug into the back of the rack mount kit.
4. Close the Ejection Lever assembly, locking the unit in place.
5. Removal: Move the ejection lever forward until the drive is disengaged
from the rear power and I/O plugs. Slide the drive out of the enclosure, using
both hands to grasp the unit.
Note For comprehensive installation instructions see HP 3U 4-Bay Rack Enclosure
Installation Guide (HP part number C4318-90001) or HP 2U 2-Bay Rack
Enclosure Installation Guide (HP part number C4317-90002).
Lever in the Closed Position Lever in the Open Position
Figure B-2 Ejection Lever Assembly