
HP Storage Essentials SRM 6.0 User Guide for Enterprise Edition and Standard Edition SRM Software (July 2008)


HP Storage Essentials SRM 6.0 User Guide 459
report to the management server, and then you must integrate the report so that it is accessible from
Reporter. Custom reports appear with their own icon in the reports tree.
IMPORTANT: You can have only one catalog (*.cat) file to a directory. If you have more than one
catalog, create a subdirectory under %JBOSS4_DIST%\server\appiq\reports\custom. For
example, if you have two reports that use a different catalog, you would create two subdirectories
under reports\custom, one for each catalog. The support files and catalog for one report would
go into one subdirectory (reports\custom\subdirectory1), and the support files and
catalog for the other report would go into another subdirectory
(reports\custom\subdirectory2).
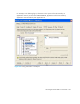
To deploy and integrate custom reports:
1. Deploy the custom report files (CLS, CAT and all other files) from Report Designer. Use Report
Designer's deploy catalog mechanism to transfer the files. Create a directory called custom
under %JBOSS4_DIST%\server\appiq\reports, and then deploy the catalog to the
following directory:
%JBOSS4_DIST%\server\appiq\reports\custom
Refer to the documentation accompanying Report Designer for more information.
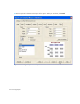
2. Create a node for your custom reports. This node appears in the tree in Reporter.
a. Create the directory %JBOSS4_DIST%\server\appiq\reports\customTreeNodes if
it does not already exist.
b. Create an XML file in that directory for your tree node; for example, custom.xml. The
management server uses this file to determine where to put the node for custom reports in the
tree.
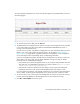
c. Use a text editor, such as Notepad, to open the XML file you created in the previous step.
Enter the following into the XML file:
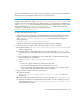
<NODE NAME="CUSTOM" LABEL="Custom" PARENT="SYSTEM"/>
where
• NAME is how reports and other tree nodes refer to this node.
• LABEL is the label that appears in the user interface for the node.
• PARENT is the name of the parent node in the tree (optional). In this case, the Custom
report appears under the SYSTEM node in the tree in Reporter.
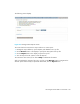
3. Populate the tree in Reporter with your custom reports.
a. Create the directory
%JBOSS4_DIST%\server\appiq\reports\definitions\custom if it does not
already exist.
b. Create an XML file in that directory for your report, for example: CustomHostReport.xml
c. Open the new XML file, and add the following information to the file, modifying it for your
settings. Refer to files in %JBOSS4_DIST%\server\appiq\reports\definitions if
you need additional samples.