
HP StorageWorks Storage Mirroring Recover User's Guide (T5437-96008, November 2009)


380 of 739
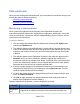
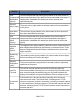
Password
Encryption
Examples
dfo /setpassword mydomain.com\admin mypassword
Stores the username (mydomain.com\admin) and password
(mypassword) in the default credentials file (dfo_credentials.dat)
dfo /dnssrvname mydnsserver.mydomain.com /srcname
mysource.mydomain.com /srcip 206.31.4.10 /tarip
210.11.12.13 /username mydomain.com\admin
/getpassword /verbose
Modifies all resource records on the specified DNS server that
match the source criteria, using the username and /getpassword to
retrieve the correct password for connecting to the DNS server
Macintosh shares
A share is any volume, drive, or directory resource that is shared across a network.
During failover, the target can assume or add any source shares so that they remain
accessible to the end users. Automatic share failover only occurs for standard Windows
file system shares. Other shares, including Macintosh volumes, must be configured for
failover through the failover scripts or created manually on the target.
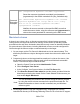
1. On your target, set the File Server for Macintosh service to manual startup. This
allows the post-failover script on the target to control when the service starts on the
target.
2. Create each volume on the target machine exactly as it exists on the source. Use
the Shared Folder wizard to configure each volume as a Macintosh-accessible
volume. Follow these steps to start the wizard:
a. Open the Control Panel and click Administrative Tools.
b. Select Configure Your Server.
c. In the Configure Your Server window, click the File Server link.
d. Click Start the Shared Folder wizard to start the wizard, and then follow the
directions provided by the wizard. On the Create Shared Folders screen, you
must enable Apple Macintosh.
Note:
You can automate the creation of the volumes during the failover process
by using the macfile volume command in the post-failover batch file. For
detailed information on how to use this command, see your Windows
reference guide.
3. On the target machine, copy the chngname utility, chngname.exe, from the
\tools\Win2K directory of the Storage Mirroring Recover CD or from the HP support