
HP StorageWorks Storage Mirroring user's guide (T2558-96073, February 2008)


18 - 3
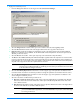
Use block checksum comparison/delta block transfer—Specify if you want the restoration process to use a
block checksum comparison to determine which blocks are different. If this option is enabled, only those blocks
(not the entire files) that are different will be restored to the source.
j. If you want to configure orphan files, click the Orphans tab. The same orphan options are available for a restoration
connection as a standard connection. See
Configuring and removing orphan files on page 14-12 for more details.
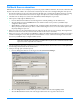
k. If you are original source was using Replicate NT Security by Name, you must enable that option on the target
before you start the restoration. The option is available on the target’s
Server Properties on the Source tab.
l. Click Restore to begin the restoration. You can identify a restoration connection because it is enclosed in
parenthesis ( ) and it has _Restore appended to the end of the replication set name. The initial restoration is
complete when the
Mirror Status is Idle. After the Mirror Status is Idle, the connection will continue replicating
any on-going data changes from the target to the source.
11. After the Mirror Status is Idle, schedule a time for failback. User downtime will begin once failback is started, so select
a time that will have minimal disruption on your users.
12. When you are ready, begin the failback process.
a. From the Failover Control Center, select the target that is currently standing in for the failed source.
b. Select the failed source and click Failback. The user downtime starts now. If you have a pre-failback script
configured, it will be started.
c. When failback is complete, the post-failback script, if configured, will be started. When the script is complete, you
will be prompted to determine if you want to continue monitoring the source, do not select either option. Leave
the prompt dialog box open as is.
13. Back in the Management Console, watch the restoration connection until activity has ended and replication is in a Ready
state. This will happen as the final data in queue, if any, is applied on the source. The replication
Ready state indicates
replication is waiting for new incoming data changes. There will not be any additional data changes because failback has
released the source identity, so users are no longer accessing their data.
14. Once replication is in a Ready state, disconnect the restoration connection from the target. This is the connection
enclosed in parenthesis () and it has _Restore appended to the end of the replication set name.
15. On the source, change the IP address that you modified earlier to the unique address back to its original address. You
can also enable any other NICs on the source.
16. Also on the source, change the source name back to its original name and reboot, or restart the Workstation, Server,
and any other services you were prompted to stop.
17. Once the source is back online, users can reconnect to the source.
18. At this time, you can go back to the dialog box in the Failover Control Center. Select Continue or Stop to indicate if you
want to continue monitoring the source. After you have selected whether or not to continue monitoring the source, the
source post-failback script, if configured, will be started.
19. You can now reconnect your original replication set on the source to your target, to reestablish protection.
NOTE: During the restoration, only the data is restored back to the source. Shares are not created on the
source during the restoration. Shares that were created on the target during failover will need to be
created manually on the source.
NOTE: The source must be online and Storage Mirroring must be running to ensure that the source post-failback
script can be started. If the source has not completed its boot process, the command to start the script
may be lost and the script will not be initiated.