
Fabric OS Encryption Administrator's Guide v6.4.0 (53-1001864-01, June 2010)


102 Fabric OS Encryption Administrator’s Guide
53-1001864-01
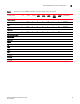
Steps for connecting to an SKM appliance
3
Repeat these steps any time another local CA is needed.
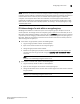
Downloading the local CA certificate
The local CA certificate you created using the procedure for “Setting up the local Certificate
Authority (CA)” on page 100 must be saved to your local system. Later, this certificate must be
imported onto the Brocade encryption group leader nodes.
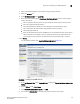
1. From the Security tab, select Local CAs under Certificates and CAs.
2. Select the CA certificate you created.
3. Click Download, and save the certificate file on your local system.
4. Rename the downloaded file, changing the .cert extension to a .pem extension. This file is
needed later when “Registering SKM on a Brocade encryption group leader” on page 109.
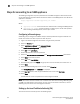
Creating and installing the SKM server certificate
To create the SKM server certificate, perform the following steps:
1. Click the Security tab.
2. Under Certificates and CAs, select Certificates.
3. Enter the required information under Create Certificate Request.
- Enter a Certificate Name and Common Name. The same name may be used for both.
- Enter your organizational information.
- Enter the E-mail Address where you want messages to the Security Officer to go.
- Enter the Key Size. HP recommends using the default value: 1024.
4. Click Create Certificate Request.
Successful completion is indicated when the new entry for the server certificate appears on
the Certificate List with a Certificate Status of Request Pending.
5. Select the newly created server certificate from the Certificate List.
6. Select Properties.
The pending request displays under Certificate Request Information.
7. Copy the certificate data from -----BEGIN CERTIFICATE REQUEST----- to -----END CERTIFICATE
REQUEST--––– lines. Be careful to exclude extra carriage returns or spaces after the data.
8. Under Certificates & CAs, select Local CAs.
The Certificate and CA Configuration page is displayed.
9. From the CA Name column, select the local CA name you created in .
10. Click Sign Request.