HP StorageWorks XP24000 Remote Web Console User’s Guide Part number: AE131–96005 First edition: June 2007
Legal and notice information © Copyright 2007 Hewlett-Packard Development Company, L.P. Confidential computer software. Valid license from HP required for possession, use or copying. Consistent with FAR 12.211 and 12.212, Commercial Computer Software, Computer Software Documentation, and Technical Data for Commercial Items are licensed to the U.S. Government under vendor's standard commercial license. The information contained herein is subject to change without notice.
Contents About this Guide . . . . . . . . . . . . . . . . . . . . . . . . . . Intended Audience . . . . . . . . . . Related Documentation . . . . . . . . Document Conventions . . . . . . . . Conventions for Storage Capacity Values Window Illustrations . . . . . . . . . HP Technical Support . . . . . . . . . Subscription Service . . . . . . . . . HP Websites . . . . . . . . . . . . Documentation Feedback . . . . . . . . . . . . . . . . . . . . . . . . . . . . . . . . . . . . . . . . . . . . . . . . . .
Licensed Capacity . . . . . . . . . . . . . . . . . . . . . . . . . . . . . . . . . . . Remote Web Console Options . . . . . . . . . . . . . . . . . . . . . . . . . . . . . . 3 Using the Remote Web Console GUI . . . . . . . . . . . . . . . . Common Elements of the Remote Web Console Main File Menu . . . . . . . . . . . . . . . . . Go Menu . . . . . . . . . . . . . . . . . Help Menu . . . . . . . . . . . . . . . . Icons . . . . . . . . . . . . . . . . . . . License Key Window . . . . . . . . . . . . . .
Restoring Backups of the Configuration Files Downloading Trace Files Using the FD Dump Using Configuration File Loader . . . . . Exporting a Spreadsheet . . . . . . Editing the Spreadsheet . . . . . . . Importing the Spreadsheet . . . . . . . . Tool . . . . . . . . . . . . . . . . . . . . . . . . . . . . . . . . . . . . . . . . . . . . . . . . . . . . . . . . . . . . . . . . . . . . . . . . . . . . . . . . . . . . . . . . . . . . . . . . . . . . . . . . . . . . . . . . . . . . . . . . . .
Figures 1 ..Example of Remote Web Console Computer and SVP Configuration . . . . . . . . . . 13 2 ..Example of the Configuration Including Syslog Servers . . . . . . . . . . . . . . . 17 . . . . . . . . . . . . . . . . . . 26 . . . . . . . . . . . . . . . . . . . . . . . . . . . . . 28 5 ..Temporary Files Settings Dialog Box (For JRE 1.5) . . . . . . . . . . . . . . . . . . 28 6 ..Temporary Files Settings Dialog Box (For JRE 1.6) . . . . . . . . . . . . . . . . . . 29 7 ..
37 ..Tool Panel . . . . . . . . . . . . . . . . . . . . . . . . . . . . . . . . . . 38 ..The Set Env. Dialog Box (Control Panel) . . . . . . . . . . . . . . . . . . . . . . 76 77 39 ..The Download Dialog Box (Control Panel) . . . . . . . . . . . . . . . . . . . . . 79 40 ..The Restore Dialog Box (Control Panel) . . . . . . . . . . . . . . . . . . . . . . 80 41 ..Install/Uninstall Error Dialog Box . . . . . . . . . . . . . . . . . . . . . . . . . 84 42 ..The New User Dialog Box . . . . . . . . . . .
Tables 8 1 ..Document Conventions . . . . . . . . . . . . . . . . . . . . . . . . . . . . . 2 ..Example of Device Numbers for Each CU . . . . . . . . . . . . . . . . . . . . . 10 19 3 ..Remote Web Console Requirements (for Windows) . . . . . . . . . . . . . . . . . 22 4 ..Supported Web Browser and Java Runtime Environment (for Windows) . . . . . . . . 23 5 ..Remote Web Console Requirements (for UNIX) . . . . . . . . . . . . . . . . . . . 24 6 ..
About this Guide This document provides instructions for installing and using the Remote Web Console web client Java application program for the HP storage system. The term storage system in this guide refers to an HP StorageWorks XP24000 Disk Array. Intended Audience This document assumes the following: • The user is familiar with the operating system and web browser software on the system hosting the Remote Web Console software.
In the Storage section, click Storage Software and then select the product. Document Conventions Table 1 Document Conventions Convention Element Blue text: Table 1 Cross-reference links and e-mail addresses Blue, underlined text: http://www.hp.
Subscription Service HP recommends that you register your product at the Subscriber’s Choice for Business website: http://www.hp.com/go/e-updates After registering, you will receive e-mail notification of product enhancements, new driver versions, firmware updates, and other product resources. HP Websites For additional information, see the following HP websites: • http://www.hp.com • http://www.hp.com/go/storage • http://www.hp.com/service_locator • http://www.hp.
About this Guide
1 About Remote Web Console Operations Storage System Web Server and Java Client Remote Web Console is the interface for various Java applications that enable you to manage the storage system. Applications run on the Java Virtual Machine (JVM) and are launched by Java Web Start through the web browsers on a Java client. The Java clients that run Remote Web Console applications are also called Remote Web Console computers. The storage system service processor (SVP) is the computer inside the storage system.
• View the storage system information • You can view storage system and LDEV information in the Identity window (“Identity Window” on page 54). • You can view the mounted status of ports in the Port Status window (“Port Status Window” on page 58). • You can view specific LUN, LDEV, and port values in the Reports Display dialog box, which is different from the Remote Web Console main window (“Reports Display Dialog Boxes” on page 69).
User Access Levels To use Remote Web Console, you need a user account. Remote Web Console user accounts contain the following information: • • • • User ID User type Password Operation authority For Remote Web Console, the default user account is administrator. By default, operation authority for all functions of Remote Web Console and program product options is given to the administrator user account. You cannot delete the administrator user account.
• View: If you have this authority, you can view the operation authority of all user accounts. You cannot add, change and delete the user accounts. However, you can change your own password. • Disable: You cannot view or change settings of other user accounts. However, you can change your password, and view the operation authorities for your user account.
The audit log is also stored in the SVP. The audit log that is stored in the SVP has the same format as the audit log that is transferred to syslog servers. You can download the stored audit log to the Remote Web Console computer as a syslog information file. Only the storage administrator can configure syslog servers for transferring the audit log or can download the syslog information file.
You need to change the SVP (Web server) to Apache, which supports SSL, in order to perform SSL-encrypted communication. Your HP service representative will change the SVP to the SSL-supported Apache. Important Terms and Concepts The Remote Web Console user should be familiar with the following terms and concepts: • Disk controller frame. The storage system has one disk controller frame that controls all data access and storage operations.
Table 2 Example of Device Numbers for Each CU CU Num ber Possible Device Numbers CU Num ber Possible Device Numbers CU Num ber Possible Device Numbers CU Num ber Possible Device Numbers 0 0:00 to 0:FF 10 10:00 to 10:FF 20 20:00 to 20:FF 30 30:00 to 30:FF 1 1:00 to 1:FF 11 11:00 to 11:FF 21 21:00 to 21:FF 31 31:00 to 31:FF 2 2:00 to 2:FF 12 12:00 to 12:FF 22 22:00 to 22:FF 32 32:00 to 32:FF 3 3:00 to 3:FF 13 13:00 to 13:FF 23 23:00 to 23:FF 33 33:00 to 33:FF 4 4:00 to
About Remote Web Console Operations
2 Installation Requirements and Procedures System Requirements The Remote Web Console Java application is downloaded from the SVP to the Remote Web Console computer. The application runs in Remote Web Console, and communicates with the attached storage systems via the TCP/IP network. The Remote Web Console software has the following system requirements: • Storage systems. The Remote Web Console can be attached to multiple storage systems of the same type (such as HP XP24000 Disk Array).
Table 3 Remote Web Console Requirements (for Windows) Item Requirement for Windows System Operating System Windows 2000 (Service Pack 2 or later) Windows Pack 2 or Windows Windows R2 XP (Service later) Server 2003 Server 2003 Processor (CPU) Intel Pentium 4 2.4 GHz or better Recommended: Pentium 4 3 GHz or better • Pentium 4 2.4 GHz or better Recommended: Pentium 4 3 GHz or better • AMD64/EMT64 • Pentium 4 2.
Table 4 Supported Web Browser and Java Runtime Environment (for Windows) Operating System CPU Web Browser Windows 2000 (SP2) Pentium 4 Internet Explorer 5.0 (SP3) JRE 1.5.0_11 Windows XP (SP2) Pentium 4 Internet Explorer 6.0 (SP2) JRE 1.4.2_08 JRE 1.5.0_07 JRE 1.5.0_11 Internet Explorer 7.0 JRE 1.6.0_01 Internet Explorer 6.0 (SP2) JRE 1.5.0_11 Internet Explorer 7.0 JRE 1.6.0_01 Internet Explorer 6.0 (SP2) JRE 1.5.0_07 JRE 1.5.0_11 Internet Explorer 7.0 JRE 1.6.0_01 Internet Explorer 6.
Table 5 Remote Web Console Requirements (for UNIX) Item Requirement for UNIX System Operating System Solaris 8, Solaris 9, or Solaris 10 HP-UX 11.0, HP-UX 11i, or HP-UX 11.31 Red Hat Enterprise Linux AS Ver2.1 and Ver4.0 Processor (CPU) • Solaris 8, Solaris 9 800 MHz UltraSPARC II or better • Solaris 10 AMD 64/EMT64T • HP-UX 11.0, HP-UX 11i 800 MHz PA-8000 or better • HP-UX 11.31 Itanium 2 Pentium 4 2.
Caution: Do not access any unreliable websites from your Remote Web Console computer. To configure your web browser: 1. Make sure that the Remote Web Console is connected to a network via a LAN. Caution: Using a modem for network connections is not supported. 2. Make sure that cookies are enabled on the browser. For Internet Explorer, click Tools, Internet Options on the menu bar of the web browser, and then click the Privacy tab. Click Advanced in the middle of the Privacy dialog box.
Caution: To allow Remote Web Console to access the SVP via a proxy server using HTTP, you need to set the proxy server on your web browser, and then Remote Web Console accesses the SVP using the proxy server. If you have set the SVP as an exception on the proxy setting of the web browser, this means that the proxy server is not used for accessing the SVP. You need to make the same setting for Java. This section describes the procedures to configure Java execution for each JRE version. JRE 1.4 For JRE 1.
2. 3. 4. 5. 6. 7. 8. 9. 10. 11. • For Windows: Double-click the icon with the label Java on the Windows Control Panel to start Java Control Panel. • For UNIX: There are two kinds of procedures for UNIX as follows: Execute the executable file ControlPanel. The file is stored in one of the following locations: /jre/bin/ControlPanel /jre/ControlPanel /jre/ControlPanel Or, use the web browser to display the Control Panel page.
Figure 4 Advanced Dialog Box Figure 5 Temporary Files Settings Dialog Box (For JRE 1.
Figure 6 Temporary Files Settings Dialog Box (For JRE 1.6) Remote Web Console Conventions General Parameters • In most Remote Web Console windows, if you change a value, the text color of that value changes to blue or the icon changes, but the changes are not implemented until you click Apply. Table 7 on page 30 describes the text colors and font types displayed on the Remote Web Console windows.
attempt the following actions: clicking Apply, Refresh ( ), or Refresh All ( ) on the File menu, ). You can only see information on Remote Web Console. or mode changing buttons ( or • When the HP StorageWorks XP Business Copy Software or ShadowImage for Mainframe quick restore operation is being performed, a Remote Web Console window may display old information (status before the quick restore operation) on logical volume (LDEV) configurations.
• On rare occasions, the shape of the icon (object) does not change after the drag and drop operation, but this is not a problem. Note: See “UNIX” on page 31 for notes on using Remote Web Console on UNIX workstations. Note: See “Troubleshooting” on page 101 for troubleshooting errors and actions during operations on the Remote Web Console computer.
window. Before you can use the Remote Web Console main window, close the obscured dialog box first. Windows Server 2003 If you are using a Windows Server 2003 computer, the following operations are necessary. • When you use the Remote Web Console for the first time: You must perform the following operation in Internet Explorer before using the Remote Web Console. 1. Click Tools and then Internet Options on the menu bar of Internet Explorer. The Internet Options dialog box appears. 2. Click the Advanced tab.
7. Click Close to close the Trusted sites dialog box. 8. Click OK to close the Security dialog box. Figure 8 Security Dialog Box (Internet Options, Internet Explorer) Figure 9 Trusted sites Dialog Box (Internet Explorer) Starting Up and Logging Into Remote Web Console This section provides an overview of the login procedure and how to log in to a storage system.
Overview of Login Procedures All Remote Web Console (Java client) users are required to log in to the Remote Web Console SVP (web server) with a valid user ID and password before executing the Remote Web Console Java application program. You need the user account for which the Account Administrator Role is set to Modify to register the Remote Web Console user accounts (see “Account Window” on page 61). The following figure shows an overview of the login process.
Restriction on Accessing Local Client Files The Java application has a strong security feature. Because of this feature, a user is not allowed to access local client files for the operation in the sandbox of a Java application. However, this sandbox security restriction can be lifted and the user can access the local files from Remote Web Console, because the electronic signature is given to the Remote Web Console Java application. The following figure shows the concept of the Java application security.
If you click Start, you are allowed to log in to Remote Web Console. As you click Start, you are allowed to access the local files during the Remote Web Console operation. You need to access the local files to use Remote Web Console. • Details If you click Details, you can view detailed information about the Java application. • Exit If you click Exit, you are not allowed to log in to Remote Web Console. • For JRE 1.5 or JRE 1.6 Figure 13 Warning - Security Dialog Box (for JRE 1.
2. Enter the IP address or fully qualified DNS name of the SVP in the web browser. The Login dialog box appears (see Figure 14 on page 37). Note: If the SVP is set to support SSL-encrypted communication, security messages might appear. For details, see “Using SSL-Encrypted Communication” on page 38. Note: If you are using a Windows Server 2003 computer, a message as shown in Figure 18 on page 40 may appear. If this message appears, take the following steps in “Using Windows Server 2003” on page 39.
Figure 15 Error Message on JRE Installation Using SSL-Encrypted Communication If the SVP is set to support SSL-encrypted communication, the Security Alert dialog box (see Figure 16 on page 38) is displayed when you log in to Remote Web Console. Click OK on the Security Alert dialog box. Furthermore, the Security Alert dialog box for the certificate (see Figure 17 on page 39) may also be displayed.
Note: Displayed statements and icons may be different. Figure 17 The Security Alert Dialog Box for the Certificate Using Windows Server 2003 If you are using a Windows Server 2003 computer, a message as shown in Figure 18 on page 40 may appear during the login operation. If this message appears, take the following steps: 1. Click Add in the message dialog box. The Trusted Sites dialog box appears (see Figure 9 on page 33). 2.
Figure 18 Internet Explorer Message (when Logging In to the SVP from a Windows Server 2003 Computer) Changing Between View Mode and Modify Mode Remote Web Console has two operation modes: Modify mode and View mode. • View mode lets you view settings of the storage system. The operation mode is View mode when you log in to Remote Web Console. • Modify mode lets you lock the setting operation of other users so that they cannot change the settings of the storage system.
• When you change the storage system settings in View mode, Remote Web Console automatically locks the setting operations by other users when the user applies the desired changes on the window. Operating in View mode requires less time to lock the setting operations by other users than operating in Modify mode.
Figure 20 Overview of License Keys and Option Installation The following table describes the types of license keys: Table 9 License Key Type Description Expiration Usable Capacity Temporary License key for trial use (Try & Buy). 120 days No upper limit Permanent License key for purchase. No limit Each program product option has an upper limit of the volume capacity that can be used. Term License key for purchase.
• The configuration settings that were made before the temporary license key expired remain in effect and cannot be deleted. Permanent Key A permanent key is purchased if you want to use program product options indefinitely. A permanent key has an upper limit of volume capacity that can be used for each program product option. Before purchasing the permanent key, you need to estimate the volume capacity that can be used for the program product option. This volume capacity is called the licensed capacity.
Note: When the license key for a program product expires, the license key of a program product which requires the expired program product will be also disabled. Licensed Capacity The licensed capacity is volume capacity that you are licensed to use with a program product option. You need to estimate the amount of volume capacity that you want to use with the program product option before you purchase the permanent key or the term key.
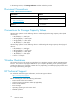
Remote Web Console Options The following table lists the options for the Remote Web Console and the licensed capacity type. Table 12 Remote Web Console Options Notes Option Name Licensed Capacity Web Console (includes the Java API and the SNMP Agent) Mounted Capacity Java application programs that are downloaded from the SVP to the Remote Web Console. LUN Manager Mounted Capacity Used only for open-systems devices.
Option Name Licensed Capacity Volume Security Port Security Opt. for Mainframe Mounted Capacity Volume Retention Manager for Mainframe Mounted Capacity Data Retention Utility Mounted Capacity HP XP External Storage Used capacity HP XP Disk/Cache Partition Unlimited Notes You may use up to 4 CLPRs without the HP StorageWorks XP Disk/Cache Partition license key. For how to create a CLPR, see the HP StorageWorks XP24000 Disk/Cache Partition User’s Guide.
3 Using the Remote Web Console GUI There are two main URLs used for accessing the Remote Web Console features: • Remote Web Console main GUI (“Starting Up and Logging Into Remote Web Console” on page 33) When you perform operations on the Remote Web Console main window, other windows (“License Key Window” on page 50 and “Configuration File Loader Window” on page 68) or the Reports Display dialog box (“Reports Display Dialog Boxes” on page 69) are displayed.
Figure 21 The Remote Web Console Main Window The Remote Web Console main window has the following features: • • • • • File menu (see “File Menu” on page 48) Go menu (see “Go Menu” on page 49) Help menu (see “Help Menu” on page 49) Icons (see “Icons” on page 49) The Apply button applies all the changes or settings made on the Remote Web Console main window. Note: This button is active only when you are in the modify mode.
all information displayed on the Remote Web Console is reacquired from the storage system; therefore, it takes time for the processing to complete. While the update is in progress, the system status keeps changing and other users are not allowed to operate from the Remote Web Console windows. A maintenance operation for the storage system or an SVP operation by the HP service representative is not allowed, either.
: Normal, : Warning, : Abnormal) indicate the subsystem error • The status lamp icons ( status by color (blue: normal, yellow: warning, red: abnormal) according to the host SIM status. For details, check the Alerts window (see “Alerts Window” on page 59). : Unlocked, : Locked) indicate the operation mode of all currently • The exclusive lock icons ( logged-in users. If all users are viewing the information in view mode, the blue unlocked icon ( ) is displayed.
Figure 22 The License Key Window The License Key window has the following features: • License Key List (“License Key List” on page 51) • Total Storage The Total Storage graphic is on the lower left corner of the License Key window, and displays the total volume capacity currently available in the storage system.
• Option name • • • • indicates Installed; indicates Not • Icon that indicates whether the option is available ( Installed) The Key Type column shows the license type: Permanent, Term, Temporary or Emergency. When no license key is installed, Not Installed is displayed.
Table 13 License Key Status Icons License Key Status Not installed. Installed with the Permanent key. Installed with the Term key and set to enable. Installed with the Term key and set to disable. License Key Window Display Icon Product Name (Note 1) Key Type Permitted Volume Term (days) Status : (Not Installed).
Note 3: You will be charged for the capacity that you use for program products such as the copying options (for example, Continuous Access and Business Copy), Volume Retention Manager, and Data Retention Utility. For these program products, X TB (Y TB) is displayed. X indicates the licensed capacity, and Y indicates the used capacity. License Install Box License Install is on the right side of the License Key window.
Figure 23 The Identity Window The Information window has the following features: • Device Information (see “Device Information” on page 55) • LDEV Information (see “LDEV Information” on page 56) • The Apply button applies all the changes or settings made on the Remote Web Console main window. Note: This button is active only when you select modify mode. • The Cancel button cancels the changes or settings made on the Remote Web Console main window.
alphanumeric characters (ASCII codes), except for some symbols, such as ", \, ;, :, ,, *, ?, <, >, |, /, ^, &, and %. You can also use a space, except for before and after the contact information. If you enter a space before or after the contact information, an error occurs when you click Apply. The contact name is required to use SNMP Agent. For detailed information on SNMP, see the HP StorageWorks XP24000 SNMP Agent Reference Guide.
Figure 24 Volume Type and Capacity in LDEV Information Volume Type You can select the type of volume capacity information from the Volume Type drop-down list. The types that can be selected from the drop-down list are as follows: • Total Volume: information on the all the volumes is displayed. • Internal Volume Only: information only on the internal volumes is displayed. • External Volume Only: information only on the external volumes is displayed.
• Reserved Capacity - displays the capacity of open volumes (LDEVs) in the storage system that are reserved by Auto LUN. The percentage (%) to total capacity of open system volumes is displayed in parentheses, as well as in the pie chart indicated by the pink area ( ). For further information on Auto LUN, see the HP StorageWorks XP24000 Auto LUN Software User’s Guide.
Figure 25 The Port Status Window Cluster-1 and Cluster-2 in the Port Status window indicate the clusters. The ports of Cluster-1 are listed on the upper part, and the ports of Cluster-2 are listed on the lower part of the Port Status window. Each cluster has 16 PCBs (Printed Circuit Board) and the name of each PCB is displayed on the header of the port list. The icons show the port name, port LED status, and equipment information for the port.
Figure 26 The Alerts window The Alerts window has the following features: • Ref. Code displays the SIM Reference Code. Note: When the SIM reference codes in the following table are displayed, you are required to resolve the error. For details on how to resolve the error, see the HP StorageWorks XP24000 Snapshot User’s Guide or the HP StorageWorks XP24000 Thin Provisioning User’s Guide. Table 14 SIM Reference Codes Reference Codes (Note) Description 601XXX These reference codes are for XP Snapshot.
Table 15 Severity Level Severity Level Description Good No error occurs and the status is good. Service Service and Moderate do not require immediate attention and are addressed during routine maintenance. Moderate Serious Acute Contact HP technical support. Follow up with technical support to verify that the problem has been resolved. See “Troubleshooting” on page 101 for further information on troubleshooting.
Figure 28 The Account Window The Account window has the following features: • • • • Account Information Tree (Section “Account Information Tree” on page 62) User Information (Section “User Information” on page 63) Permission Information List (Section “Permission Information List” on page 63) The Apply button applies all the changes or settings made for user accounts. This button is not available in view mode. • The Cancel button cancels the changes or settings for user accounts.
User Information On the upper right of the Account window, User Information is displayed. You can edit and view the authority of registered user accounts in User Information. User Information consists of the following items: • User ID: The user ID that is set when the user account was registered is displayed. • SLPR ID: SLPR ID indicates the user type of the user account. SA is displayed for storage administrators.
For the user accounts of storage administrators, you can set the permission for all of the functions. For storage partition administrators, the available functions are different from those of storage administrators. Table 16 on page 64 also shows the availability of each function for storage partition administrators. • Permission: Kind of permission for the operation of each function. There are two kinds of permissions as follows: • Modify: The user can use the function to perform the operation.
Icon Function Function Detail Availability of Functions for Storage Partition Administrator Operation Authority Required to Perform Functions ShadowImage for Mainframe ShadowImage for Mainframe Not available Mainframe Connection Parallel Access Volume Not available HP StorageWorks XP Volume Security Not available Volume Retention Manager Not available Data Retention Utility Data Retention Available HP StorageWorks XP External Storage Software External Storage Not available Configuration
Figure 29 The Login Message Window The Login Message window has the following features: • Login Message You can enter alphanumeric characters (ASCII codes) and some symbols. You can enter up to 2,408 letters. The message that you enter in this text box will be displayed in the Remote Web Console login window. • The Apply button applies all the changes or settings made. This button is not available in the View mode. • The Cancel button cancels the changes or settings.
Figure 30 The Syslog Window The Syslog window has the following features: • Output to Primary Server: You can specify whether to transfer the audit log to the syslog server. This item allows you to specify whether to transfer the audit log to the primary syslog server. To transfer the audit log to the primary syslog server, select Enable. If you do not want to transfer the audit log to the primary syslog server, select Disable.
In the syslog information file that is stored in the SVP, the detailed information is always stored regardless of this setting • Download Syslog: As you click Download, you can download the syslog information file to the Remote Web Console computer. • Apply: The Apply button allows you to apply all the settings made on the Syslog window. This button is available only when you are in modify mode. • Cancel: The Cancel button allows you to cancel all the settings made on the Syslog window in modify mode.
Note: If you use the Mozilla web browser, the Download Manager dialog box may display • • • • • • when you click Import. If this occurs, close the Download Manager dialog box and continue the operation. The Export button allows you to export the current spreadsheet file. For instructions on exporting the spreadsheet file, see “Exporting a Spreadsheet” on page 95. Note: If you use the Mozilla web browser, the Download Manager dialog box may display when you click Export.
• when the operation mode is changed from View mode to Modify mode on the Remote Web Console main window. Common Elements All Reports Display dialog box displays the following items. • If the volume is a LUSE volume, you can display the detailed information for the LUSE volume. If you select a LUSE volume in the list on the LUN dialog box or the LDEV dialog box, and right-click, the Detail Information command is displayed.
• SLPR drop-down list: You can display the information on a particular SLPR when you select the SLPR from the SLPR drop-down list. If you have logged in as a storage partition administrator, only information about the allocated SLPR is displayed, and you cannot select other SLPRs in this drop-down list. • Type drop-down list: You can select a port type, and only information about the selected port type is displayed on the Port list.
Figure 33 The LUN Window (Reports Display) The displayed items on the LUN dialog box are as follows: • SLPR drop-down list: You can display the information about a particular SLPR when you select the SLPR from the SLPR drop-down list. If you have logged on as a storage partition administrator, only information about the allocated SLPR is displayed, and you cannot select other SLPRs from this drop-down list.
• Capacity: Volume capacity. For an expanded (LUSE) volume, the total capacity of the LDEVs that consist of the LUSE volume is displayed. • RAID: RAID level. • Paths: Number of LU paths. LDEV Window For more detailed information about the displayed items, see the HP StorageWorks XP24000 Virtual LVI/LUN (VLL) and Volume Shredder User's Guide.
• Capacity: Volume capacity. Open-system volumes are displayed in gigabyte (GB), mainframe volume are displayed in cylinder (Cyl). For an expanded (LUSE) volume, the capacity of the each LDEV is displayed. • RAID: RAID level. • Internal Volume Information: The hard disk type of internal volume is displayed as follows: The blank indicates Fibre Channel drive. A hyphen (-) indicates external volume. • Parity Group: Parity Group. • Paths: Number of LU paths.
Figure 35 The Connected Host Window (Reports Display) The displayed items on the Connected Host dialog box are as follows: • LDKC drop-down list: You can select the LDKC for which information is to be displayed from the drop-down list. • CU drop-down list: You can select the CU for which information is to be displayed from the drop-down list. • Connected Host list: Following items are displayed in the Connected Host list: • No. Indicates the sequential number of the list.
When you click Detail Information, detailed information about the LUSE volume is displayed on the Detail Information dialog box. Figure 36 The Detail Information Dialog Box (Reports Display) The Detail Information dialog box displays the same items as the LDEV list in the LDEV dialog box (see “LDEV Window” on page 73). Tool Panel The Tool Panel allows you to launch multiple dialog boxes, which enable you to specify environment parameters of Remote Web Console, or configure SSL-encrypted communications.
• Set Up HTTP Blocking (see your HP service representative) • Release HTTP Blocking (see your HP service representative) Control Panel From the Control Panel, the storage administrator can, for example, set Remote Web Console environment parameters, and download files of configuration information. To open the Control Panel for Remote Web Console, click Control Panel in the Tool Panel dialog box (see “Tool Panel” on page 76) and log in from the displayed dialog box.
• Number of current user entries - Shows the number of user entries currently registered in the user account list. • Automatic distribution of Java plug-in - The Java Runtime Environment (JRE) is required to use Remote Web Console, but if a Remote Web Console computer (Java client) does not have the JRE, the following will be executed when the user logs in to the SVP. • For Windows: the SVP automatically distributes and installs the appropriate JRE into that Remote Web Console computer.
Before the parameters are submitted, a confirmation message is displayed. After the parameters have been submitted, another message is displayed, which requires re-login to update the parameters. • Reset - Resets the Remote Web Console settings to the defaults. Download Dialog Box The Download dialog box allows you to download files of the Remote Web Console configuration information. To open the Download dialog box, click the Download tab in the Control Panel.
• The Submit button opens the Download File dialog box (see Figure 44 on page 91) to download the selected files. • The Reset button clears all the check boxes. Restore Dialog Box The Restore dialog box allows you to restore the downloaded backup files of the configuration information for Remote Web Console. To open the Restore dialog box, click the Restore tab in the Control Panel.
• The Next button allows you to go on to the next step of the restoring backup file operation. You need to specify the restoring file in Upload File, and then you can click Next. • The Reset button clears all the check boxes and text boxes.
Using the Remote Web Console GUI
4 Performing Remote Web Console Operations Enabling and Disabling Remote Web Console Options To activate the program product options of the storage system on Remote Web Console, the program product options need to be installed using license keys. This section describes the program product options on Remote Web Console, and the procedures for installing and uninstalling the program product options from the License Key window (see “License Key Window” on page 50).
Enabling Options Using a License Key File You can enable multiple options in a single procedure, using a license key file. The license key files are provided by HP. To install Remote Web Console options on the Remote Web Console using the license key file: 1. 2. 3. 4. 5. 6. Log in to the Remote Web Console and open the License Key window (“License Key Window” on page 50). Change to Modify mode. From Mode, click File. The Browse button becomes available.
Table 17 Conditions to Enable Available Button Relationship between Mounted Capacity of Disk Drives and Licensed Capacity Availability of the Available Button Mounted capacity ≤ Licensed capacity Available Mounted capacity > Licensed capacity Not available To install Remote Web Console options automatically on the Remote Web Console using the Available button: 1. Log in to the Remote Web Console and open the License Key window (“License Key Window” on page 50). 2. Change to Modify mode. 3.
8. Click Apply (or Cancel). The status of the uninstalled option changes from Installed to Not Installed. Caution: On rare occasions, a program product option that is displayed as Not Installed, but still has available licensed capacity (shown as XX TB), might remain in the list. In this case, select that option and select Uninstall to reset information about the option.
2. Change to Modify mode (see “Changing Between View Mode and Modify Mode” on page 40). 3. In the Account Information tree, select the folder to which you want to register a user account. To register a user account as a storage administrator, select the SA folder. To register a user account as a storage partition administrator, select the folder of SLPR No. to which you want to register the user account. 4. Right-click the folder to which you want to register a user account.
2. Change to Modify mode (see “Changing Between View Mode and Modify Mode” on page 40). 3. In the Account Information tree, open the folder to which the user account for which you want to change the password is registered. 4. In the Account Information tree, select the user ID of the user account for which you want to change the password. 5. Right-click on the user ID, and then select the Change Password command. The Change Password dialog box (Figure 43 on page 88) is displayed. 6.
b. Right-click the mouse and then select the operation authority (View or Modify). The selected authority is displayed in the Permission column. 7. To change the operation authority for multiple user accounts at one time, repeat steps 3 through step 6. 8. Click Apply. The settings are applied to the storage system. Enabling or Disabling User Accounts To set a user account to enable or disable, log in with a user account for which Modify is set for the Account Administrator Role.
Caution: If you edit the Remote Web Console environment parameters to change the settings, you must back up the Remote Web Console configuration file by downloading the file from the SVP. For instructions on downloading the configuration file, see “Downloading the Configuration Files” on page 90. The Set Env. dialog box of the Control Panel (see “Set Env.
6. On the Download File dialog box, confirm that the selected files are marked with a colored icon, and then click Download. The File Download dialog box opens. 7. On the File Download dialog box, click Save. The Save As dialog box opens. Note: The compressed file to be downloaded is automatically named; however, you can change the name. 8. Specify the name of a folder in which to save the compressed file, and click Save. When download is complete, the Download Complete dialog box appears. 9.
3. 4. 5. 6. 7. 8. 9. 10. 11. 12. The Control Panel of the Remote Web Console is displayed. If the SVP is set to support SSL-encrypted communication, security messages might appear. For details, see “Using SSL-Encrypted Communication” on page 38. Click the Restore tab to open the Restore dialog box (see “Restore Dialog Box” on page 80). Check the check box for Archive File and click Browse to specify the directory of the file. Click Next. A confirmation message is displayed.
Figure 46 The Password Check Dialog Box Figure 47 The Restore File Dialog Box Downloading Trace Files Using the FD Dump Tool The Remote Web Console supports the FD Dump Tool function. The FD Dump Tool function is available only to storage administrators, and enables storage administrators to download the Remote Web Console configuration information from the SVP either onto a floppy disk or onto a hard disk drive.
2. 3. 4. 5. 6. 7. 8. The login dialog box is displayed. Enter the user ID and password, and click Login. The Download Trace Files dialog box is displayed (see Figure 48 on page 94). If the SVP is set to support SSL-encrypted communication, security messages might appear. For details, see “Using SSL-Encrypted Communication” on page 38. Click Normal Trace. Click Next >>. A message that confirms the execution of compression of the trace files is displayed. Click OK.
Figure 50 The Download Trace Files Dialog Box 3 for Starting Download Using Configuration File Loader This section explains how to export or import a spreadsheet file using Configuration File Loader. For the format of a spreadsheet file, see the corresponding document of program product options. Note: The instructions in this section assume the use of Microsoft Excel 2000. Microsoft Excel is recommended for best compatibility. Exporting a Spreadsheet To export a spreadsheet file: 1. 2. 3. 4. 5. 6. 7. 8.
Figure 51 The Export Dialog Box Editing the Spreadsheet Note: The instructions explained in this section assume the use of Microsoft Excel 2000. If you use a different spreadsheet software, all values must be displayed in text format. To edit a spreadsheet file: 1. 2. 3. 4. 5. 6. 7. 96 Launch Microsoft Excel, click File and Open, then open the exported spreadsheet. The Text Import Wizard - Step 1 of 3 dialog box is displayed.
Figure 52 Text Import Wizard - Step 1 of 3 Dialog Box Figure 53 Text Import Wizard - Step 2 of 3 Dialog Box XP24000 Remote Web Console User’s Guide 97
Figure 54 Text Import Wizard - Step 3 of 3 Dialog Box Note: In the Data preview, you need to select the row with the largest number of columns. Importing the Spreadsheet After you have edited the spreadsheet, you will import the spreadsheet file. The Import button allows you to import the edited spreadsheet file. To import the spreadsheet file: 1. 2. 3. 4. 5. 6. 7. 8. 98 Log in to Remote Web Console, and open the Configuration File Loader window (see “Configuration File Loader Window” on page 68).
Figure 55 The Import Dialog Box XP24000 Remote Web Console User’s Guide 99
Performing Remote Web Console Operations
5 Troubleshooting General Troubleshooting For troubleshooting information on the storage system, see the HP StorageWorks XP24000 Disk Array Owner's Guide. For a complete list of Remote Web Console error codes, see the HP StorageWorks XP24000 Remote Web Console Error Codes. The user is responsible for the operation and normal maintenance of the Remote Web Console computer. Here are some guidelines for troubleshooting the Remote Web Console computer: • Check the cabling and the LAN.
Error Condition Probable Cause / Recommended Action Only the Exit button, the Refresh, and Refresh All commands are effective when accessing the SVP from the Remote Web Console. The SVP might not be ready or perform some write processes from the other system. Wait for a while, and then click the Refresh command in the File menu. If the SVP is not restored even though you have clicked the Refresh command, click the Refresh All command.
Error Condition Probable Cause / Recommended Action Remote Web Console does not respond. Exit the Remote Web Console by pressing Ctrl key, Alt key, Shift key, and D key all at once. If you still cannot exit the Remote Web Console, restart the Remote Web Console computer, or terminate the Remote Web Console process with the following method. For Windows: Exit all applications that use Java, and then start the task manager and terminate javaw.exe and javaws.exe.
Error Condition Probable Cause / Recommended Action Incorrect Display/ Disoperation during the Remote Web Console Operation You have clicked the Basic Information command ( ), and then you have opened the setting dialog box of the other program product before the displaying processing (acquiring information for the Reports Display dialog box) has not been finished. As a result, the Reports Display dialog box remains in the status of displaying processing and does not reply.
Error Condition Probable Cause / Recommended Action The program on the SVP is updated. Exit all web browsers on the Remote Web Console computer, and then restart the browsers. If in doubt, you should exit and restart the browsers. Remote Web Console processing is temporarily delayed. An internal processing (for example, configuration change, P.P. check, operational information acquisition, etc.) might be being executed on the SVP (Web server). If you are unable to resolve an error condition.
Troubleshooting
A Glossary, Acronyms, and Abbreviations Table 19 Glossary, Acronyms, and Abbreviations CCI RAID Manager CLPR cache logical partition CPU central processing unit CU control unit CV custom-sized volume Cyl cylinder DKC disk controller DNS domain name system EMT64T Extended Memory 64 Technology FTP File Transfer Protocol Hi-Star Hierarchical Star Network HTTP HyperText Transfer Protocol IBM International Business Machines Corporation IETF Internet Engineering Task Force IP Internet
SIM service information message SNMP simple network management protocol SN Serial Number SPARC Scalable Processor ARChitecture SSL secure socket layer S VOL secondary volume SVP service processor sync synchronous TCP/IP Transmission Control Protocol / Internet Protocol UDP User Datagram Protocol URL uniform resource locator VOL volume 108 Glossary, Acronyms, and Abbreviations
Index A array group, 18 audience, 9 logging in, 36 logical partition, 75 LPAR, 75 C M contacting technical support center, 105 conventions document, 10 storage capacity values, 10 D disabling options, 85 disk array frame, 18 disk controller frame, 18 document conventions, 10 related documentation, 9 documentation HP website, 9 providing feedback, 11 E enabling options, 83 license key code, 83 license key file, 84 environment parameters, 89 modify mode, 40 O options disabling, 85 enabling, 83 enab
T technical support HP, 10 service locator website, 11 technical support center contacting, 105 U User Types, 15 110 V view mode, 40 W websites HP, 11 HP Subscriber's Choice for Business, 11 product manuals, 9 Windows requirements, 23