hp StorageWorks DAT autoloader internal model DAT 40x6i, DAT 72x6i getting started guide
open this flap for quick start installation poster
1 4 5 6
2 3 7 8 UNIX
autoload_master-frame6.
autoload_master-frame6.fm Page 2 Monday, December 29, 2003 9:28 AM © 2003-2004 by Hewlett-Packard Development Company, L.P. November 2003 Part Number: Q1566-90905 Hewlett-Packard Company makes no warranty of any kind with regard to this material, including, but not limited to, the implied warranties of merchantability and fitness for a particular purpose.
autoload_master-frame6.fm Page 3 Monday, December 29, 2003 9:28 AM Before you start HP StorageWorks DAT models This guide describes how to install and operate the following HP StorageWorks DAT models: • HP StorageWorks DAT 72x6 • HP StorageWorks DAT 40x6 Which operating systems are supported? HP StorageWorks DAT autoloaders can be connected to servers running under Windows®, NetWare, UNIX, Tru64 and Linux. Refer to the “HP StorageWorks Tape Software Compatibility” topic on our World Wide Web site (www.hp.
autoload_master-frame6.fm Page 4 Monday, December 29, 2003 9:28 AM How can I check the SCSI bus type and SCSI ID? For many operating systems, you can install HP Library & Tape Tools from www.hp.com/ support/tapetools and run the “Install Check” to check your server’s current SCSI configuration (see page 43). This will provide information about the SCSI bus and the SCSI IDs in use.
autoload_master-frame6.fm Page 5 Monday, December 29, 2003 9:28 AM Backup software and drivers Backup software For optimum performance it is important to use a backup application that is appropriate for your system’s configuration. In a direct attach environment, where the autoloader is attached to a standalone server, you can use backup software that is designed for a single server environment. In network configurations you will need backup software that supports enterprise environments.
autoload_master-frame6.
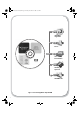
autoload_master-frame6.fm Page 7 Monday, December 29, 2003 9:28 AM Using the CD-ROM The HP StorageWorks Tape CD-ROM contains drivers, useful utilities and information to help you install and use your autoloader. Before installation, Windows and HP-UX users can use the HP Library & Tape Tools software to check SCSI ID information on the SCSI bus. Other UNIX users may like to print off the UNIX Configuration Guide.
autoload_master-frame6.
autoload_master-frame6.fm Page 9 Monday, December 29, 2003 9:28 AM Checking the SCSI connection Use the following questions to help you check your SCSI connection. As long as you have a spare drive bay in your server you should have a spare connection on the internal SCSI bus. You need to ensure it is the correct SCSI bus type. If you answer ‘Yes’ to all these questions, you are ready to install your autoloader. If you answer ‘No’, you will probably need to purchase and install additional items.
autoload_master-frame6.
autoload_master-frame6.fm Page 11 Monday, December 29, 2003 9:28 AM Step 1: Check the autoloader’s SCSI ID Note Your HP StorageWorks DAT autoloader is shipped with a default SCSI ID of 5. Each device on the SCSI bus must have a unique SCSI ID number. The autoloader can be assigned any unused ID between 0 and 15. Do not use SCSI ID 7, which is reserved for the SCSI controller. SCSI ID 0 is typically assigned to the boot disk and should also not be used unless the autoloader is on a dedicated SCSI bus.
autoload_master-frame6.
autoload_master-frame6.fm Page 13 Monday, December 29, 2003 9:28 AM Step 2: Check the option switch value (Sun systems only) Only read this section if you are installing your autoloader into a Sun workstation system running Solaris version 2.6 or below. Go to step 3 if you are using your autoloader on a UNIX system, or straight to step 4 if you are using your autoloader on a Windows PC system. The option switch setting is used to configure the autoloader for specific systems.
autoload_master-frame6.
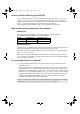
autoload_master-frame6.fm Page 15 Monday, December 29, 2003 9:28 AM Step 3: Set the configuration switches (UNIX systems only) Only read this section if you are installing your autoloader into a UNIX system. Go straight to step 4 if you are installing your autoloader into a Windows PC. 1 Check the UNIX Configuration Guide on the HP StorageWorks Tape CD-ROM for specific advice for your operating system. The following table summarizes the typical switch settings for different types of server.
autoload_master-frame6.
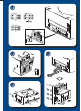
autoload_master-frame6.fm Page 17 Monday, December 29, 2003 9:28 AM Step 4: Prepare the mounting bay Warning To avoid personal injury or damage to the server or autoloader, ensure that the server is disconnected from the mains power supply while you install the drive. Caution Static electricity can damage electronic components. Always wear an antistatic wriststrap if one is available. If not, after you have disconnected power from the server and removed the cover, touch a bare metal part of the chassis.
autoload_master-frame6.fm Page 18 Monday, December 29, 2003 9:28 AM The diagram illustrates metal rails for use with a legacy HP ProLiant server. Other servers have different mounting hardware requirements. Please refer to your server documentation. Omit this step if your server does not require mounting hardware.
autoload_master-frame6.fm Page 19 Monday, December 29, 2003 9:28 AM Step 5: Attach mounting hardware If your server requires special rails or other hardware to install the autoloader, mount them on the autoloader in this step. If your server does not require special mounting hardware, proceed to “Step 6: Attach Ycable and install drive” on page 21 now. HP ProLiant servers Different models of server require different mounting methods. • Some HP ProLiant servers require mounting rails.
autoload_master-frame6.
autoload_master-frame6.fm Page 21 Monday, December 29, 2003 9:28 AM Step 6: Attach Y-cable and install drive Your autoloader is shipped with a small foam gasket on each side of the drive. This is to reduce EMI emissions but is only required, if there is a loose fit between the drive and the side of your server's drive bay. You may safely remove these gaskets, if this is necessary to allow the autoloader to be inserted.
autoload_master-frame6.
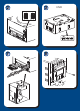
autoload_master-frame6.fm Page 23 Monday, December 29, 2003 9:28 AM Step 7: Attach power and SCSI cable 1 Attach a spare power cable from the server's internal power supply to the male end of the Ycable, as shown in figure 9, item 1. 2 Attach a spare connector on the server or HBA’s SCSI ribbon cable to the SCSI connector of the drive, as shown in figure 9, item 2. 3 If the autoloader is the last device on the SCSI chain, make sure that the SCSI cable is terminated correctly.
autoload_master-frame6.
autoload_master-frame6.fm Page 25 Monday, December 29, 2003 9:28 AM Step 8: Secure the autoloader Caution Ensure that nothing inside the server touches the changer mechanism on the top of the autoloader because it rotates during use. Mounting hardware used 1 Secure the autoloader into place. Use the screws you removed in “Step 4: Prepare the mounting bay” on page 17 to fix the autoloader in place, as shown in figure 10a. 2 Replace the cover on the server.
autoload_master-frame6.
autoload_master-frame6.fm Page 27 Monday, December 29, 2003 9:28 AM Step 9: Verify installation Once you have installed the drive hardware, you should verify that it is functioning properly before you store your valuable data. Check operation Ensure that you have downloaded any drivers and upgrades necessary for your backup application (see page 5). 1 Switch on the server. This will also switch on the autoloader.
autoload_master-frame6.
autoload_master-frame6.fm Page 29 Monday, December 29, 2003 9:28 AM To unload a magazine 1 Press the Eject button on the front panel. (See figure 12.) 2 The autoloader ejects the magazine. However, if one of the cartridges is still in the drive mechanism when you press the Eject button or the autoloader is busy, it may be a long time before the autoloader will respond to the request because it will finish the task it is performing first.
autoload_master-frame6.
autoload_master-frame6.fm Page 31 Monday, December 29, 2003 9:28 AM Your HP StorageWorks DAT autoloader There are three LEDs, an LCD, two buttons and an eject button on the front panel of your autoloader. See page 29 for more information about loading and unloading cartridges and page 50 for information about forcing ejection. Front panel LEDs There are three LEDs as illustrated in the diagram. (See figure 13.
autoload_master-frame6.
autoload_master-frame6.fm Page 33 Monday, December 29, 2003 9:28 AM Load cartridge button Press the Load Cartridge button to load the selected cartridge from the magazine into the drive and then put the autoloader into stacker mode. In stacker mode, the loaded cartridge is used first; when it is full, or the host server sends an UNLOAD command, the autoloader replaces it with the cartridge from the next highest numbered slot in the magazine. See page 29 for more information about autoloader modes.
autoload_master-frame6.
autoload_master-frame6.fm Page 35 Monday, December 29, 2003 9:28 AM Use the correct media In order to maximize drive and media reliability, normally use the autoloader to provide one week's backup per magazine. Ideally, use five cartridges and one cleaning cartridge in each magazine. This allows you to perform a full backup, up to 40 (DDS-4) GB or 72 (DAT 72) GB each working day, and ensures that the tape heads are cleaned once a week. For best performance we recommend HP branded media.
autoload_master-frame6.
autoload_master-frame6.fm Page 37 Monday, December 29, 2003 9:28 AM To clean the tape heads HP recommends weekly cleaning of the autoloader using an HP cleaning cartridge (part number C5709A). Do not use swabs or other means of cleaning the heads. The cleaning cartridge uses a special tape to clean the tape heads. A cleaning cartridge can only be used 50 times or as instructed on the cartridge packaging. Always place a check mark in a box each time you use the cartridge to clean the drive.
autoload_master-frame6.fm Page 38 Monday, December 29, 2003 9:28 AM Handling cartridges • Do not touch the tape media. • Do not attempt to clean the tape path or tape guides inside the cartridge. • Do not leave cartridges in excessively dry or humid conditions. Do not leave cartridges in direct sunlight or in places where magnetic fields are present (for example, under telephones, next to monitors or near transformers). • Do not drop cartridges or handle them roughly.
autoload_master-frame6.fm Page 39 Monday, December 29, 2003 9:28 AM Register your autoloader Once you have installed and tested your HP StorageWorks DAT autoloader, please take a few minutes to register your product. You can register via the web (www.register.hp.com). To ensure your registration is complete, there are a number of questions on the electronic form that are mandatory. Other questions are optional. However, the more you feel able to complete, the better we can meet your needs.
autoload_master-frame6.
autoload_master-frame6.fm Page 41 Monday, December 29, 2003 9:28 AM Using HP OBDR Compatibility HP One-Button Disaster Recovery is a standard feature on all HP StorageWorks DAT autoloaders. However, it can only be used with specific configurations and will only recover the server to which the autoloader is directly connected. To check whether your system (hardware, operating system and backup software) is OBDRcompatible, please refer to our World Wide Web site www.hp.com/go/connect.
autoload_master-frame6.fm Page 42 Monday, December 29, 2003 9:28 AM Testing for compatibility We recommend that you perform a full disaster recovery immediately after installation—if possible, onto a blank hard disk. If you do not have a blank hard disk and do not want to overwrite your system, you can safely cancel the disaster recovery process at step 3 in the following procedure. Refer to our connectivity web site (www.hp.com/go/connect) for more information about suitable backup applications.
autoload_master-frame6.fm Page 43 Monday, December 29, 2003 9:28 AM Diagnostic tools HP Library & Tape Tools HP Library & Tape Tools does not work on all operating systems. Compatibility information, updates, and the latest version of this software can be found at www.hp.com/support. HP Library & Tape Tools software provides free diagnostic and troubleshooting utilities. It allows you to: • Quickly identify, diagnose and troubleshoot drive and media problems.
autoload_master-frame6.fm Page 44 Monday, December 29, 2003 9:28 AM Optimizing performance Various factors can affect autoloader performance, particularly in a network environment or if the drive is not on a dedicated SCSI bus. If your autoloader is not performing as well as expected, consider the following points before contacting HP Support at www.hp.com/support. • Is the autoloader connected to a suitably-rated built-in SCSI bus or HBA, see “Why is the SCSI bus type important?” on page 3.
autoload_master-frame6.fm Page 45 Monday, December 29, 2003 9:28 AM Troubleshooting The first step in problem-solving is establishing whether the problem lies with the cartridge, the drive, the host server and its connections, or with the way the system is being operated. Most modern SCSI host bus adapters locate and display attached devices when the system is booting up. On Windows systems, if you swap or connect a product when your system is running, you will need to reboot the system.
autoload_master-frame6.fm Page 46 Monday, December 29, 2003 9:28 AM How should the SCSI bus be configured? Description Further information Correct configuration of the SCSI bus with Refer to the SCSI Configuration section in the multiple drives can be a complex area and electronic User’s Guide on the more help may be required. HP StorageWorks Tape CD-ROM.
autoload_master-frame6.fm Page 47 Monday, December 29, 2003 9:28 AM Do drivers need to be installed and, if so, which ones Description Further information It is unclear whether there is a need to install drivers onto the system, and more help is required. Detailed information specific to your system can be found on the www.hp.com/go/connect web site. Windows drivers can be obtained from the HP StorageWorks Tape CD-ROM or from www.hp.com/support.
autoload_master-frame6.fm Page 48 Monday, December 29, 2003 9:28 AM The server boots but does not recognize the autoloader Possible reason Recommended action The power or SCSI cable is not connected properly. Check that the cables to the autoloader are firmly connected. Ensure that the SCSI cable does not have any bent pins. Replace, if necessary. (Refer to the www.hp.com/go/connect web site.) The SCSI bus is not terminated correctly. Check that the SCSI bus is actively terminated.
autoload_master-frame6.fm Page 49 Monday, December 29, 2003 9:28 AM Understanding the OAR LED The amber Operator Attention Required LED indicates warning conditions, as described in the following table: LED display Meaning On A serious hardware error has occurred. • If you have just installed the autoloader, check the installation for loose connections and repeat the self-test. One of the two power cables may not be connected.
autoload_master-frame6.fm Page 50 Monday, December 29, 2003 9:28 AM Forcing ejection If you press the Eject button when the autoloader is busy, it may be a long time before the autoloader will respond to the request because it will finish the task it is performing first. However, if you need to unload a cartridge urgently, even at the risk of losing data, you must force ejection. Caution You can lose data if you force ejection.
autoload_master-frame6.fm Page 51 Monday, December 29, 2003 9:28 AM Other sources of information You will also find troubleshooting information and contact details on the HP StorageWorks Tape CD-ROM and the HP web site. In particular: • The online User’s Guide on the HP StorageWorks Tape CD-ROM contains an extensive troubleshooting topic. • The HP support web site contains a link to www.hp.
autoload_master-frame6.fm Page 52 Monday, December 29, 2003 9:28 AM Replacing your autoloader If your autoloader proves to be faulty and cannot be repaired and it is still covered by the original warranty, it will be replaced. To disconnect your autoloader 1 Unpack your replacement drive, and retain the packaging. 2 Power off the server and any other devices that are on the same SCSI bus. 3 Remove the cover from the server, see page 17.
http://www.hp.com/go/storagemedia http://www.hp.