
FW 07.00.00/HAFM SW 08.06.00 McDATA Intrepid 6064 Director Installation and Service Manual (620-000108-920, April 2005)


4
Performing Port Diagnostic Loopback Tests
4-33
Repair Information
2. At the management server, open the SAN management
application (SANavigator or EFCM).
3. At the SAN management application physical map, right-click
the product icon representing the director to be tested, then select
Element Manager from the pop-up menu. The application opens.
4. Disconnect the fiber-optic jumper cable from the port to be tested.
If a port card will be tested, disconnect all fiber-optic jumper
cables.
ATTENTION! If name server zoning is implemented by port number, ensure
fiber-optic cables that are disconnected to perform the loopback test are
reconnected properly. A cable configuration change disrupts zone operation
and may incorrectly include or exclude a device from a zone.
5. Insert a loopback plug into the port.
— If the port to be tested is shortwave laser, insert a multimode
loopback plug into the port receptacle.
— If the port to be tested is longwave laser, insert a singlemode
loopback plug into the port receptacle.
— If an entire port card will be tested, insert an appropriate
loopback plug in all port receptacles.
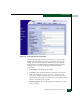
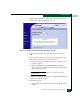
6. Select the Port Diagnostics option from the Maintenance menu. The
Port Diagnostics dialog box displays (Figure 4-16).
7. Type the port number to be tested or select all ports at the Port
Select area of the dialog box.
8. At the Diagnostics Test list box, select the External Loop option.
9. Click Next. At the Port Diagnostics dialog box, the message
Loopback plug(s) must be installed on ports being diagnosed
appears.
10. Verify a loopback plug is installed and click Next. The message
Press START TEST to begin diagnostics appears, and the Next
button changes to a Start Test button.