
FW 07.00.00/HAFM SW 08.06.00 McDATA Intrepid 6064 Director Installation and Service Manual (620-000108-920, April 2005)


5
5-28
Intrepid® 6064 Director Installation and Service Manual
Removal and Replacement Procedures (RRPs)
c. Alternately loosen each Allen screw one or two turns until
the torque tool turns freely.
6. Using the handle, pull the SBAR assembly out of the director
chassis. Support the assembly with one hand when performing
this step.
7. Place the SBAR assembly in an anti-static bag to provide ESD
protection.
Replacement To replace an SBAR assembly:
1. Remove the replacement SBAR assembly from its protective
anti-static bag.
2. Inspect the printed wiring assembly (PWA) side of the SBAR
assembly for bent or broken connector pins that may have been
damaged during shipping. If any pins are damaged, obtain a new
assembly.
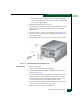
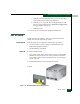
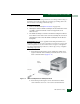
3. Orient the SBAR assembly (Figure 5-11). Insert the assembly into
the director chassis guide, then push the assembly toward the
backplane to engage the connector pins.
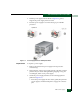
4. Tighten the brass Allen screws that secure the SBAR assembly to
the backplane as follows. Tighten the screws alternately to
prevent binding and damage to the connector pins.
a. Insert the tip of the torque tool into either brass Allen screw
(right or left side of the assembly). Turn the screw one or two
turns clockwise. As the screw turns, that side of the assembly
pulls into the backplane connector.
b. Insert the tip of the torque tool into the other brass Allen
screw. Turn the screw one or two turns clockwise. As the
screw turns, the alternate side of the assembly pulls into the
backplane connector.
c. Alternately tighten each Allen screw one or two turns until
until you feel the torque tool release and hear a clicking sound.
d. Verify the assembly is flush and even with the other SBAR
assembly in the director.
5. Disconnect the ESD wrist strap from the director chassis and your
wrist.
6. Inspect the assembly to ensure the amber LED is extinguished. If
the amber LED is illuminated, go to MAP 0000: Start MAP on
page 3-9 to isolate the problem.