
FW V06.XX/HAFM SW V08.02.00 HP StorageWorks Director Element Manager User Guide (AA-RTDUC-TE, July 2004)

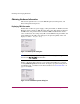
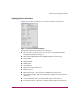


Table Of Contents
- Contents
- About this Guide
- Overview
- Feature Keys
- Managing the Director
- Element Manager Description
- Using the Element Manager
- Backing Up and Restoring Element Manager Data
- Monitoring and managing the Director
- Hardware View
- Port Card View
- Port List View
- Node List View
- Performance View
- FRU List View
- Port Operational States
- Link Incident Alerts
- Threshold Alerts
- Configuring the Director
- Configuring Identification
- Configuring Management Style
- Configuring Operating Parameters
- Configuring a Preferred Path
- Configuring Switch Binding
- Configuring Ports
- Configuring Port Addresses (FICON Management Style)
- Configuring an SNMP Agent
- Configuring Open Systems Management Server
- Configuring FICON Management Server
- Configuring Feature Key
- Configuring Date and Time
- Configuring Threshold Alerts
- Creating New Alerts
- Figure 49: Configure Threshold Alert(s) dialog box
- Figure 50: New Threshold Alerts dialog box - first screen
- Figure 51: New Threshold Alerts dialog box - second screen
- Figure 52: New Threshold Alerts dialog box - third screen
- Figure 53: New Threshold Alerts dialog box - summary screen
- Figure 54: Configure Threshold Alerts dialog box - alert activated
- Modifying Alerts
- Activating or Deactivating Alerts
- Deleting Alerts
- Creating New Alerts
- Configuring Open Trunking
- Exporting the Configuration Report
- Enabling Embedded Web Server
- Enabling Telnet
- Backing Up and Restoring Configuration Data
- Using Logs
- Using Maintenance Features
- Optional Features
- Information and Error Messages
- Index
Monitoring and managing the Director
74 Director Element Manager User Guide
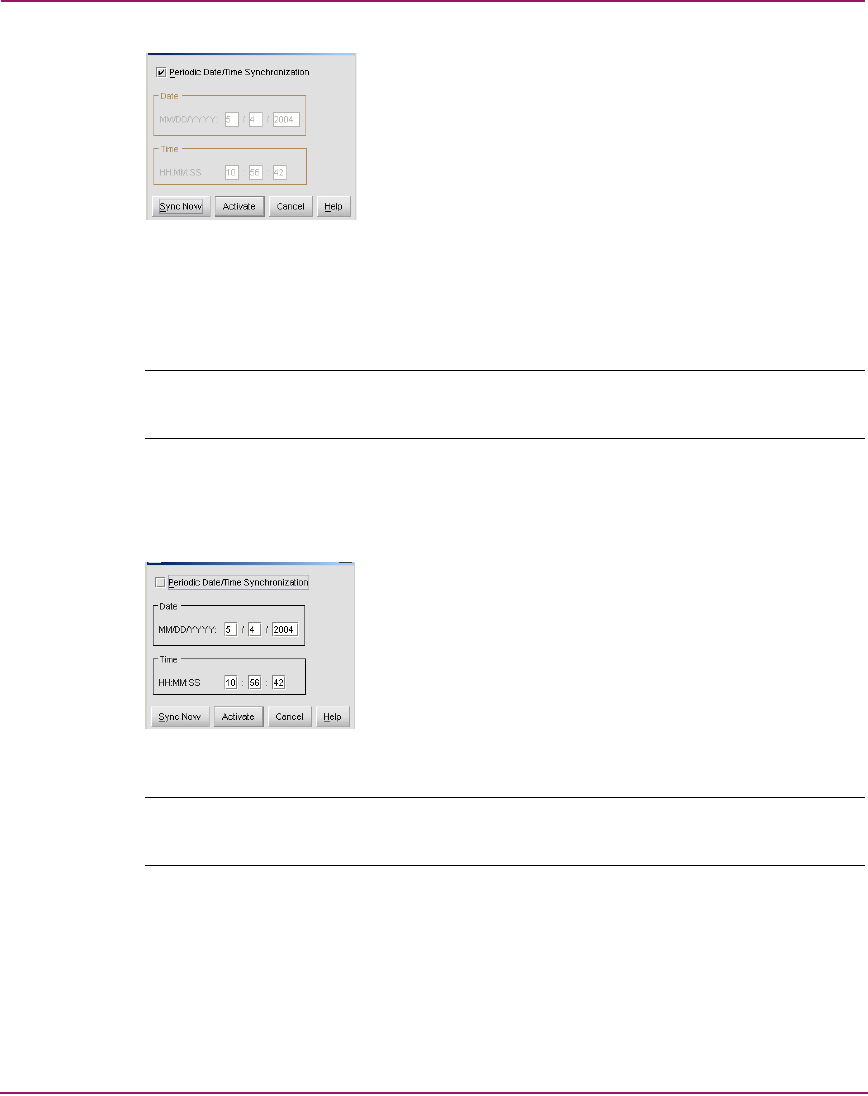
Figure 17: Configure Date and Time Periodic Synchronization dialog box
To immediately synchronize the director date and time with the HAFM
appliance, be sure the Periodic Date/Time Synchronization option is
enabled and then click Sync Now.
Note: If you enable the Periodic Date/Time Synchronization option and click
Activate,
the time will synchronize at the next update period.
To set the director with a specific date and time, make sure that the Periodic
Date/Time Synchronization field is not selected (see Figure 18). Enter the
date and time, and then click Activate.
Figure 18: Configure date and time (manually)
Note: Use the range of 0 to 23 for hours. Use the range of 0 to 59 for minutes and
seconds.
■ Set Online State—Click this option to display the Set Online State dialog
box. The dialog box displays the current state (offline or online) and provides
a button for changing the state.