
DCFM Enterprise User Manual (53-1001775-01, June 2010)


434 DCFM Enterprise User Manual
53-1001775-01
Enabling a CEE port or LAG
17
Enabling a CEE port or LAG
If you select multiple switches or multiple ports and LAGs from two or more switches, both the
Enable button and the Disable button are disabled.
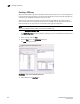
1. Select Configure > Switch > CEE from the menu bar.
The CEE Configuration dialog box displays, showing the status of all CEE-related hardware and
functions.
2. Select one or more CEE ports or LAGs (which can span multiple switches) that you want to
enable.
NOTE
All selected LAGs must be in the same state (enabled or disabled); otherwise, both the Enable
and Disable buttons are disabled.
3. Click Enable.
The selected CEE port or LAG is enabled for CEE configuration.
4. Click OK.
The CEE Confirmation and Status dialog box displays.
5. Review the changes carefully before you accept them.
6. Click Start to apply the changes, or click Close to abort the operation.
The selected CEE port or LAG is enabled for CEE configuration. (The Status column in the CEE
Configuration dialog reflects the change).
Deleting a LAG
You can only delete a link aggregation group (LAG) that is selected from a single switch. If you select
multiple switches or multiple ports from two or more switches, the Delete button is disabled.
1. Select Configure > Switch > CEE from the menu bar.
The CEE Configuration dialog box displays, showing the status of all CEE-related hardware and
functions.
2. Select one or more LAGs (that can span multiple switches) that you want to delete from the
Products/Ports table.
3. Click Delete.
4. Click OK.
The CEE Confirmation and Status dialog box displays.
5. Review the changes carefully before you accept them.
6. Click Start to apply the changes, or click Close to abort the operation.
The LAG is removed from the Products/Ports list and any of the LAG members display without
the LAG containment.