
Fabric OS Encryption Administrator's Guide v6.4.0 (53-1001864-01, June 2010)


Fabric OS Encryption Administrator’s Guide 39
53-1001864-01
Creating a new encryption group
2
10. Enter a file name, or browse to the desired location.
11. Enter the passphrase, which is required for restoring the master key. The passphrase can be
between eight and 40 characters, and any character is allowed.
12. Re-type the passphrase for verification.
13. Click Next.
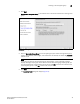
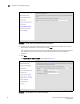
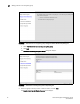
The Confirm Configuration panel displays the encryption group name and switch public key
certificate file name you specified, shown in Figure 16.
FIGURE 16 Confirm Configuration dialog box
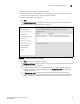
14. Click Next to confirm the displayed information.
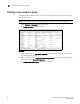
The Configuration Status displays, as shown in Figure 17. The configuration status steps vary
slightly depending on the key vault type.
• A progress indicator shows that a configuration step is in progress. A green check mark
indicates successful completion of all steps for that Configuration Item. A red stop sign
indicates a failed step.
• All Configuration Items have green check marks if the configuration is successful. A
message displays below the table, indicating that the encryption switch was added to the
group you named, and the public key certificate is stored in the location you specified.