
edge switch 2/32 product manager user guide


3–22 edge switch 2/32 product manager user guide
Configuring the Switch
Procedure
To configure SNMP traps and assign community names, use the following steps:
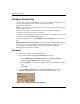
1. Choose SNMP from the Configure menu on the menu bar.
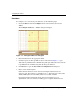
The Configure SNMP dialog box displays.
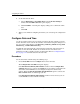
Figure 3–9: Configure SNMP dialog box
2. Click the Enable Authorization Traps field to enable authorization traps to be
sent to SNMP management stations when unauthorized stations try to access
SNMP information from the Switch.
3. Click a field in the Community Name column to choose the row. Enter the
SNMP community name for the trap recipient. Enter up to 32 characters. This also
defines community names from which SNMP managers can read MIB variables
from or write MIB variables to the Switch. Refer to the note under Configure
SNMP on page 3-21 for more information about assigning community names.
4. Click the Write Authorization check box to enable write authorization for the
community name. A check mark displays in the box to indicate that write
authorization is enabled.
5. Enter the IP address for a trap recipient (SNMP management station) by clicking
in the Trap Recipient column and entering an IP address.
NOTE: Step 6 usually is not necessary. If you do not wish to override the default UDP number,
skip to step 7.