
HP StorageWorks EML E-Series drive module replacement instructions (May 2006)


Removal
HP
StorageWorks
EML E-Series
Drive Module
Replacement
2
3
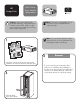
Note: You can find an animation of the
removal process on the documentation CD
that shipped with the tape library.
1
Open the back
doors of the library.
Re
mo
val
HP
S
torage
W
o
r
k
s
EML E
-Series
D
r
e
Cauti
on:
Par
ts c
a
n b
e
d
a
m
a
g
e
d
by
electro
s
t
a
tic dischar
ge.
Keep pa
r
t
s in th
eir
co
n
t
a
in
e
rs u
n
til
n
e
e
d
e
d.
E
n
s
u
re that
y
o
u
are
pr
o
per
ly
g
rou
nded w
hen
t
ouching
s
ta
t
ic
s
ensit
ive
co
mpo
n
en
ts.
N
ot
e:
Thi
s
par
t is
hot
-plug
gabl
e.
It
i
s
not
n
ece
ssa
ry
t
o power down
t
h
e
l
ibrary
t
o
add
t
his p
a
r
t,
h
ow
e
ver,
t
he
li
brary
doe
s
have to
be
pow
er
-
cyc
l
ed
wh
en adding or
replacin g
a dr
ive.
N
ot
e:
A
new
driv
e
w
il
l
not b
e
recogn
ize
d
b
y
t
he li
brary
until a
f
t
e
r
a
r
ebo
o
t
.
2
3
1
O
pen
th
e
b
a
ck
doo
r
o
f t
h
e
l
ibr
ar
y
.
h
p
S
t
o
r
a
g
e
W
o
r
k
s
E
S
L
E
-
s
e
r
i
e
s
I
n
t
e
r
f
a
c
e
M
a
n
a
g
e
r
C
au
t
i
o
n
:
P
a
r
t
s
c
a
n
b
e
d
a
m
a
g
e
d
b
y
e
l
e
c
t
r
o
s
t
a
t
i
c
d
i
s
c
h
a
r
g
e
.
K
e
e
p
p
a
r
t
s
i
n
th
e
i
r
c
o
n
t
a
i
n
e
r
s
u
n
t
i
l
n
e
e
d
ed
.
E
n
s
u
r
e
y
o
u
a
r
e
p
r
o
p
e
r
l
y
g
r
o
u
n
d
e
d
w
h
e
n
t
o
u
ch
i
n
g
s
t
a
t
i
c
-
s
e
n
s
i
t
i
v
e
c
o
m
p
o
n
e
n
t
s
.
N
o
t
e
:
T
h
i
s
p
a
r
t
i
s
n
o
t
h
o
t
-
p
l
u
g
g
a
b
l
e
.
I
t
i
s
n
e
c
e
s
s
a
r
y
t
o
p
o
w
e
r
do
w
n
t
h
e
l
i
b
r
a
r
y
t
o
r
e
pl
a
c
e
t
h
i
s
p
a
r
t
.
2
3
1
1
0
0
2
6
O
p
e
n
t
h
e
b
a
c
k
do
o
r
o
f
t
h
e
l
i
b
r
a
r
y
.
I
n
s
pe
c
t
t
h
e
c
o
n
t
e
n
t
s
o
f
t
h
e
k
i
t
.
P
o
w
e
r
d
o
w
n
t
h
e
l
i
b
r
a
r
y
.
a
.
P
l
a
c
e
t
h
e
l
i
b
r
a
r
y
o
f
f
-
l
i
n
e
b
y
p
r
e
ss
i
n
g
t
h
e
S
t
an
d
b
y
b
u
t
t
o
n
o
n
t
h
e
l
i
b
r
a
r
y
'
s
f
r
o
n
t
p
a
n
e
l.
T
h
e
l
i
b
r
a
r
y
r
o
b
o
t
i
c
s
c
o
m
p
l
e
t
e
s
a
n
y
c
u
r
r
e
n
t
c
o
m
m
a
n
d
s
a
n
d
t
h
e
n
s
t
o
p
s
.
b
.
V
e
ri
f
y
t
h
a
t
t
h
e
f
r
o
n
t
p
a
n
e
l
d
i
s
p
l
a
y
i
n
d
i
c
a
t
e
s
“
S
y
s
t
e
m
O
f
f
-
l
i
n
e
”
.
c
.
V
e
r
i
f
y
t
h
a
t
t
h
e
p
i
c
k
e
r
i
s
e
m
p
t
y
.
I
f
t
h
e
r
e
i
s
a
t
a
p
e
c
a
r
t
r
i
dg
e
i
n
t
h
e
p
i
c
k
er
,
p
e
r
f
o
r
m
a
M
o
v
e
c
o
m
m
a
n
d
t
o
p
l
a
c
e
t
h
e
c
a
r
t
r
i
d
g
e
i
n
a
n
a
v
a
i
l
a
b
l
e
s
l
o
t
.
[
C
o
n
t
e
n
t
n
e
e
d
e
d
.
]
d
.
P
r
e
s
s
a
n
d
h
o
l
d
t
h
e
p
o
w
e
r
b
u
t
t
o
n
l
o
c
a
t
e
d
o
n
t
h
e
fr
o
n
t
o
f
t
h
e
l
i
b
r
a
r
y
b
e
h
i
n
d
t
h
e
l
a
p
t
o
p
t
r
a
y
u
nt
i
l
t
he
f
r
o
n
t
p
a
n
e
l
g
o
e
s
bl
a
n
k
.
4
F
l
i
p
t
h
e
t
w
o
b
r
e
a
k
e
r
s
w
i
t
c
h
e
s
o
f
f
a
t
t
h
e
p
o
w
e
r
d
i
s
t
r
i
b
u
t
i
o
n
u
n
i
t
.
I
nspe
ct the c
ontents of
t
he kit.
Y
o
u
m
ay
need a
f
la
t
-b
lad
e
scr
e
wdriv
er
t
o
r
e
mo
ve and
r
e
p
lace
this
tape d
r
iv
e
.
I
f
you
a
r
e
remo
v
i
ng a
n
exist
i
ng
tap
e
drive,
make s
u
re
t
o
u
n
load
an
y
tap
e c
a
rtridges in
th
edrive
to b
e
r
e
mo
ved usi
n
g yo
u
r applica
tio
n
sof
t
ware or
th
e
li
br
ary
GU
I t
ou
ch
scr
e
e
n
. Use
y
our
backu
p so
f
t
w
ar
e
to cease
l
ibr
a
ry
ac
t
i
v
i
t
y.
4
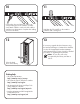
Iden
ti
f
y
t
he
tap
e
dr
i
ve
to
b
e
r
ep
la
ced
. T
he F
a
u
l
t
L
ED
l
i
g
ht may
b
e
l
it, sig
n
i
f
y
ing
a
hot
sw
ap c
a
n
o
c
c
u
r
.
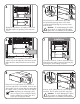
Inspect the contents of the kit. You may need a
screwdriver to remove and replace this tape drive.
If you are removing an existing tape drive,
make sure to unload any tape cartridges in
the drive to be removed using your application
software or the library GUI touch screen. Use
your backup software to stop library activity.
Caution: Parts can be damaged by
electrostatic discharge. Keep parts in their
containers until needed. Make sure that
you are properly grounded when touching
static sensitive components.
Note: This part is hot-pluggable. You do
not need to power down the library to
replace this part.