
HP StorageWorks EML E-Series drive module replacement instructions (May 2006)

Installation
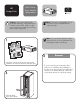
Disconnect the FC cable from the drive to
be replaced by pressing down on the cable
connector tab and pulling the connector away
from the drive.
Caution: To avoid damaging FC cables,
do not pinch or sharply bend the cables
tighter than a 5-centimeter (2-inch) diameter.
5
67
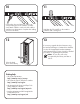
Connect an FC cable to the FC connector on the
new drive. The FC cable should click into place.
Caution: To avoid damaging FC cables,
do not pinch or sharply bend the cables
tighter than a 5-centimeter (2-inch) diameter.
9
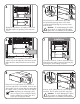
If necessary, use a screwdriver to loosen the
captive screw at the right side of the drive module.
Grasp the drive and pull the drive from the drive
bay.
To install a new drive, locate a vacant drive bay.
Remove the face plate covering the drive bay by
removing the screw holding it in place.
Remove the end cap from the FC connector on
each new tape drive to be installed. Insert the new
drive module into the vacant drive bay and tighten
the captive screw to secure the drive to the chassis.
Note: Replacing an existing tape drive
does not require power-cycling the library,
however, adding a new tape drive does
require power-cycling the library.
8
4
Identify the tape drive to be replaced. The Fault
LED light may be lit, signifying a hot swap can
occur.