
HP StorageWorks EML E-Series e2400-FC 2Gb Interface Controller Replacement Instructions (AD560-96031, September 2007)


Installation
6
7
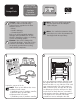
For a new
installation, remove
and discard the
appropriate slot
cover for each
controller you will
be installing. Orient
the interface
controller as shown. Align the interface controller with
the guides in the appropriate slot and slide it into the
library. Push the ejector handles inward to fully seat
the controller. Using a #1 Phillips screwdriver, tighten
the ejector handle screws.
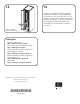
8
Use a #1 Phillips screwdriver to loosen the captive
screws in the black ejector handles at both ends of
the interface controller. Push the ejector handles
outward, and then pull on them to remove the
interface controller. Place the interface controller
into an electrostatic bag.
Removal
5
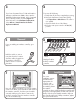
4
Unplug all cables
from the interface
controller.
LTO3
LTO4
To power off the library,
a. Verify that all jobs have completed processing.
b. Using the Operators Control Panel (OCP),
select Operations > Unlock Door. The robot is
now parked.
c. Open the back doors of the library.
d. Press the main power switch to the O (Off)
position.
Label the cables or write a
note that shows the locations
of all the cables plugged into
the interface controller to
make it easier to reconnect
them later.
If you are adding an interface controller, go to
step 8.
3
If you have Command View TL 2.0 and Interface
Manager card firmware I200 or later, start the
Hardware Replacement Wizard. In the Command
View TL Library window, click the Support tab.
In the left panel, select Hardware Replacement.
Select Actions > Launch Interface Controller
Replacement Wizard.