
HP StorageWorks ESL E-series e2400-160 Interface Controller Installation Poster (February 2004)
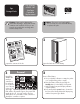

ACT/
LNK
ACT/
LNK
PORT 1 PORT 0 ETHERNET
SERIAL
PWR
FIBRE
CHANNEL
FIBRE
CHANNEL
ACT/
LNK
ACT/
LNK
PORT 1 PORT 0 ETHERNET
SERIAL
PWR
FIBRE
CHANNEL
FIBRE
CHANNEL
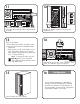
13
Power on the library.
a. Verify that power cables are firmly in place.
b. Press the power button located behind the
laptop tray.
c. After several seconds, verify that the current
state of the library appears in the System
State display on the front panel (“System On-
line” or “System Off-line”).
Note: To change the state, press the
Standby button on the front panel.
This toggles the library between on-line
and off-line states.
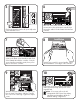
11
Secure the SCSI cables going from the controller
to the tape drives with the cable restraint bracket
as shown.
12
Flip the two breaker switches on at the power
distribution unit.
ACT/
LNK
ACT/
LNK
PORT 1 PORT 0 ETHERNET
SERIAL
PWR
FIBRE
CHANNEL
FIBRE
CHANNEL
ACT/
LNK
ACT/
LNK
PORT 1 PORT 0 ETHERNET
SERIAL
PWR
FIBRE
CHANNEL
FIBRE
CHANNEL
Configuration
16
Use the Interface Manager's command-line
interface or the HP StorageWorks Command
View ESL User Interface to verify detection of
the new board(s), and to perform configuration
and firmware updates, if necessary.
Verify that the power LED on the controller is solid
green. This indicates a good connection.
14
Close the back door of the library.
15