
HP StorageWorks ESL E-Series Tape Drive Replacement Instructions (December 2005)

Drive Replacement
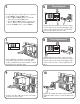
Drive Removal
Using a flat-head screwdriver, loosen the captive
screws located on the lower left and upper right
corners of the tape drive module. Pull the drive
plate from the cluster and set it aside.
6
Using a flathead screwdriver, loosen the captive
screw at the upper left corner of the tape drive
module. Grasp the drive where the fan is located
and pull the drive from the cluster.
7
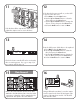
Using a flat-head screwdriver, remove the drive
plate from the new drive by loosening the captive
screws located on the lower left and upper right
corners of the new drive. Pull the plate from the
drive.
Insert the new drive half-way into the now-vacant
opening in the drive cluster.
8
910
5
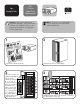
From the OCP, power off the drive to be replaced.
a. From Menu, select the Ops button.
b. Use the Up and Down buttons to select the
drive, then press the Select button.
c. Use the Up and Down buttons to change the
drive to off-line, then press the Select button.
d. Select the Back button to return to Menu.
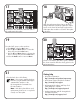
Replace the existing drive plate on the new drive.
Tighten the captive screws to secure the plate to the
drive.