
HP StorageWorks ESL E-Series Tape Drive Replacement Instructions (December 2005)

11
16
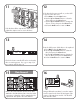
Using a flat-head screwdriver, loosen the captive
screws located on the lower left and upper right
corners of the tape drive module. Pull the drive
plate from the cluster.
14
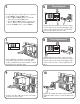
From the OCP, power off the drive to be replaced.
a. From Menu, select the Ops button.
b. Use the Up and Down buttons to select the
drive, then press the Select button.
c. Use the Up and Down buttons to change the
drive to off-line, then press the Select button.
d. Select the Back button to return to Menu.
13
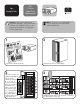
Check the cluster controller LED to be sure that the
drive is receiving power. If it is, go to step 21; if
not, continue with the Step 14.
Plate Removal
15
Remove the SCSI terminator and the SCSI cable
attached to the failed drive plate. Note the cable
connections so that they can be reattached to the
replacement drive plate in the same manner.
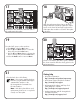
Push the drive all the way into the cluster and
tighten the captive screw to secure the drive.
12
If the drive did not power itself on, use the OCP
to power on the drive now.
a. From Menu, select the Ops button.
b. Use the Up and Down buttons to select the
drive, then press the Select button.
c. Use the Up and Down buttons to change the
drive to on-line, then press the Select button.
d. Select the Back button to return to Menu.