
HP StorageWorks ESL E-Series Tape Drive Replacement Instructions (December 2005)
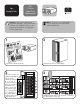


Getting help
• HP product information:
http://www.hp.com/products/tapestorage
• HP technical support and phone numbers:
http://www.hp.com/support
• HP StorageWorks Library and Tape Tools
(L&TT) diagnostic software:
http://www.hp.com/support/tapetools
• Interface Manager and HP StorageWorks
Command View ESL:
http://www.hp.com/support/cvesl
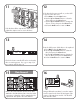
21
Reattach the SCSI terminator and SCSI cable to
the replacement drive plate.
Check to see that the drive LED is green, and that
the cluster controller LED also shows green for the
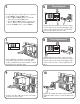
replacement drive.
17
Align the replacement drive plate on the drive.
Using a flat-head screwdriver, tighten the captive
screws on the lower left and upper right corners
of the tape drive module to secure the drive plate
to the drive.
18
2019
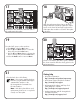
From the OCP, power on the new drive.
a. From Menu, select the Ops button.
b. Use the Up and Down buttons to select the
drive, then press the Select button.
c. Use the Up and Down buttons to change the
drive to on-line, then press the Select button.
d. Select the Back button to return to Menu.
Close the back door of the library.
Note: If necessary, upgrade the drive
firmware using the Interface Manager's
command-line interface or the
HP StorageWorks Command View
ESLUserInterface.
Note: If the drive plate did not need
replacement, please store or recycle the
unused, new drive plate.