
HP StorageWorks ESL E-Series Tape Library Cluster Upgrade Instructions (February 2004)

See other side
hp StorageWorks
ESL E-Series Tape
Library Cluster Upgrade
ESL E-Series Tape Library Cluster Upgrade Installation
Instructions
First Edition (January 2004)
Part Number: 355650-001
*355650-001*
© Copyright 2004 Hewlett-Packard Development Company, L.P.
Hewlett-Packard Company makes no warranty of any kind with regard to
this material, including, but not limited to, the implied warranties of
merchantability and fitness for a particular purpose. Hewlett-Packard shall
not be liable for errors contained herein or for incidental or consequential
damages in connection with the furnishing, performance, or use of this
material.
This document contains proprietary information, which is protected by
copyright. No part of this document may be photocopied, reproduced,
or translated into another language without the prior written consent of
Hewlett-Packard. The information contained in this document is subject to
change without notice.
Product names mentioned herein may be trademarks of their respective
companies as reflected by an associated footnote.
Hewlett-Packard Company shall not be liable for technical or editorial
errors or omissions contained herein. The information is provided “as is”
without warranty of any kind and is subject to change without notice. The
warranties for Hewlett-Packard Company products are set forth in the
express limited warranty statements for such products. Nothing herein
should be construed as constituting an additional warranty.
Printed in the U.S.A.
Installation
Instructions
Read instructions completely before
beginning the installation procedure
About this document
This document provides instructions for adding a tape drive
cluster to an HP StorageWorks ESL E-Series tape library.
Before you begin
Caution: Before continuing with the installation procedure,
ensure the library is powered off and that the main switches
on the power distribution unit are turned off (to the left).
Caution: Parts can be damaged by electrostatic discharge.
Keep parts in their containers until needed. Ensure you are
properly grounded when touching static-sensitive
components.
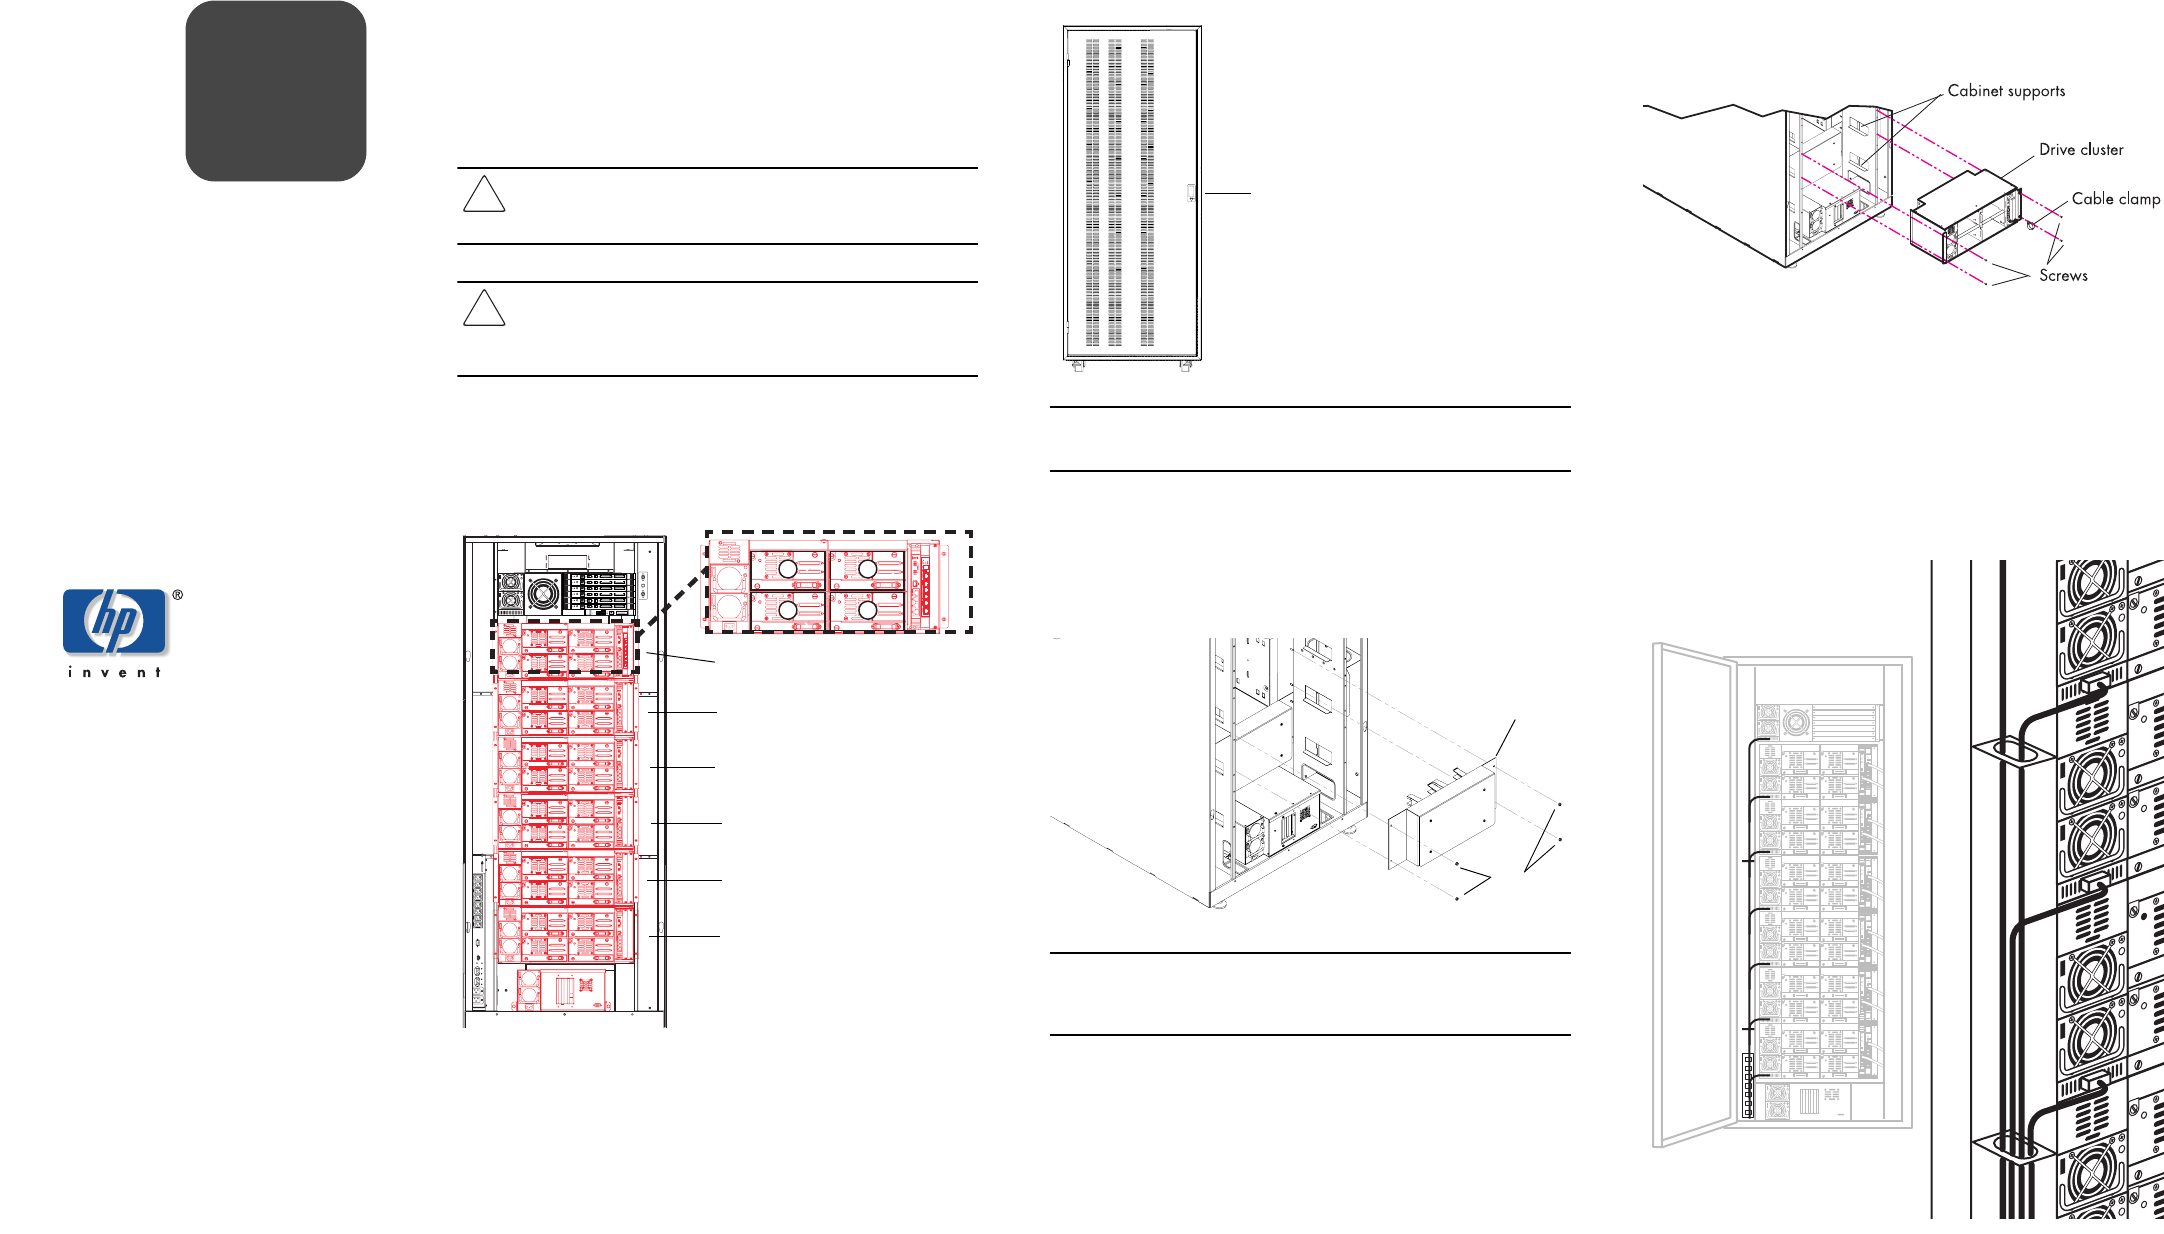
Installing the drive cluster
The library may contain up to 24 tape drives in 6 drive clusters
(see Figure 1).
Figure 1: Drive cluster numbering
1. Make sure the back door of the library is open to access the
drive cluster bays (see Figure 2).
Figure 2: Library (back view)
Note: Drive clusters must be installed sequentially from top to bottom
(clusters 0 through 5). There can be no gaps between drive clusters.
2. Before continuing with the installation procedure, ensure the
library is powered off and that the main switches on the
power distribution unit are in the off (left) position.
3. Using a 11/32-inch nut driver, remove the four nuts securing
the cluster bin panel to the library (see Figure 3).
Figure 3: Removing a cluster bin panel
Note: Retain the cable clamp and ensure it remains attached to the
drive cluster (see Figure 4). The clamp will be used for routing SCSI
cables.
4. Align the drive cluster with the cabinet supports and insert it
into the library.
5. Add the cable clamp on top of the lower right screw hole on
the cluster.
6. Secure the cluster and cable clamp to the library frame using
four Phillips screws (see Figure 4).
Figure 4: Installing the drive cluster
7. Repeat step 2 through step 6 for each additional drive cluster
to be installed.
Connecting drive cluster cables
1. Connect a power cable from the front of the power
distribution unit, located on the lower left side of the library,
to the drive cluster power connector below the power supplies
by routing it through the left cable access channel (see
Figure 5).
Figure 5: Connecting the cluster power cable
2. Connect the I
2
C communications cable located to the right of
each drive cluster to the I
2
C connector on the cluster
controller (see Figure 6).
ACT/
LNK
ACT/
LNK
PORT 1 PORT 0 ETHERNET
SERIAL
PWR
FIBRE
CHANNEL
FIBRE
CHANNEL
ACT/
LNK
ACT/
LNK
PORT 1 PORT 0 ETHERNET
SERIAL
PWR
FIBRE
CHANNEL
FIBRE
CHANNEL
ACT/
LNK
ACT/
LNK
PORT 1 PORT 0 ETHERNET
SERIAL
PWR
FIBRE
CHANNEL
FIBRE
CHANNEL
ACT/
LNK
ACT/
LNK
PORT 1 PORT 0 ETHERNET
SERIAL
PWR
FIBRE
CHANNEL
FIBRE
CHANNEL
ACT/
LNK
ACT/
LNK
PORT 1 PORT 0 ETHERNET
SERIAL
PWR
FIBRE
CHANNEL
FIBRE
CHANNEL
ACT/
LNK
ACT/
LNK
PORT 1 PORT 0 ETHERNET
SERIAL
PWR
FIBRE
CHANNEL
FIBRE
CHANNEL
12
34
Cluster 1
Cluster 2
Cluster 3
Cluster 4
Cluster 5
Cluster 0
Back access door
Nuts
Cluster bin panel