
HP StorageWorks ESL E-Series Ultrium 1840 FC tape drive upgrade or replacement (AH194-96001, October 2007)


6.9 Configure the library and SAN
Reset the library settings
Rese t the library settings from Command View TL or the Interface
Manager. Retain the Interface Manager Network Settings, SNMP
Settings, and Trace and Event logs.
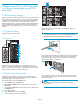
To reset the library settings from Command View TL:
1. In the Launcher window, select the library to be configured.
2. In the Library window, click the Suppor t tab.
3. In the left panel, select Restore Factory Defaults.Alistof
components appears in the right panel.
4. Select Actions>RestoreDefaultsonAllComponents.
5. On the screen that appears you can retain Interface Manager
Network Settings, SNMP Set t ings, and Trace and Event Logs. Click
Next and then click Finish.
To reset the library settings from the Interface Manager command line,
log in and enter the following command:
restore system defaults imnet mgmt logs snmp
Configure the components
Use Command View TL or the Interface Manager CLI to enter the host
mapping, access control, and FC speed settings for all components.
See the HP StorageWorks Interface Manager and Command View TL
User’s Guide for detailed procedures.
On the OC P, verify that the number of con figured drives in the library is
correct. If the number of configureddrivesisincorrect,usetheOCPto
change the number. This will require a library reboot.
Configure the SAN switch
RezonetheSAN,ifnecessary,toaccountfornewhardwareandpaths.
Reboot the SAN FC switch if necessary .
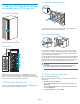
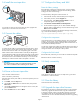
6.10 Verif y connectivity
11571
Verify that the FC port A LED on the new tape drive is green when
connected to a switch and linked.
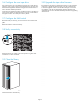
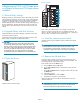
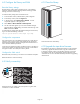
6.11 Close the li
brary
10010
Close the back door of the library.
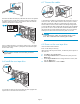
6.12 Upgrade the tape drive firmware
Ensure that the tape drive has the latest firmware for correct operation.
If necessary, upgrade the drive firmware using the Command View
TL firmware upgrade wizard or the Interface M anager’s Command
Line Interface. See the HP StorageWorks Interface Manager and
Command View TL User’s Guide for detailed procedures on upgrading
drive firmware.
Page 1 0