
HP StorageWorks ESL E-Series Ultrium 1840 FC tape drive upgrade or replacement (AH194-96001, October 2007)


3 Adding an LTO4 tape drive to a library
that already has an LTO4 tape drive
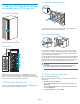
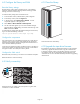
3.1 Open the library
10002
Open the back door of the library.
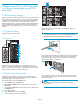
Drive clusters
11561
0
1
2
3
4
5
Drive clusters are numbered from 0 to 5 star ting at the top of the
cabinet. In each drive cluster the drives are identified as follows: top
rightisA,topleftisB,bottomrightisC,bottomleftisD.Adrawingof
the drive cluster is located on the inside back door.
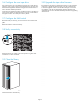
3.2 Re
move the drive bay cover
Locate a vacant drive bay. Remove the face plate covering the drive
bay by removing the screw holding it in place.
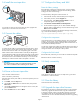
3.3 Install the n
ew tape drive
11568
1
2
1) Insert the
new drive into the vacant drive bay, then 2) tighten the
captive scr
ew to secure the drive to the cluster.
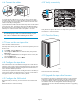
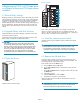
3.4 Connect the cables
11567
2
1
1) Connec
ttheFCcabletoportAonthenewdrive. TheFCcable
connecto
r clicks into plac e. Connect the other end of the FC cable to
its corre
sponding port on the SAN. Attach a label to each end of the
cable to
mark the port designations.
2) Inser
t the Ethernet cable included with the tape drive into the MGMT
port on t
he new drive. Connect th e other end of the Ethernet cable to
the inte
rnal network switch installed in the library. Do not c onnect the
MGMT po
rt or internal network switch to the public or site LAN.
CAUTION:
To avoid damaging FC cables, do not bend them sharply or pinch
them. Allow a radial bend when reattaching the FC cables.
3.5 Power on the new tape drive
Inser
t new LTO4 media if desired.
If the
tape drive did not power itself on, use the front panel to power on
the d
rive now .
a. From
Menu,selecttheOps button.
b. Use t
he Up and Down buttons to select the drive, then press the
Sel
ect button.
c. Use
the Up and Down buttons to change the drive to on-line, then
pre
ss the Selec t button.
d. Se
lect the Back button to return to Menu.
Page 2