
HP StorageWorks ESL E-series Mixed Media Installation Instructions (November 2004)

8
10
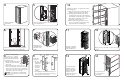
Install the new panels. For each panel, perform
the following steps:
a. Align the lower rail on the back of the panel
with the corresponding rail on the library.
b. Carefully begin to slide the panel onto the
rail, aligning the upper rail on the back of the
panel with the corresponding rail on the library.
c. Firmly push the panel all the way into the
library until it clicks into place.
d. Press in the latch and pull the panel out to
be sure it is properly mounted, and to verify
that it stops at the second latch point.
Remove existing panel(s) 1;
1 and 2; or 1, 2, and 3
(as many as will be replaced)
from the left side of the library.
For each bin panel:
a. Release the latch and pull the
handle of the panel until the
panel stops.
b. Locate and release the levers in the rails
at the top and bottom of the frame side of the
panel—move the bottom lever up and the top
lever down to release the panel—then pull the
panel all the way out of the library.
Note: New panels for a mixed media
library are installed on the left side of the
library only.
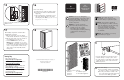
5
Flip the two breaker switches off (to the left) at the
power distribution unit.
Manually remove
all media from the
left panels of the
library.
76
Open the front doors of the library and gently
push the library robotics to the cabinet floor.
9
Identify the
new panels.
• The top
and bottom
panels have
the latch on
the face of
the panel
above the
handle.
• The middle panel has the latch at the top on
the inside front of the panel, and is missing
the bin pack in the first column.
11
Open panel 2 of the library to expose the empty
column.
12
13
For each removable
magazine, place its
base into the empty
column of the panel
and push its top
against the panel until
it snaps into place.
4
Open the back door
of the library.
Locate the removable
magazines included
in the installation kit.
Top
panel
Bottom
panel
Middle
panel
14
Close panel 2, then
close the front door
of the library.