
HP StorageWorks ESL E-series Removable Load Port Magazine Installation Instructions (November 2004)

Install removable magazines
Install removable
load port panels
12
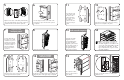
From the front of the panel, remove the screw(s)
that secure the red plate to the panel.
9
Remove the four screws securing each panel to
the library and remove the panels.
From the front side
of the panel, align
the holes in the
panel and rail for
the screws. Secure
the load port
panels to the rails
using 4 screws per
panel.
11
10
To align the new load port panels on the library rails,
hang each panel on the upper rail by its red plate.
13 14
Install the removable
magazines into the
newly-installed panels.
For each removable
magazine, place its base
into the empty column of
the panel and push its
top against the panel
until it snaps into place.
8
Remove the bins from the panels.
6
Remove fixed
load port panels
7
5
Open the front doors of the library and manually
remove all media from the first column of panel 2
and the first and second columns of panel 5.
From the back side of
the panel, use a small
screwdriver to push out
and remove the plastic
darts that hold the bins
on the first column of
panel 2 and the first
and second columns
of panel 5.
Use the load port release on the back of the
main panel to expose the rails of the panel to
be replaced.
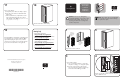
Note: If your library is a mixed-media
library, ensure that the correct type of
removable magazines are installed on the
correct side of the library (LTO on the LTO
side, SDLT on the SDLT side). The tape
type is indicated on the top, front of each
removable magazine.
Close panels 2 and 5,
then close the front door
of the library.
1
2
16
Flip the two breaker switches on at the power
distribution unit.
Front
Left panel Right panel
Left panel Right panel
Back
15