
HP StorageWorks EVA iSCSI connectivity quick start instructions for Windows (5697-7442, March 2008)

Step 5. Connect t
he mpx100/100b to
an I P switch
1. Connect one end of a standard Cat 5e or Cat 6 network cable
to the MGMT port on the mpx100/100b (Figure 3). Connect the
other end to an IP switch in a network that is accessible from the
management server running Command View EVA.
2. Connect one end of another Cat 5e or Cat 6 net work cable to the
GE1 port on the mpx100/100b. Connect the other end to an IP
switch in a network that is accessible from the server(s) running
an iSCSI initiator.
Step 6. Start the mpx100/100b
1. Attach the AC power cord to the mpx100/100b and the power
distribution unit (PDU). Verify that the mpx100/100b system power
LED is illuminated. The mpx100/100b runs a self-test and b egins
normal operation.
2. Verify that the heartbeat LED is blinking (once per second) and that
the input
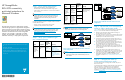
faultLEDisnotilluminated.Figure 3 shows the location of
the ports and LEDs on the mpx100/ 100b.
25055a
FC1
FC2
GE1
GE2
MGMT
HP StorageWorks
mpx100
IOIOI
!
Management port
10/100 Ethernet
AC power
Input fault LED
Heartbeat LED
System power LED
RS-232 port
FC ports
iSCSI ports
Figure 3 mpx100/100b ports and LEDs
NOTE:
See the
HP StorageWorks EVA iSCSI connectivity user guide
for
adesc
ription of the LED fault indications.
Step 7. Set the mpx100/100b
management port for Command View
EVA
NOTE:
The mpx100/100b management port’s default IP address is
10.0
.0.1/255.0.0.0.Thempx100/100bserialport's
def
ault settings are 115200/8/n/1.
1. Use Telnet to connect to the mpx100/100b management port, or
connect to the mpx100/100 b serial port using the HP-supplied
connector.
2. Loginwiththeusernameguest and the password password.
3. Enter admin start and the password, config.
4. Enter set mgmt and follow the prompts to set the management
port properties that enable Command View EVA to communicate
with the mpx100/100 b.
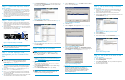
5. Start Command View EVA and select the iSCSI Devices folder under
the Hardware folder in the Command View EVA window.
6. Click Discover iSCSI Devices (Figure 4). If the iSCSI device has not
been discovered, click Add iSCSI Device, enter the mpx100/10 0b
IP address, and click OK.
Figure 4 Discover iSC S I devices
7. Click iSCSI Controller 1 under the iSCSI Devices folder (Figure 5).
Figure 5 iSC SI Controller 1
8. Enter the IP address and subnet mask for Por t 1 on the IP Ports tab.
Click Save changes.
Step 8. Install the iSCSI initiator
NOTE:
The mpx100/100b software kit is available in a .zip file or
.iso file. You can write the .iso file to a CD-ROM or copy
the .zip file to a folder.
1. Download the mpx100/100b software kit from the HP
website h
ttp://h18006.www1.hp.com/pro ducts/storagewo rks/
evai
scsiconnect/index.html.
2. Run l
aunch.exe from the kit folder ;
nl
OR
nl
If you created a CD-ROM, insert it. Run launch.exe if the
software does not start automatically.
3. Click Install iSCSI software package, accept the default settings,
and reboot the server.
4. Click the Microsoft iSCSI Initiator icon on your desktop.
NOTE:
The
terms initiator and host are used interchangeably. The
in
itiator is the host accessing the storage sy stem.
5. Click the Discovery tab (Figure 6). Click Add to add the IP address
of Por t 1 on the mpx100/100b.
Figure 6 Addi
ng an IP address
6. Click OK to e
xit.
7. Click the Ta
rgets tab. The target status is Inactive (Figure 7).
Figure 7 Inactive target status
8. Select a target a nd click Log On.ClickAutomatically restore this
connection when the system boots (do not enable multipathing) and
then click OK (Figure 8). The target status is Connected.
Figure 8 Connected target status
IMPORTANT:
By default, the mpx100b supports up to 16 initiators. To
increase the number of initiators, two license upgrades are
ava
ilable. The first upgrade provides an additional 32 initiators;
the
second upgrade provides unlimited initiators, up to the
max
imum supported by HP.
Step 9. Set up LUN
s using Command
View EVA
1. Click the EVA storage system icon to present iSCSI storage. For
example, in Figure 9, MROSANLAB-HSV13 is the EVA storage
system. Select the Virtual Disks folder.
2. Create a Vdisk and present it to the host entry iSCSI Host.
3. Click the ACTIVE attribute of the newly created Vdisk and then click
the Presentation tab (Figure 9).
Figure 9 Setting u p LUNs to present a Vdisk
4. Click the iSCSI tab.
5. Click the Present button.
6. Select the iSCSI initiator and click Present V disk (Figure 10).
Figure 10 Presenting a Vdisk
Step10. SetuptheiSCSIdriveonthe
iSCSI initiator
1. Open Windows Computer Management.
2. Select Disk Management.
3. Select Action > Rescan Disks. The newly created Vdisk appears; if
not, r eboot the iSCSI initiator.
4. Format and partition the disk.