HP EVA4000/6000/8000 and EVA4100/6100/8100 Updating Product Software Guide (XCS 6.250) Abstract This guide describes how to upgrade controller software, disk drive firmware, and related EVA management software on HP 4000/6000/8000 and 4100/6100/8100 Enterprise Virtual Array models only. P6000, used throughout this document, is the new branding for the Enterprise Virtual Array product family. General references to HP P6000 Command View may also refer to earlier versions of HP Command View EVA.
© Copyright 2005, 2012 Hewlett-Packard Development Company, L.P. The information contained herein is subject to change without notice. The only warranties for HP products and services are set forth in the express warranty statements accompanying such products and services. Nothing herein should be construed as constituting an additional warranty. HP shall not be liable for technical or editorial errors or omissions contained herein.
Contents 1 Getting started...........................................................................................6 Upgrade overview....................................................................................................................6 Resynchronization................................................................................................................6 Online upgrade..................................................................................................................
Upgrading HP P6000 Replication Solutions Manager (optional)...................................................33 Monitoring storage system stability............................................................................................33 Preparing an HP P6000 Continuous Access environment for upgrading.........................................34 Upgrading disk drive firmware in an HP P6000 Continuous Access environment........................35 Saving storage system configuration information............
Websites..........................................................................................................................66 Typographic conventions.........................................................................................................67 Rack stability..........................................................................................................................68 Customer self repair.........................................................................................
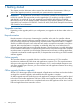
1 Getting started This chapter provides information about required kits and reference documentation. Before you perform the upgrade procedures, ensure that your system meets the requirements. IMPORTANT: To upgrade from an HSV200-A or HSV210-A controller to an HSV200-B or HSV210-B controller, HP requires that you also upgrade the I/O modules (A and B) to AD623C and AD624C on each shelf.
Upgrade paths For details about supported upgrade and downgrade paths, see Table 3.1, Upgrade support for controller software versions, and Table 3.2, Downgrade support for controller software versions, respectively, in the HP P6000 Enterprise Virtual Array Compatibility Reference. See Table 1 (page 7) for the link to this document. Reference documentation Table 1 (page 7) identifies the documentation you should have available when upgrading the storage system.
You must also obtain a supported version of HP P6000 Command View. When you purchase HP P6000 Command View, you can choose to receive a software CD or an E-Delivery kit. If you choose an E-Delivery kit, you will receive an email from HP with download instructions. TIP: For E-Delivery kits, be sure to save the HP mail with the download instructions. You will need them if you need to download the software again. IMPORTANT: HP P6000 Command View 9.2 or later is required with XCS 6.250.
2 Pre-upgrade tasks Before starting the upgrade, you should perform several tasks to minimize the time required to complete the upgrade. The tasks you perform depend on your system configuration and HP P6000 Command View implementation. These tasks focus on upgrading components to ensure they meet the supported configuration for XCS 6.250. Table 5 (page 37) provides a checklist so you can track your progress as you perform these pre-upgrade tasks.
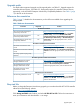
Table 2 Management software version worksheet (continued) Software Locating version information1 Current Required version version (minimum) 1.5.0_042 JRE Upgrade procedure 1. Open Windows control panel. “Upgrading browsers and JREs” (page 32) 2. Double-click the Java icon. 3. On the General tab, click About. The version of Java is displayed. Web browser (required) Internet Explorer 8.0 2 From your browser, select Help > About Internet Explorer.
2. Click Help in the session pane. The full version is displayed in the top right window bar (see Figure 2 (page 11)). If the version listed is earlier than the minimum supported version, it must be upgraded. Figure 2 HP P6000 Command View online help TIP: The version number is also shown at the bottom of the login screen. Checking the storage system hardware Estimated time to complete: 15–20 minutes When to perform: 1–2 weeks prior to the upgrade, and then daily until the upgrade is completed.
c. d. If a problem is indicated, expand the navigation tree under the Hardware folder, until you see a hardware component icon with an attention or warning icon on it. Click the component icon to display the Disk Enclosure Properties window (Figure 4 (page 12)). The Operational state fields indicate if there is a hardware error. Figure 4 Checking operational states 3. Verify that there are no hardware components in the Unmappable Hardware folder: a.
Event indicators When exhibiting incorrect behavior, you will see events indicating that the status of the battery has changed: • On battery 0, the event is: 0e030019; The status of battery assembly "0" has changed. • On battery 1, the event is: 0e070019; The status of battery assembly "1" has changed. Visual indicators A battery undergoing a load test is indicated by: • Both the green Status and amber Fault LEDs flashing, when running any XCS version earlier than 6.220.
Collecting SAN configuration data using SAN Visibility HP provides the SAN Visibility tool to automate the process of collecting SAN configuration data. SAN Visibility collects configuration information from the Fibre Channel switches and hosts on your SAN. Any information provided by devices when they log into the fabric is included. The raw configuration data is collected, packaged, and sent to HP, where it is formatted into a complete report and returned to you.
g. 4. Click Yes to confirm the name change. To detect switches, select Switch Settings and IP Address, and enter the following information: a. The IP Address of the primary switch for the SAN for which you want a report. Information will be collected for all devices connected to this switch. b. To discover and perform data collection for a single switch, clear Discover connected switches. (If this check box is selected, SAN Visibility discovers and performs data collection for all connected switches.) c.
5. Select Host Settings and enter the following information: • 16 Under Discover Host, select one of the following options: ◦ IP Address: Enter the IP address of the host in the IP Address field. ◦ a. b. Subnet: To discover hosts for a range of IP addresses: Enter the starting IP address in the Start at IP Address field. Enter the limiting IP address in the Stop at IP Address field. • Enter the access information, as required, to initiate host discovery.
6. Select Customer Details and enter the following information: a. Enter your name in Name. This information is required. b. Enter your e-mail address in E-Mail to receive the completed report. This information is required. It is not necessary to have an e-mail address connected to the EVA controller. You should enter the e-mail address where you typically receive e-mail. You can enter multiple email addresses in E-Mail by separating entries with a semicolon (;). c. d. e.
Obtaining a report from HP Once you have configured SAN Visibility for data collection, you can obtain a report. There are two methods for obtaining a report: • Automatically—Automatically e-mails the data to HP when collection is complete. You will need to know the SMTP address of your mail server. Select the SMTP address from the list. Use this method if you have external e-mail access from your environment. • Manually—Requires that you send your data manually to HP (the file will be in .hp format).
2. 3. 4. 5. 6. 7. Select the fabric for which you want to create a report from the Choose switch group for data collection. Check Collect data for all component groups to create reports for all the fabrics. Clear Capture Performance data. If you want to gather switch performance data, leave this option selected. Selecting this option will increase the amount of time required to collect the switch data.
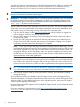
Figure 5 Sample SAN Visibility report Reading the report 1. 2. Save the attached .hppr file to a preferred location. Do not change the file extension. Double-click the saved file to extract the processed report. The report is stored at: \ExtractedProcessReports\\ 3. 4. Click on the .hppr file to open the report in your browser. In the left navigation pane, click High Level Fabric Summary. The High Level Fabric Summary window opens (Figure 5 (page 20)).
5. To review update recommendations for your switches and HBAs, select the applicable folder on the left side of the window. In Figure 5, it is the folder called MySwitchGroup. Look for the group name you created in step 2 of “Using SAN Visibility” (page 14) The Best Practices and Recommendations window opens (Figure 6 (page 21)). Figure 6 Sample SAN recommendations If the firmware or driver version recommended is later than what is currently running, ensure that you upgrade the appropriate switch or HBA.
time that host I/O will be allowed to complete successfully beyond the 60-second timeout. Additionally, some applications may be more sensitive to I/O delays. • Processing host I/O during the upgrade—The upgrade competes with host requests that have a higher priority, which can affect the upgrade outcome. Select a time for the upgrade when host I/O is at a minimum. • Communicating with HP P6000 Command View—The first steps of the upgrade have a lower priority than host I/O.
Analyzing storage system I/O using HP P6000 Performance Data Collector Use the HP P6000 Performance Data Collector included with HP P6000 Command View to gather and analyze statistics on storage system utilization. This section provides recommendations on using HP P6000 Performance Data Collector to gather statistics to help identify periods of low storage system activity.
Running HP P6000 Performance Data Collector 1. 2. Double-click the HP P6000 Performance Data Collector icon on the desktop. The HP P6000 Performance Data Collector command window opens. Enter the following command to capture and display the total IOPS (Req/s) and throughput (MB/s), where n is the interval in seconds and m is the duration in seconds: evaperf as -cont n –dur n –sz array -fo filename Specify an interval and duration that will enable you to view a period of low I/O activity.
3. When the command has completed, open the file in an ASCII editor. The virtual disk information will be similar to that shown in Figure 7 (page 25). Activity is reported for each controller accessing a virtual disk. The total activity for each virtual disk is the sum of the reported activity for each controller. A virtual disk may also be a snapshot, snapclone, or a DR group member. In the output, ID (identification) is used interchangeably with virtual disk.
Table 3 HP P6000 Performance Data Collector virtual disk statistics (continued) Counter Description Write MB/s The rate at which data is written to the virtual disk by all hosts; includes transfers from the source array to the destination array. Write Latency (ms) The average time it takes to complete a write request (from initiation to receipt of write completion). Flush MB/s The rate at which data is written to a physical disk for the associated virtual disk.
IBM AIX Checking or changing timeouts AIX requires the disk settings shown in Table 4 (page 27) for the native multipath drives. Table 4 IBM AIX timeout settings Setting Value Description PR_key_value NA Sets the key value for persistent reservations. Persistent reservations are not supported. Algorithm fail_over Sets the load balancing algorithm to fail_over. All I/O uses a single path; the remaining paths are in standby mode. The value round_robin is not supported.
• load_balancing = 1 • excludemodel = 0x0 • auto_restore = 0xA6 Emulex Driver parameters (single path) • HPELXLPFC=y • nodev_timeout=60 • qdepth=30 • discovery_threads=1 Emulex Driver parameters (with Multipulse) • nodev_timeout=10 • qdepth=16 • discovery_threads=32 To check or set Linux parameters, use the set_parm executable located in the /opt/hp/ directory. When executed, the options to change timeout values are displayed.
If the registry entry is created or changed, reboot the Windows system for the new timeout value to take effect. NetWare No changes are needed for NetWare operating system timeouts. The default values from HBA are: • Login retry count: 8 • Port down retry count: 16 • Link down timeout: 8 OpenVMS The maximum LUN timeout value is 120 seconds. NOTE: OpenVMS tolerates the controller reboot that occurs at the end of the controller spftware update process.
VMware VMware ESX (Hypervisor) does not time I/O for a guest operating system. Thus the SCSI timeouts on commands issued by each VMware guest (Linux, Windows, Solaris) are the timeouts set for these systems. NOTE: For Microsoft Windows guests, set the Windows SCSI timeout registry to 60 secs as follows: 1. In the Windows registry, find HKEY_LOCAL_MACHINE\System\CurrentControlSet\ Sevices\Disk\TimeOutValue 2. Set this value to 60 decimal (3Ch), 3. If the registry entry does not exist, you must create it.
Back up all storage system data Estimated time to complete: Varies When to perform: As close as possible to the upgrade Before starting the upgrade, HP recommends that you perform a full verified backup of all storage system data. Although not required, it is a best practice to back up your data before performing major operations such as software upgrades. Schedule the backup as close to the upgrade as possible.
3. Verify the display of storage system resources in the interface. In the navigation pane, click Hardware and verify the following: • New, uninitialized arrays appear as uninitialized storage systems. • Previously initialized arrays appear with their previous names and correct status. (Select each storage array to view the Properties window.) • Previous disk groups, hosts, virtual disks, and other resources appear in the navigation pane.
To download the software, go to Software Depot: http://www.software.hp.com Select Insight Remote Support from the menu on the right. Upgrading HP P6000 Replication Solutions Manager (optional) NOTE: HP P6000 Replication Solutions Manager requires JRE 1.5.0_04 and later. Go to the Oracle website (www.oracle.com) and download the required JRE.
Figure 8 Controller Events (Initialized system) window d. Check the Severity field to determine if any unexpected critical events have occurred. If critical events have occurred, perform the steps outlined in the corrective action codes to correct the problems. In some cases, it may be necessary to call your HP-authorized service representative to fix the problem. 3.
have only two versions of controller software. You cannot have more than two versions in an HP P6000 Continuous Access environment. • While the HP P6000 Continuous Access storage systems are running different controller software versions, you cannot make any configuration changes to your storage systems (for example, do not add or delete DR groups or members of DR groups).
Saving storage system configuration information Estimated time to complete: 10–15 minutes When to perform: As close as possible to the upgrade Before starting the upgrade, collect and save your current configuration information. This data can be used to restore the existing configuration, if necessary. The configuration data is saved to a series of files stored in a location other than on the storage system.
For more information about using the utility or using the CAPTURE commands, see the HP Storage System Scripting Utility Reference. See “Reference documentation” (page 7) for the link to this document. Task checklist Use the following checklist to track your progress and mark when a task is completed.
Table 5 Pre-upgrade task checklist (continued) Task “Preparing an HP P6000 Continuous Access environment for upgrading” (page 34) Time required: Varies depending on replication configuration When to perform: As close as possible to the upgrade “Saving storage system configuration information” (page 36) Time required: 10–15 minutes When to perform: As close as possible to the upgrade 38 Pre-upgrade tasks Task complete
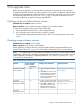
3 Upgrading the Enterprise Virtual Array The following steps guide you through the process of upgrading the system software. Follow them carefully and in the order specified. Table 7 (page 57) provides a checklist so you can track your progress as you perform the upgrade. Make sure you have all the items indicated before beginning the upgrade. IMPORTANT: Reference.
1. Open HP P6000 Command View and click the icon of the storage system you want to upgrade. a. If there are any caution or warning conditions, click the Hardware folder to expand the navigation tree. The Hardware Folder Properties window (Figure 9 (page 40)) opens. The Operational State box for the LED display and EMU indicates if there is a hardware problem. Figure 9 Hardware Folder Properties window b. c. d. Select the array and click Refresh to update the cache.
2. Verify that there are no hardware components in the Unmappable Hardware folder: a. Expand the navigation tree under the Hardware folder in the navigation pane. b. Click the Unmappable Hardware folder. Hardware components can be placed in the Unmappable Hardware folder for several reasons. For example, hardware components can be placed in the Unmappable Hardware folder when the I/O modules on a disk enclosure are not working, the controllers restart, or there is a hardware failure.
e. If critical events have occurred within the last 48 hours, perform the steps outlined in the corrective action codes to correct the problems. In some cases, you may need to call your HP-authorized service representative. CAUTION: If any critical events have occurred within the last 48 hours, do not proceed with the upgrade until the situation is resolved. 5. Verify that no changes to the storage system configuration are in progress.
Clearing the password on the Operator Control Panel (OCP) Clearing the password requires access to the storage system. The OCP is located on the front of each controller. Using the following procedure to clear the password on the storage system controllers. The password can be cleared from either controller. 1. Press four times to scroll to the System Password menu. 2. Press to display Change Password? 3. Press to scroll to Clear Password. 4. Press to display Clear Password. 5.
Step 5. Upgrading the controller software Estimated time to complete: 25–30 minutes CAUTION: • Stop all storage modification jobs (such as creation, deletion, shrinkage, expansion, and presentation) 30 minutes before starting the controller software upgrade. • Before upgrading the controller software, ensure that the storage system configuration is stable and is not modified.
6. Click Continue to proceed or Cancel to exit. The Code Load Storage System-Page 1 window Figure 13 (page 45) opens. Figure 13 Code Load Storage System-Page 1 window 7. Check the box "I have completed the storage system and SAN checks outlined in the HP Enterprise Virtual Array Updating Product Software Guide for my storage system version." and click Next Step." The Code Load Storage System-Page 2 window opens. Figure 14 Code Load Storage System — Page 2 8.
9. Click Next step to proceed with the upgrade. The Code Load Storage System-Page 4 window opens. 10. Click Browse, navigate to the controller software image (created from the downloaded .ISO image) (see Required kits), and select the appropriate file: Table 6 Controller software For this array: Select: EVA8000/8100 \\HSV210\6240\210_6240.SSS EVA4000/4100 EVA 6000/6100 \\HSV200\6240\200_6240.SSS 11. Click Next Step to upload the appropriate controller software image file.
12. Read any pre-update application notes before proceeding. Click Finish to proceed or Cancel to exit the procedure. If you click Finish, the new controller software is copied to the controllers and validated. The upgrade process begins and the Initiating firmware code load page opens. See Figure 15 (page 47). This page is displayed while the upgrade components are processed.
Figure 16 Storage system updating firmware 13. A final Confirm System Code Load window opens. Enter YES (all uppercase) and click Code Load System to continue. In the Initialized Storage System Properties window, verify the version of the storage system software in the Version box. It should be 6250. IMPORTANT: During a typical update, the command view interface may become responsive before all EMU updates are done.
Figure 17 Verifying XCS version after upgrading NOTE: After upgrade of the controllers, the array may not be visible from HP P6000 Command View. Either wait at least 15 minutes for the array to reappear, or reboot the server if necessary. Step 6. Upgrading disk drive firmware Estimated time to complete: Varies depending on the number of disk drives that require upgrading and the I/O load on the storage system. It can take 30 seconds to 3.5 minutes per drive to upgrade the firmware.
proceed after such a pause, review the controller logs to establish where you are in the upgrade process and relaunch the online upgrade. The upgrade will start where it left off. CAUTION: When upgrading disk drive firmware: • Do not power off any components or perform controller resynchronizations or reboots. • Upgrade the disk drive firmware after you upgrade the storage system software.
3. If you have not already done so, download the disk drive firmware file from the following website: http://www.hp.com/support/evadiskfirmware a. Store the file in a known local directory. If you are running HP Command View EVA 9.x or later, continue with step 4. NOTE: It is recommended that you use the default directory of C:\Program Files\ Hewlett-Packard\Sanworks\CodeLoad. If you use a different directory, you will have to enter the complete path when identifying the location of the firmware files. b.
Figure 19 Code Load Disk Drives Online — Page 1 window A warning Confirm Disk Drive Code Load confirmation window opens (Figure 20 (page 52)). Click Continue to proceed or Cancel to exit the procedure. Figure 20 Confirm Disk Drive Code Load Warning 9. Do one of the following: a. If you are running HP Command View EVA 9.x or later, click Browse and navigate to the zip file or manually enter the path to the zip file (from Step 3.a). b. If you are running HP Command View EVA 8.
Figure 21 Code Load Disk Drives — Page 2 window 11. Click Next step. The disk drive firmware upgrade begins. A status page opens, indicating the progress of the upgrade for each disk drive. The disk drives are upgraded sequentially. Depending on the I/O load on the storage system, it can take 30 seconds to 3.5 minutes per drive to upgrade the firmware. The status is updated at 45-second intervals. CAUTION: Do not select a disk drive to manage it during the disk drive upgrade.
Figure 23 Code Load Disk Drives — Page 3 window 12. Click Finish. Upgrading firmware on an individual disk If you need to upgrade the firmware on a single disk, download the firmware and installation instructions from the following website: http://www.hp.com/support/evadiskfirmware IMPORTANT: Upgrading disk drive firmware on a single disk can be performed online or offline, unless the disk is a member of a disk group that contains Vraid0 virtual disks. If so, when using HP Command View EVA 9.
NOTE: • This step is only required if you use password protection on the storage system. • When you add a system password to the controller, you must also enable password access in HP P6000 Command View. The two work in conjunction with one another. Long passwords (up to 16 characters) are supported.
Figure 24 Enable Password Access to a Storage System window 5. 6. Select the World Wide Node Name of the storage system for which you want to enable password access. Enter the password in the password and Confirm password fields. NOTE: 7. Make sure you use the same password you entered on the controller OCP. Click Enable Password. A message box opens. 8. Click OK. HP P6000 Command View enables password access to the storage system. Step 8.
Task checklist Use the following checklist to track your progress and mark when a task has been completed. Table 7 Upgrade task checklist Task Task complete “Step 1. Checking the health of the Enterprise Virtual Array” (page 39) Time required: 20–30 minutes “Step 2. Configuring User-Initiated Service Mode (UISM)” (page 42) Time required: 10–15 minutes “Step 3. Disabling storage system passwords” (page 42) Time required: 10–15 minutes “Step 4.
4 Troubleshooting This chapter provides information to help you solve problems you may encounter with different parts of your storage system after completing your upgrade. To determine if there are problems with HP P6000 Command View, answer the following questions: • Has an HBA failed? • Has a controller failed? • Have you set or reset the storage system password? The following website provides access to information for troubleshooting problems with HP P6000 Continuous Access: http://h20000.www2.hp.
Invalid firmware image file (Status code 21006) If the XCS image file is the wrong one, an Operation failed message is displayed (Figure 26 (page 59)). Click OK to return to the Initialized Storage System Properties window. Figure 26 Invalid firmware image file (Status code 21006) EMU communication events following an XCS 6.200 upgrade Symptom If you have recently upgraded from XCS 6.
NOTE: This procedure may cause data to become temporarily unavailable to the host. Normally this will not happen, but if a hardware failure occurred while performing this procedure, the host may lose access to data until the procedure is complete. HP recommends that you schedule a maintenance window to perform these steps. 1. 2. 3. 4. Disconnect the enclosure address bus cable from each EMU. Unseat/remove all EMUs in the array, and then restart the top controller.
If these actions do not resolve the problem, contact your HP-authorized service representative for help. Selecting a storage system When selecting a storage system, ensure that the status icon is a green cluster symbol indicating good health (Figure 27 (page 61)). Figure 27 Status icon for an array in good health If the status icon for the storage system is not green, it indicates a problem that you must correct before proceeding. Expand the navigation tree to locate the problem.
2. 3. 4. Ensure that the server and the array are logged into the fabric. Use one of the following utilities to check the SAN Fibre Channel switch: • HBAnywhere (Emulex) • SanSurfer (QLogic) Clear the browser cache as follows: a. On the General tab under Temporary Internet files, click Settings. b. Click Every visit to the page under Check for newer versions of stored pages. c. On the General tab, under Temporary Internet files: i. Click Delete Cookies. ii. Click Delete Files. d. 5.
Table 8 Possible causes and corrective actions for HTTP 404 and HTTP 503 errors (continued) Possible Cause Corrective Action 503 Error: HP P6000 Command View may be down when a browser makes a request. The web server returns a 503 (No Service) error because it cannot access the page. Retry the request when HP P6000 Command View is up.
Cause HP P6000 Command View may have lost communication with the controllers. Two possible scenarios are: • The management server HBA may have timed out commands to the controllers. See “Unknown storage system—cause 1” (page 64). • The controllers are running a version of XCS that HP P6000 Command View does not recognize. See “Unknown storage system—cause 2” (page 64).
Access control Access authentication proceeds as follows: 1. The user's security group is checked to control access to various functions and web pages with HP P6000 Command View. 2. If the user belongs to the HP Storage Admins group, access is granted. 3. If the user belongs to the HP Storage Users group and the web page allows access to users with the View HP Storage privilege, access is granted. 4.
5 Support and other resources Contacting HP For worldwide technical support information, see the HP support website: http://www.hp.
• HP Software Depot: http://www.software.hp.com • HP Single Point of Connectivity Knowledge (SPOCK): http://www.hp.com/storage/spock Typographic conventions Table 11 Document conventions Convention Element Blue text: Table 11 (page 67) Cross-reference links and e-mail addresses Blue, underlined text: http://www.hp.
Rack stability Rack stability protects personnel and equipment. WARNING! To reduce the risk of personal injury or damage to equipment: • Extend leveling jacks to the floor. • Ensure that the full weight of the rack rests on the leveling jacks. • Install stabilizing feet on the rack. • In multiple-rack installations, fasten racks together securely. • Extend only one rack component at a time. Racks can become unstable if more than one component is extended.
Index 063ec513 event, 59 event 063ec513, 59 log, 33 A H agent options, using, 43 analyzing storage system I/O, 23 application I/O timeouts, 30 array checking for errors, 11, 33, 39 hardware errors, 40 help obtaining, 66 host I/O timeouts managing, 26 HP technical support, 66 HP P6000 Command View checking hardware, 40 checking version, 10 disabling passwords, 43 enabling passwords, 55 errors, troubleshooting, 62 installing, 31 online help, 11 upgrading, 31 web server, normal interaction, 62 HP P6000 Pe
adding passwords, 54 clearing passwords, 42 online upgrade managing host I/O timeouts, 26 selecting appropriate time, 22 operating systems, and JREs, 32 recommended browsers, 32 Replication Solutions Manager, 33 User-Initiated Service Mode, 42 V P VCS minimum version before upgrade, 7 verifying software version, 10 View Events page, 33 window, 41 password protection, 54 removing, 42 W R rack stability warning, 68 recommended browsers, 32 related documentation, 66 Replication Solutions Manager, 33 req