
HP StorageWorks Replacing DIMMs in HSG60 and HSG80 Cache Modules Installation Instructions (EK-80DIM-IM. E01, March 2005)

Page 2
Note: The cache size requirement for running ACS V8.8-
x
P or
V8.8-
x
S is 512 MB. For ACS V8.8-
x
F, V8.8-
x
G, and V8.8-
x
L, the
minimum cache size requirement is 128 MB in unmirrored
configurations and 256 MB in mirrored configurations, per cache
module.
Cache memory configuration
Regardless of the array controller software (ACS) version, in
dual-redundant configurations, both cache modules must
contain the same memory configuration.
If you are upgrading the current cache configuration to
increase memory, make sure the cache module memory
configuration is valid (see Table 1).
Note: Failure to upgrade cache memory appropriately can result
in an inoperable controller and increase subsystem down-time.
Upgrading a cache memory configuration requires the storage
subsystem to be shutdown. For single-controller
configurations, a shut down is expected. In dual-controller
configurations, because each cache module must contain the
same memory configuration, both controllers must be shut
down during the replacement period for the second controller.
If subsystem downtime is not crucial, HP recommends using
the applicable single-controller configuration procedure for the
specific controller type to replace the DIMMs.
Replacing an HSG60 and HSG80 DIMM
in single-controller configurations
Use the steps in “Removing DIMMs” and “Installing DIMMs”
to replace DIMMS in a cache module.
Caution: Static electricity can easily damage a cache
module or a DIMM. Wear a snug-fitting, grounded
electrostatic discharge (ESD) wrist strap.
Note: If a DIMM fails, note which DIMM needs replacement based
on the diagram displayed on the console. ACS displays the
following CLI messages if a DIMM failure is detected:
1. %CER--DebugTop> --18-MAY-2005 10:50:47--
Cache module DIMM 2 failed
2. %EVL--DebugTop> --18-MAY-2005 10:50:58--
Instance Code: 02623801 (not yet reported to
host)
DIMM Instance Code
DIMM-1 = 02613801
DIMM-2 = 02623801
DIMM-3 = 02633801
DIMM-4 = 02643801
Refer to
HP StorageWorks HSG60 and HSG80 Array Controller
and Array Controller Software Troubleshooting Guide
for cache
policies information that to determine which cache module and
DIMM are at fault.
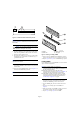
Removing DIMMs
Use the following steps to remove DIMMs from a cache
module in single-controller configurations:
1. Determine whether the controller is operational:
■ If the controller is operational, connect a PC or terminal
to the controller maintenance port.
■ If the controller is not operational, Go to step 6 on
page 3.
2. From the host console, stop all host activity to the
controller, and then dismount the logical units in the
subsystem.
3. If using a Microsoft
® Windows 2000 or Windows NT®
platform, shut down the server.
4. Run the Fault Management Utility (FMU) to obtain the last
failure codes, if desired.
5. Shut down “this controller” with the following command:
SHUTDOWN THIS_CONTROLLER
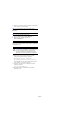
Note: After the controller shuts down, the Reset button and the first
three port LEDs turn on (see Figure 4 on page 3). This can take
several minutes depending on the amount of data that needs to be
flushed from the cache module.
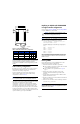
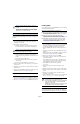
Figure 3: Cache module DIMM locations
Table 1: Valid cache module memory configurations
Memory DIMMs Quantity Location
128 MB 32 MB 4 1234
256 MB 128 MB 2 13
512 MB 128 MB 4 1234
CXO6576B
1
2
3
4