
HP StorageWorks Replacing DIMMs in HSG60 and HSG80 Cache Modules Installation Instructions (EK-80DIM-IM. E01, March 2005)

Page 3
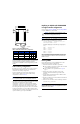
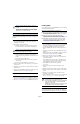
Figure 4: Controller Reset button and first three port LEDs
Note: For HP StorageWorks Model 2100 and 2200 enclosures,
omit step 6 and step 7. The ECB does not contain switches or use
ECB Y-cables.
Caution: You must disable the ECB before disconnecting
the ECB Y-cable from the cache module. Failure to disable
the ECB can damage the cache module.
6. Disable the ECB by pressing in the battery disable switch
while removing the ECB Y-cable from the cache module.
7. Release the battery disable switch.
8. Disengage both retaining levers, remove the cache module,
and then place the cache module on an antistatic bag or a
grounded antistatic mat.
Note: You must remove the DIMMs for installation in the
replacement cache module.
9. Note the location of each DIMM in the old cache module
and install the DIMMs in same location of the replacement
cache module.
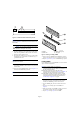
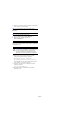
10. Press down on the DIMM retaining clips (see Figure 5) at
both ends of the DIMM being removed.
Note: To facilitate pressing down on the DIMM retaining clips, use
the eraser end of a pencil or a small screwdriver.
Figure 5: Removing or installing a DIMM
11. Gently remove the DIMM from the DIMM slot, and then
place it in an antistatic bag or on a grounded antistatic mat.
12. Repeat step 10 and step 11 for each DIMM being replaced.
Installing DIMMs
Use the following steps to install DIMMs in a cache module in
single-controller configurations:
Note: Before installing DIMMs, note the following:
■ New cache modules have no DIMMs installed; the DIMMs are
packaged separately. Unpack the DIMMs and install them into
the cache module as required.
■ Both cache modules
must
contain the same memory
configuration for the ACS version. See Figure 3 and Table 1 on
page 2 for valid cache module memory configurations.
■ Some HSG80 controller configurations require a 512-MB
cache memory configuration. Make sure the cache memory
configuration meets or exceeds the ACS requirement. See
“Cache memory configuration” on page 2.
1. Insert each DIMM (see Figure 5) straight into the
appropriate slot of the cache module, ensuring that the
notches in the DIMM align with the tabs in the slot.
2. Press the DIMM gently into the slot until seated at both
ends.
3. Engage the two retaining clips for the DIMM (see
Figure 5).
4. Make sure both ends of the DIMM are firmly seated in the
slot and both retaining clips engage the DIMM.
5. Repeat step 1 through step 4 for each DIMM.
1 Reset button 2 First three port LEDs
123456
CXO6991A
1
2
1 DIMM
2 DIMM slot
3 DIMM retaining clips
4 Rail guide
CXO6577B
1
2
3
4