
HP StorageWorks Replacing an HSG60 or HSG80 Array Controller Installation Instructions (EK-80CTL-IM. F01, March 2005)

Page 7
5. For the controller to be replaced, complete the
following substeps:
Caution: Use thin needle-nose pliers to remove the cable
from the controller to avoid potentially damaging the cable
for fiber optic cables without extender clips.
a. Disconnect all host bus cables from the
controller being removed.
b. Disengage both controller retaining levers, and
then remove the controller from the enclosure
(see Figure 8 on page 4).
c. Place the controller in an antistatic bag or on a
grounded antistatic mat.
6. For the operational controller, complete the
following substeps:
a. Observe that after the “other controller” is
removed, FRUTIL restarts all device ports and
asks if a replacement controller is available.
b. Enter N(o) after FRUTIL asks you if a
replacement controller is available, and then
disconnect the PC or terminal from the
controller maintenance port. FRUTIL exits. If
you have a replacement controller available,
complete the instructions in the “Installing a
controller” below.
Caution: If reverting to a single-controller configuration, fill
the vacant controller bay with a blank bezel to prevent the
enclosure from developing an over-temperature condition.
Installing a controller
Perform the following steps to install a controller in a
dual-redundant controller configuration if only the controller is
not installed:
Caution: Ensure that the controller being installed has the
same ACS version as the operational and previous
controller. Failure to follow this precaution causes controller
configuration information to be erased, and then the
controller is rendered unusable.
1. For the operational controller, complete the
following substeps:
a. Connect a PC or terminal to the maintenance
port of the operational controller if not already
connected.
Note: The controller connected to the PC or terminal becomes “this
controller.” The controller being removed becomes the “other
controller.”
b. Ensure that the controller configuration is
customized to your needs, and then record the
controller configurations (for example, Failover
mode, cache module status, serial numbers,
SCSI mode, mirrored and nonmirrored
information, and so forth).
c. Start FRUTIL by entering the following
command:
RUN FRUTIL
d. Enter N(o) to the question about replacing the
cache battery. The FRUTIL Main Menu is
displayed.
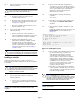
e. Enter option 2 to install a controller or cache
module.
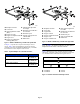
If both the controller and cache are missing, the
Install Options screen is displayed (see
Figure 14).
Figure 14: Install Options screen
f. Enter option 4 to exit FRUTIL, and then install
the cache module using procedures for a
dual-redundant configuration, if both the
controller and cache modules have been
removed. (Refer to instructions for installing a
cache module in a dual-redundant controller
configuration of the HP StorageWorks HSG60
and HSG80 Array Controller and Array
Controller Software Maintenance and Service
Guide for more information.) Otherwise,
continue to the next substep.
g. Enter Y(es) to confirm the intent to install the
“other controller.” FRUTIL quiesces the device
ports and displays a message indicating that the
controller is being installed.
Caution: Wait for
FRUTIL
to quiesce the device
ports—indicated by an All device ports
quiesced message. Failure to allow the ports to quiesce
can result in data loss. Quiescing can take several minutes.
The length of time is dependent on the amount of I/O
activity and the number of units that are online.
Note: If
FRUTIL
times out before a replacement controller is
installed, restart
FRUTIL
.
\
Install Options:
1. Other controller and cache module
2. Other controller module
3. Other cache module
4. Exit
NOTE: OPTION 1 DISABLED (So: Do cache, then
controller.)
Enter choice: 1,2,3,4 ->