
HP Array Configuration Utility User Guide (416146-001, January 2006)


Modifying an existing configuration 20
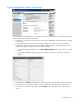
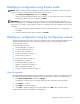
Modifying a configuration using Express mode
NOTE: Express mode is listed as a configuration option only if the controller that you select has unused
space on an array or physical drives that are not assigned to an array.
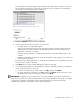
1. Click Express Configuration, and then click Begin.
If there are unassigned physical drives on the controller, you can create a new array or expand an
existing array. Make your choice, and then click Next.
IMPORTANT: An array expansion, logical drive extension, or logical drive migration takes about 15
minutes per gigabyte, or considerably longer if the controller does not have a battery-backed cache. While
this process is occurring, no other expansion, extension, or migration can occur simultaneously on the same
controller.
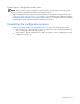
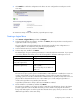
The screen displays the optimum configuration for the controller and asks you to confirm that it is
acceptable.
2. Select the appropriate radio button, and then click Finish.
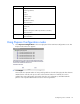
Modifying a configuration using the Configuration wizards
The options listed in the menu region of the screen depend on the controller model and configuration. For
example, the Expand array option is listed only if there is at least one unassigned physical drive
connected to the controller.
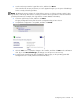
The possible menu options are:
• Clear configuration (on page 20)
• Controller settings (on page 21)
• Create an array (on page 21)
• Create a logical drive (on page 22)
• Delete arrays (on page 23)
• Delete logical drives (on page 24)
• Expand array (on page 24)
• Extend logical drive (on page 25)
• Migrate a logical drive (on page 25)
• Spare management (on page 26)
• Selective storage presentation (on page 26)
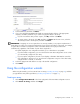
Clear Configuration
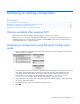
The Clear Configuration task deletes all logical drives connected to the controller, reconfigures the arrays
into independent (unassigned) physical drives, and resets all controller settings to their default values.
1. Click Clear Configuration, and then click Begin.
ACU displays a warning screen to remind you that you will lose all data on the logical drive.
2. Click Delete to continue.
3. Click Finish to accept the changes.
4. Click Save to apply the changes to the system, and then click OK on the confirmation alert.
The physical drives are now available for reconfiguration.