Technical Note Revised October 2006 Prepared by: Network Storage Solutions Hewlett Packard Company Contents Configuring the StorageWorks MSA1000 and MSA1500cs for External Boot with NetWare Configuring the HP StorageWorks Modular Smart Array 1000 and 1500cs for external boot with Novell NetWare – New Installations Considerations ............................ 3 Initial Steps .................................. 4 Install Host Bus Adapter (HBA) in the Server..............4 Setup for RBSU Servers .......
Configuring the MSA1000/MSA1500cs for External Boot - NetWare 2 Notice © 2007 Hewlett Packard Company HP, Hewlett Packard, Compaq, StorageWorks, SmartArray, SupportPaq, and the Compaq logo are trademarks of Compaq Information Technologies Group L.P. Microsoft, Windows, and Windows NT are trademarks and/or registered trademarks of Microsoft Corporation. Other product names mentioned herein may be trademarks of their respective companies.
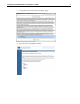
Configuring the MSA1000/MSA1500cs for External Boot - NetWare 3 Considerations Please read and understand the following: • These steps and procedures are intended for an advanced user who has a solid foundation of knowledge in server hardware, storage hardware, and the NetWare operating system and installation. • These procedures currently apply only to Novell NetWare versions 5.x and 6.x. • All prerequisites and current scaling limitations for StorageWorks MSA1000 and MSA1500cs apply.
Configuring the MSA1000/MSA1500cs for External Boot - NetWare 4 Initial Steps Install Host Bus Adapter (HBA) in the Server Install the HBA in an open slot in the server. Connect the appropriate fibre cables to the HBA and interconnect devices. Review the install documentation that came with the HBA or the Quick Install Guide (MSA 1000/MSA1500cs) for detailed instructions. Setup for RBSU Servers 1. Make sure you have the latest ROM BIOS installed on your server.
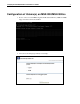
Configuring the MSA1000/MSA1500cs for External Boot - NetWare Configuration of Volume(s) on MSA1000/MSA1500cs 1. Power on the server with HP StorageWorks Modular SAN Array 1000 and 1500cs Support Software CD in the CD-Rom . 2. Select the desired language and keyboard settings.
Configuring the MSA1000/MSA1500cs for External Boot - NetWare 3. Accept the License Agreement by clicking ‘Agree’. 4. Select the Array Configuration Utility.
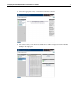
Configuring the MSA1000/MSA1500cs for External Boot - NetWare 5. Select the appropriate Array controller from the list to the left. 6. The selected array controller and available drives will be displayed.
Configuring the MSA1000/MSA1500cs for External Boot - NetWare 7. Select the drives to be included in the array and choose OK 8.
Configuring the MSA1000/MSA1500cs for External Boot - NetWare 9. Configure the volume with the Fault Tolerance and parameters desired and choose OK 10. Click Save to commit the changes.
Configuring the MSA1000/MSA1500cs for External Boot - NetWare 11. Click OK on the popup window. 12.
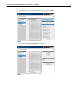
Configuring the MSA1000/MSA1500cs for External Boot - NetWare 13. When the configuration is saved, you are back to the main menu: 14. To restrict access to the newly created LUN, you have to enable Selective Storage Presentation. Click on the Selective Storage Presentation link in the right pane. 15. This opens a new window in the right pane; select Enable and click OK.
Configuring the MSA1000/MSA1500cs for External Boot - NetWare 12 16. This will display a list of all known WWN to the MSA controller. 17. Pick the one for your server, give it a logical name, set the correct Host mode for your OS and give the server access to the LUN. If you have multipathing, you have to select both HBA’s in the server, give them unique names, and give both access to the LUN.
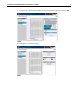
Configuring the MSA1000/MSA1500cs for External Boot - NetWare 18. Click OK, and accept the warning by clicking OK. 19. Click Save.
Configuring the MSA1000/MSA1500cs for External Boot - NetWare 14 20. This brings you back to the main menu. Click on Exit in the lower left corner, and then click Exit in the upper right corner. Click OK on the popup window. 21. Configuration of the MSA1000/MSA1500cs is complete. 22. Remove the HP StorageWorks Modular SAN Array 1000 Support Software CD from the CD-Rom and prepare to configure the boot BIOS in the next section.
Configuring the MSA1000/MSA1500cs for External Boot - NetWare Configuration of Boot BIOS with Qlogic BIOS Utility As the Server typically will boot to an internal drive, the server has to be configured to boot via the Fibre Channel Host Bus Adapter. The following steps illustrate this. 1. Power on the server. As the server boots, the menu prompt for the HBA will display. Press to start the QLogic (Fast!UTIL ) BIOS Utility.
Configuring the MSA1000/MSA1500cs for External Boot - NetWare 2. At the QLogic main menu, select Configuration Settings and press Enter 3. Select the first option Adapter Settings and press Enter.
Configuring the MSA1000/MSA1500cs for External Boot - NetWare 17 4. By default, the Host Adapter BIOS is disabled. Arrow down to Disabled, and press Enter to Enable. 5.
Configuring the MSA1000/MSA1500cs for External Boot - NetWare 18 6. Press the Escape key to back up one menu, and arrow down to Selectable Boot Settings, and press Enter to select it. 7. By default, the Selectable Boot option is disabled. Press Enter to Enable it.
Configuring the MSA1000/MSA1500cs for External Boot - NetWare 8. After enabling, it will look like this. Arrow down to (Primary) Boot Port Name, Lun:, and press Enter.
Configuring the MSA1000/MSA1500cs for External Boot - NetWare 20 9. Next, you are presented with a list of devices found on the SAN. Note: If you do not see any devices listed, there is a fibre cabling problem that will need to be root caused. Arrow down to the MSA1000/1500cs that you want to boot from (In this example, we are showing two MSA1500cs’s in the SAN). Once the correct MSA is highlighted, press Enter. 10. The next screen shot shows the available LUNs on the selected MSA controller.
Configuring the MSA1000/MSA1500cs for External Boot - NetWare 11. Once the Boot LUN is selected, the screen will appear as follows: 12. Press the Escape Key, and press Enter to Save Changes.
Configuring the MSA1000/MSA1500cs for External Boot - NetWare 22 13. Press the Escape Key again, and select Exit Fast!UTIL 14. Select the Reboot System option. The server will now attempt to boot from the volume controlled by the MSA1000.
Configuring the MSA1000/MSA1500cs for External Boot - NetWare 23 15. As the Server is going through POST (Power On Self Test), you will see a screen like the one below, showing that the QLogic BIOS is active, and has a LUN to attempt to Boot from. 16. It is important to note that the Server will fail in attempting to Boot from this LUN, as no Operating System has yet to be installed on this boot Volume. See the following section, Installation of Operating System for the final steps.
Configuring the MSA1000/MSA1500cs for External Boot - NetWare 24 Installation of Operating System Completing the OS install to the Server 1. Install DOS on the boot disk. See your DOS Operating System Vendor’s documentation for creating a bootable DOS partition. 2. Follow the standard NetWare instructions to begin the installation. Typically this is accomplished by loading the DOS CD ROM device drives, and at the CD Drive prompt, running the NetWare install (INSTALL.BAT). 3.
Configuring the MSA1000/MSA1500cs for External Boot - NetWare 25 4. After several other install / interview questions, the install will begin, with a progression bar showing install status 5. At some point during the install, you will be notified of the detected drivers. When prompted, you will want to load additional drivers to support the QLogic HBA and the MSA1000/MSA1500cs. Arrow down to Modify, and press Enter. Arrow down to Storage adapters: and press Enter.
Configuring the MSA1000/MSA1500cs for External Boot - NetWare 26 6. Press the Ins key to Add an additional driver. After pressing Ins, the screen will look like this: 7. Press the Ins key again to Add an unlisted driver.
Configuring the MSA1000/MSA1500cs for External Boot - NetWare 27 8. Use the floppy disk you have prepared as noted under the ‘Consideration’ chapter of this document. Place the floppy diskette in the floppy drive, and press Enter. You will be presented with a list of possible drivers to load, select QL2300.HAM QLogic QLA2300 PCI Fibre Channel Host Bus Adapter, and press Enter. 9.
Configuring the MSA1000/MSA1500cs for External Boot - NetWare 28 10. You will need to modify the QLogic driver parameters, arrow down to the QL2300.HAM under Driver name, and press Enter. To modify the driver parameters. Press Enter on Select/Modify driver parameters. 11. Add slot number that corresponds to the slot number of the server where the HBA was installed.
Configuring the MSA1000/MSA1500cs for External Boot - NetWare 29 12. That will add this device driver to the list to load. Select Return to driver summary and press Enter 13.
Configuring the MSA1000/MSA1500cs for External Boot - NetWare 14. Once Continue has been press, you will see a screen like the one below, where the Operating System is loading the drivers. 15. The installation will now continue normally. Depending on the hardware installed, you may or may not need to load additional drivers for Network adapters, etc. For this demonstration, it is assumed that no other drivers need to be loaded.
Configuring the MSA1000/MSA1500cs for External Boot - NetWare 31 16. Finally, you will be asked to create the first NetWare volume – SYS. Chose the size of this volume, and follow the standard NetWare installation procedure to complete the installation. Note that the Device it is being created on is the MSA1000. NetWare has now been successfully installed to a Boot LUN on the MSA1000/MSA1500cs.