
HP StorageWorks Simple SAN Connection Manager user guide (5697-0083, August 2009)


130 Managing storage subsystems
e. (Optional) To create another logical disk, click Add.
f. (Optional) To remove a logical disk, select it, and then click Delete.
g. When you are finished adding, editing, and deleting logical disks for this disk group or storage
pool, click Next to continue.
6. If you have multiple disk groups (for EVA storage), the wizard window shown in Figure 102 appears for
the next disk group. If you have multiple storage pools (for MSA storage), the wizard window shown in
Figure 103 appears for the next storage pool. Complete the wizard window as you did in step 5 for
each disk group or storage pool that you created in step 4. Then click Next to continue.
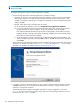
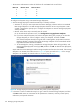
The wizard prompts you to consider if the logical disk creation is set up correctly, as shown in
Figure 104.
Figure 104 Storage Deployment wizard: continue creating logical disk (custom deployment)
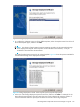
7. To continue, click Yes. To redefine the deployment, click No.
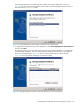
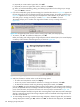
Before proceeding with configuring the storage subsystem with the selected option, the wizard displays
a summary of the selection and resulting actions, as shown in Figure 105.
Figure 105 Storage Deployment wizard: summary (custom deployment)
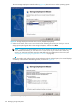
8. Verify the information and then select one of the following options:
• To confirm and complete the wizard, click Deploy.
• To return to previous wizard windows and review or change your selections, click Back.
• To abandon all selections made using the Storage Deployment wizard, click Cancel.
If you click Deploy, using the HP Storage System Scripting Utility (SSSU) or the subsystem VDS hardware
provider, Simple SAN Connection Manager initializes the subsystem, creates the disk groups or storage
pools, creates the LUNs, and presents the LUNs to the servers (hosts) as summarized in Figure 105.
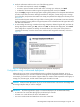
If the selected subsystem already has logical disks containing data, Simple SAN Connection Manager
displays a message warning that the storage subsystem will be uninitialized and all logical disks and
their data will be deleted.
9. To acknowledge the warning, uninitialize the storage subsystem, delete all logical disks, and start the
Storage Deployment wizard, type YES, and then click OK. To abandon this deployment, click Cancel.