
HP StorageWorks Simple SAN Connection Manager user guide (5697-0083, August 2009)


HP StorageWorks Simple SAN Connection Manager user guide 97
Expanding a logical disk
Simple SAN Connection Manager enables you to easily increase the size of logical disks within your SAN.
To expand a logical disk:
1. To access the Expand Logical Disk dialog box, choose one of the following options:
• On the Logical Disk Operations menu, click Expand Logical Disk.
• In the navigation pane or the content pane’s LUN Assignment map, right-click the logical disk icon,
and then on the shortcut menu, click Expand Logical Disk.
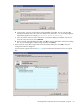
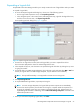
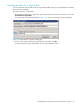
The Expand Logical Disk dialog box (Figure 65) opens.
Figure 65 Expand Logical Disk dialog box
2. If more than one logical disk is listed, select the logical disk you want to expand from the list.
The Current Size (GB) text box shows the selected logical disk’s size.
3. In the Expand size by box, enter the amount to expand the logical disk either by clicking the up arrow
or typing the number.
4. For logical disks in an MSA storage subsystem, choose the size unit by selecting either MB or GB from
the list. (For logical disks in an EVA storage subsystem, only the GB size unit is available.)
NOTE: The expand functionality is not supported on remote servers running Linux.
5. Click Expand Logical Disk.
6. To expand additional logical disks, repeat steps 2 through 5.
NOTE: For some storage subsystems, the logical disk expansion request returns immediately;
however the actual expansion process takes much longer to complete. While the expansion is in
progress, the subsystem rejects any new request to expand the logical disk. To determine if the
expanded logical disk status is rebuilding, click the Refresh the Storage Subsystem command on the
Advanced Operations menu.
7. When you are finished expanding logical disks, click Close.