
HP StoreEver MSL2024, MSL4048, MSL8048, and MSL8096 Tape Libraries User and Service Guide (AK378-96059, December 2012)

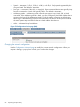
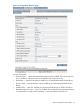
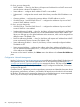
Table Of Contents
- User and Service Guide
- Contents
- 1 Features and overview
- Library options
- Interface specifications and requirements for parallel SCSI drives
- Interface specifications and requirements for Fibre Channel drives
- Interface specifications and requirements for SAS drives
- LTO-4 and later generation tape drives and encryption
- Logical libraries
- Control path and data path failover
- Front panel overview
- Back panel overview
- Tape drive back panel overviews
- Tape drive power indicator
- Controller health status indicator
- Power supply back panel (MSL4048, MSL8084, and MSL8096)
- 2 Installing the library
- Preparing the host
- Planning the parallel SCSI configuration
- Planning the SAS configuration
- Planning the Fibre Channel configuration
- Choosing a location
- Unpacking the shipping container
- Identifying product components
- Removing the shipping lock
- Mounting the device in a rack
- Installing the tabletop conversion kit
- Installing tape drives
- Installing a redundant power supply
- Changing the SCSI address (parallel SCSI drives only)
- Connecting the parallel SCSI cable (parallel SCSI devices only)
- Connecting the Fibre Channel cables (Fibre Channel devices only)
- Connecting the SAS cable (SAS devices only)
- Powering on the device
- Configuring the device
- Verifying the connection
- Labeling and loading the tape cartridges
- Verifying the installation
- Configuring additional features
- 3 Tape cartridges and magazines
- 4 Operating the tape library
- Remote management interface (RMI)
- Overview
- Login
- Status pane
- Getting help
- Identity
- Status
- Configuration
- Changing the system configuration
- Changing the drive configuration
- Changing the network configuration
- Configuration: Network Management
- Changing the administrator password
- Setting the date and time
- Setting error log mode
- Setting event notification parameters
- Saving and restoring the device configuration and restoring factory defaults
- Operations
- Support
- MSL2024 Operator control panel (OCP)
- LED indicators
- Library home screen
- Operator control panel buttons
- Understanding the menu structure
- Unlocking the mailslot (Unlock Mailslot)
- Status/Information
- Configuration
- Configuring logical libraries (Status/Information > Set Logical Libraries)
- Changing the administrator password (Configuration > Change Admin Password)
- Setting the number of reserved slots (Configuration > Set Reserved Slot Count)
- Configuring the mailslot (Configuration > Configure Mailslot)
- Bar code reporting format (Configuration > Barcode Format Reporting)
- Changing the SCSI address — parallel SCSI devices (Configuration> Change Drive)
- Changing the drive configuration — Fibre Channel devices (Configuration > Change Drive)
- Setting the master drive (Configuration > Set Master Drive)
- Setting behaviors (Configuration > Library behavior)
- Setting the date and time (Configuration > Library Date/Time)
- Configuring network settings (Configuration > Configure Network Settings)
- Configuring automatic cleaning (Configuration > Configure Auto Cleaning)
- Restoring factory defaults (Configuration > Restore Defaults)
- Saving and restoring the library configuration (Configuration > Save/Restore Configuration)
- Operations
- Unlocking, removing, and replacing magazines (Operations > Unlock Left or Right Magazine)
- Cleaning a tape drive (Operations> Clean Drive)
- Moving tapes in the library (Operations > Move Tape)
- Updating tape cartridge inventory (Operations > Perform Inventory)
- Rebooting the library (Operations> Reboot library)
- Enabling password locks (Operations > Enable Library Password Locks)
- Support
- Powering a drive on or off (Support > Power On/Off Drives)
- Running the demonstration (Support > Run Demo)
- Running the slot to slot test (Support > Run Slot To Slot Test)
- Running the wellness test (Support > Run Wellness Test)
- Upgrading firmware (Support > Library FW Upgrade, Support > Drive FW Upgrade)
- Viewing logs (Support > Library Error Log)
- Downloading a support ticket (Support > Download Support Ticket)
- Forcing the drive to eject a tape (Support > Force Drive To Eject Tape)
- MSL4048, MSL8048, and MSL8096 operator control panel
- Overview
- Using the OCP
- Illustrated menu option and navigation examples
- Info menu
- Configuration menu
- Changing the number of logical libraries (Configuration > Logical Libraries)
- Changing the library configuration (Configuration > Library)
- Changing the drive configuration (Configuration > Drives)
- Changing the network configuration (Configuration > Network)
- Barcode reporting format (Configuration > Barcode Reporting)
- Setting and changing the administrator password (Configuration> Set Admin Password)
- Restore defaults (Configuration > Restore Defaults)
- Setting the library date and time (Configuration > Set Date and Time)
- Saving and restoring the library configuration (Configuration> Save/Restore)
- Operations menu
- Support menu
- Powering drives on and off (Support > Power on/off Drives)
- Cleaning the tape drive (Support > Clean Drive)
- Running tests (Support > Run Tests)
- Viewing logs (Support > View Logs)
- Updating library and drive firmware (Support > FW Upgrade)
- Force ejecting a drive (Support > Force Drive Eject)
- Downloading a support ticket (Support > Support Ticket)
- Rebooting the tape library (Support > Reboot)
- Remote management interface (RMI)
- 5 Troubleshooting
- Detection problems after installing a parallel SCSI device
- Detection problems after installing a SAS device
- Fibre Channel connection problems
- Operation problems
- Performance problems
- Service and repair
- The wellness test
- Error codes
- Warning events
- Configuration change events
- Information events
- Using HP Library & Tape Tools to diagnose problems
- 6 Upgrading and servicing the tape library
- Possible tools needed
- Installing a new tape drive
- Removing and replacing a tape drive
- Removing and replacing a magazine
- Installing a redundant power supply (MSL4048, MSL8048, and MSL8096 only)
- Replacing the power supply (MSL4048, MSL8048, and MSL8096)
- Replacing the library controller (MSL4048, MSL8048, and MSL8096)
- Removing and replacing the base chassis
- 7 Support and other resources
- 8 Documentation feedback
- A Technical specifications
- B Regulatory information
- C Electrostatic discharge
- Glossary
- Index

NOTE: Barcode labels longer than eight characters might scan incorrectly, especially if they
are not high-quality labels.
• Barcode Label Alignment Reported to Host — configures the end of the bar code label
characters to report to the host application when reporting fewer than the maximum number
of characters. For example, when reporting only six characters of the bar code label
12345678, if alignment is left, the device will report 123456. If alignment is right, the device
will report 345678. The default is left.
• Ignore Barcode Media ID — when disabled, the barcode Media ID on the tape cartridges
will be checked by the device. The device will only allow appropriate tape cartridges to be
loaded into tape drives. The barcode Media ID is the last two characters of the barcode. For
example, an LTO-4 labeled cartridge will not be allowed to move into an LTO-3 tape drive.
See “Backward read compatibility” (page 60). When Ignore Barcode Media ID is enabled,
the device will move any tape to any tape drive. If the cartridge is incompatible with the tape
drive, a message will be displayed. HP strongly recommends that all tape cartridges have
barcodes with the correct Media ID.
• Magazine access using front panel - Admin password required — when enabled, the
Administrator password is required to remove the magazines from the front panel. When
disabled, the magazines may be removed using the operator control panel without entering
a password. The default is to require the Administrator password.
• Select Language — The language option affects the text on the RMI, the error messages, and
the help pages. It does not affect the OCP menus, which will always be in English.
• Enable Extended Mode— When the library extender is properly installed and extended mode
is enabled, the libraries will operate as an extended library.
The following settings are configurable for each logical library:
• Library LUN Hosted By Drive — specifies the master tape drive for the logical library. The
default is the lowest numbered tape drive in the logical library. If a logical library has only
one tape drive, it is the master drive for the logical library. If a logical library has more than
one tape drive, you may specify the master. The number is the physical drive number.
• Library Mode — specifies the library mode for each logical library. The default mode is
Automatic.
The device supports three behavior modes: Random, Sequential, and Automatic. The device
automatically detects the required mode from the series of SCSI commands it receives; however,
you can also change the mode. Choose the operating mode based on the capabilities of the
software controlling the tape cartridges.
Random mode — In Random mode, the device does not automatically load tapes into the
tape drives; it waits for commands from the software or operator to load and unload tapes.
Random mode is used with a full featured or a robotics-aware backup application and is the
most common mode of operation. Your backup software must support robotics, which may
require an additional software module.
Sequential mode — In Sequential mode, the device automatically loads and unloads tapes
from the drive. Sequential mode is used when the backup software is NOT robotics-aware or
was designed for standalone drives only.
In Sequential mode, the logical library will only use the lowest-numbered tape drive in the
logical library.
The operator begins the sequence by loading the desired tape into the tape drive. When a
tape is unloaded for any reason, the device automatically removes the tape from the drive,
returns it to its original slot, then loads the tape from the next available higher numbered slot.
Remote management interface (RMI) 83